
Documentation
Introduction
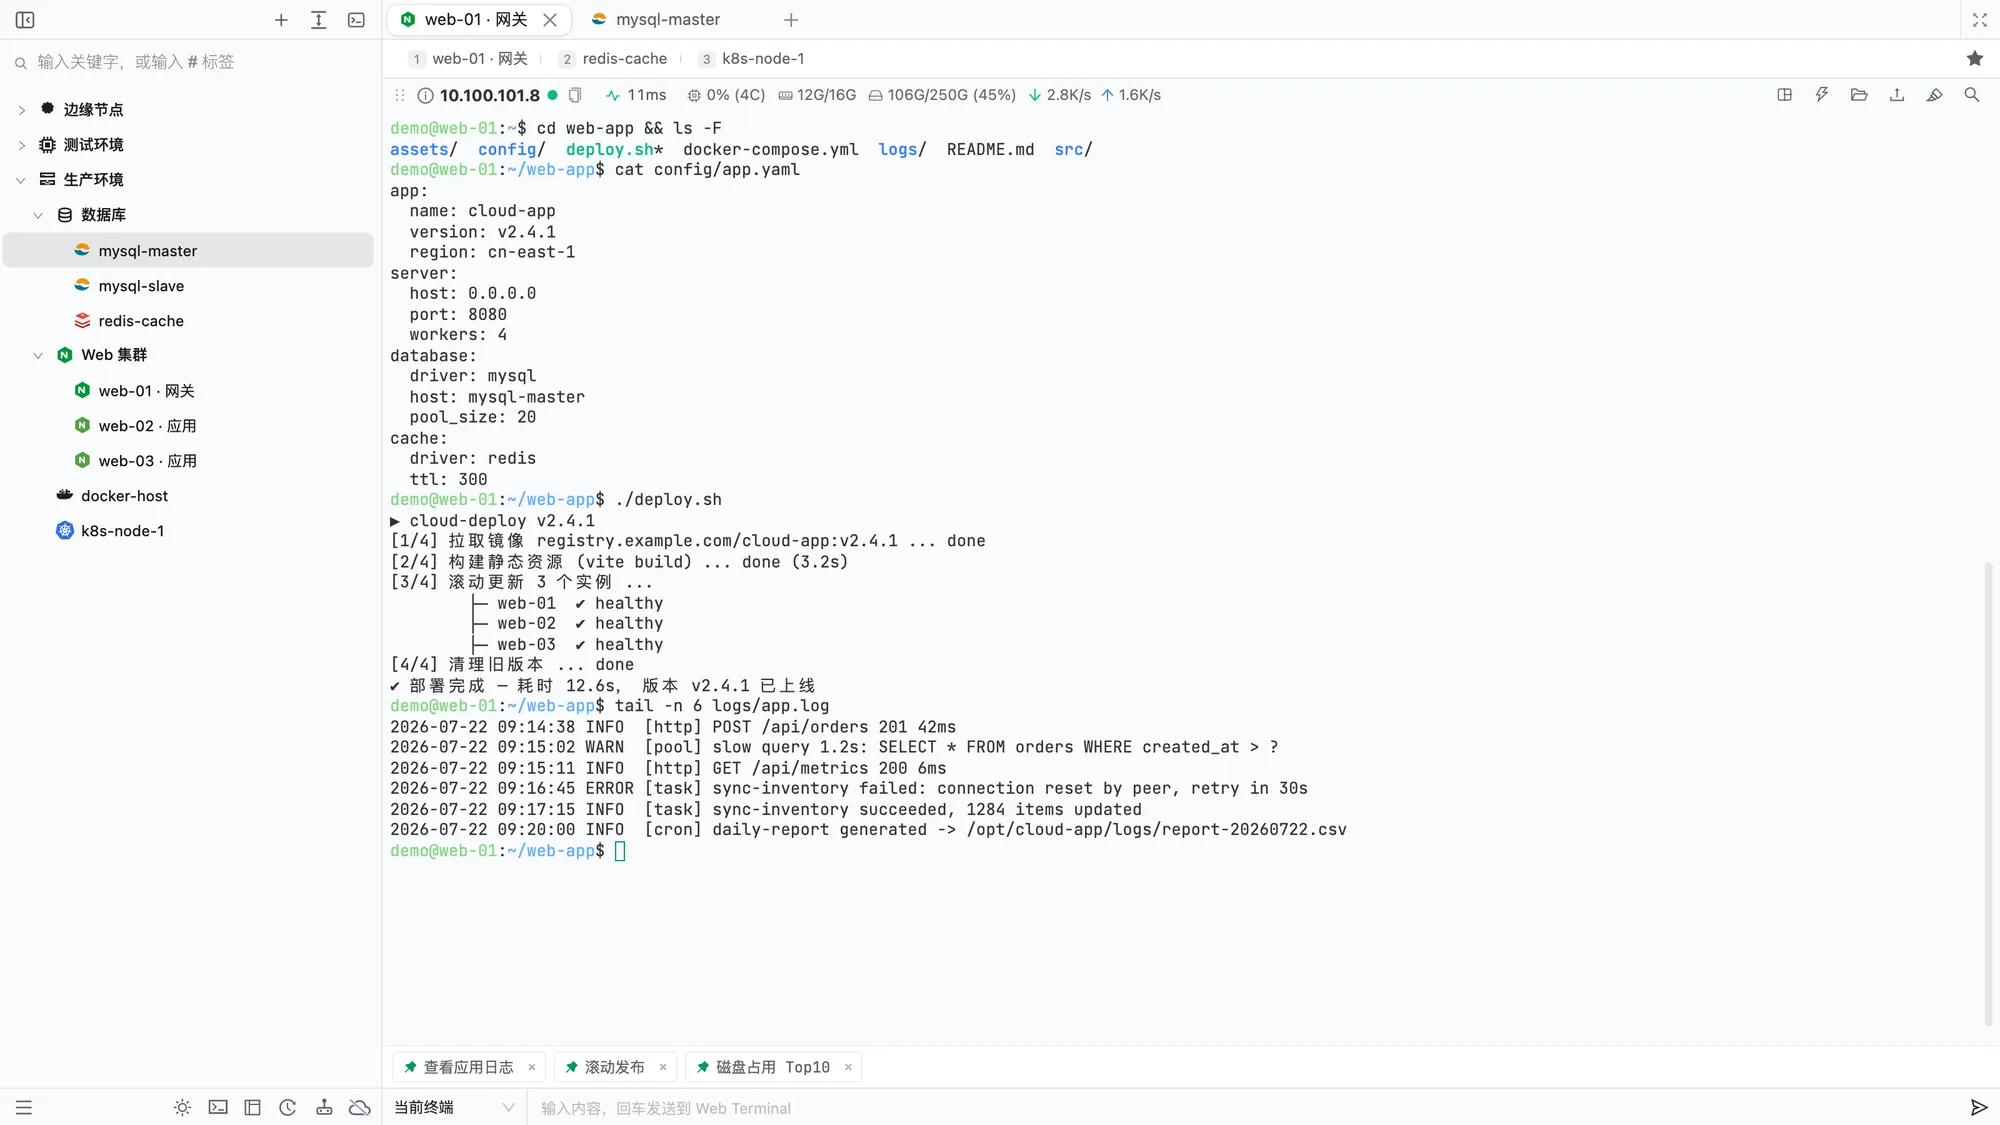
Cloud Term is a cross-platform terminal built with React + Rust (Tauri), available as a web app and Windows / macOS desktop apps. Its core features include:
- Multiple protocols: manage SSH, Redis (standalone / Sentinel / Cluster), Telnet, serial, and RDP in one sidebar, with folders, tags, favorites, drag-and-drop ordering, and bulk actions; connect directly, through multi-hop SSH jump hosts, or via a proxy
- SSH terminals with split panes, tabs, eight tab styles, tabs you can drag into new windows, broadcast input, regular expression search, selection menus, sharing output as an image, and automatic reconnection
- A terminal AI assistant that reads the current terminal context, executes commands according to your permissions, and summarizes results, with support for multiple OpenAI-compatible API environments. Desktop apps can also run an MCP server for external AI tools
- Live system monitoring and disk analysis for SSH latency, CPU, memory, disks, networks, sortable processes, on-demand port queries, Docker details / logs / shell access, and per-directory disk usage
- Remote file management: SFTP in list, grid, or full-screen view, with create, rename, move, delete, permissions, and online editing; drag-and-drop uploads and ZMODEM (
rz/sz) queue automatically - SSH tunnels: manage local, remote, and dynamic SOCKS5 forwarding rules in one place
- A snippet marketplace and pinned command bar with over a hundred official operations commands and support for pinning your own commands below the terminal
- Optional terminal plugins for completion, file previews, IP lookup, JSON formatting, and task notifications
- Skins and libraries: eight built-in skins plus the cloud theme library, and sixteen built-in cursor styles plus the cloud cursor library
- End-to-end encrypted cloud sync for connections, identities, favorites, snippets, and settings, with selectable sync scopes
- Team collaboration with shared connections, roles, an SSH public key directory, and audit logs
- Imports from Xshell / SecureCRT / MobaXterm / PuTTY / KiTTY / FinalShell / WindTerm / electerm / OpenSSH / CSV / Excel, with built-in shortcut presets for these clients
Sign in with the same account on any supported platform to keep connections, credentials, snippets, and supported settings in sync across devices.
Installation
macOS
Choose the installer for your processor on the download page:
- Apple Silicon (M series): download the Apple Silicon version
- Intel: download the x86_64 version
Open the downloaded .dmg and drag Cloud Term into Applications. Desktop apps check for updates automatically. A notification appears at the top when an update is available; download it in the app and restart to finish updating.
Windows
Download the Windows 10 / 11 (x64) package (.zip) from the download page, extract it, and run the .exe inside to install. In-app automatic updates are also supported.
After installation, File Explorer adds Open in Cloud Term to the context menu for folders, folder backgrounds, and drives. It opens a local terminal window in the selected directory.
Web app
Open www.cloudterm.cn in your browser without installing anything. The web and desktop apps share the same cloud sync data.
Getting started
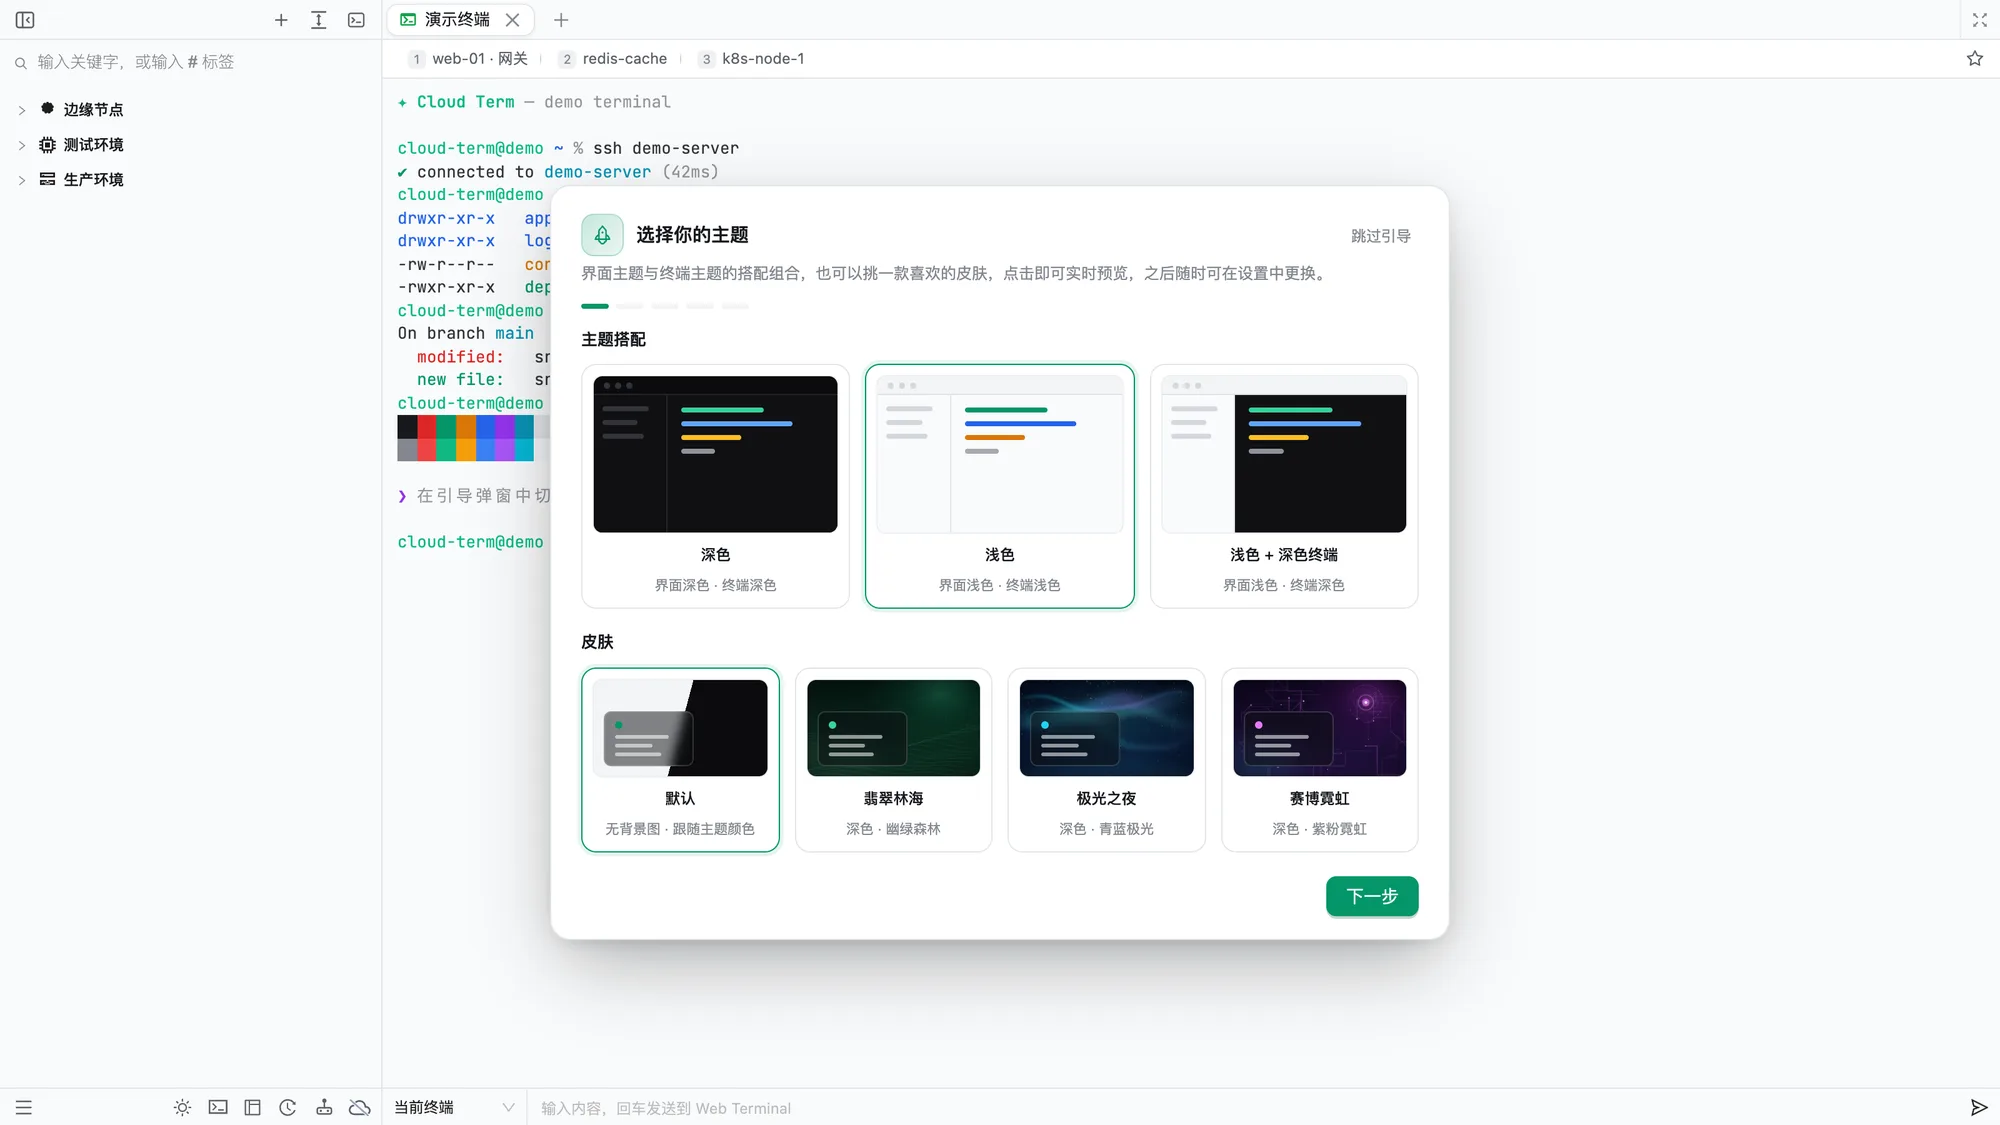
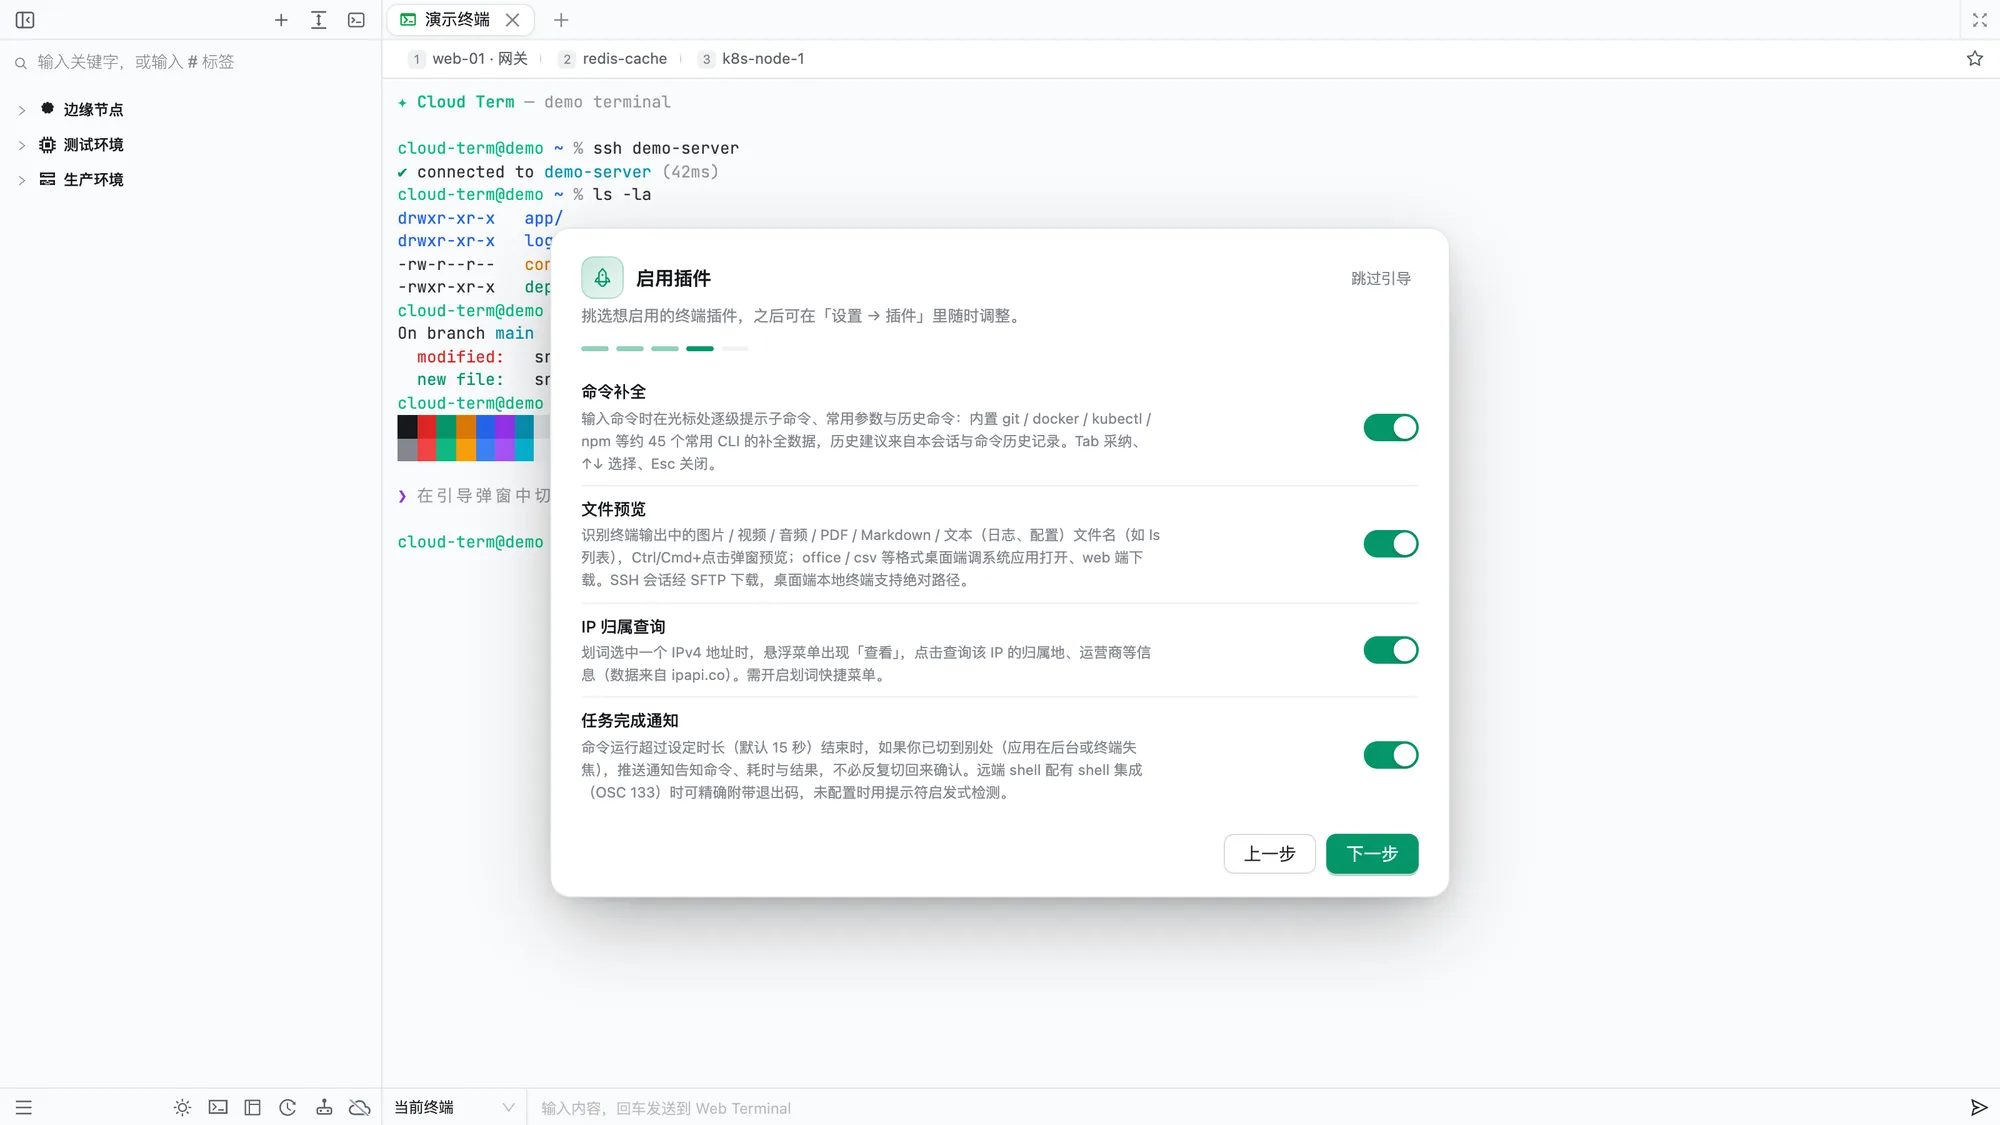
The first launch opens a six-step onboarding guide. A demonstration terminal behind the guide previews each choice as you make it:
| Step | Options |
|---|---|
| 1. Choose a theme | Three combinations (dark / light / light interface + dark terminal) and skin cards, with instant previews |
| 2. Choose fonts | Interface font, terminal font, terminal font size, and weight |
| 3. Set preferences | Restore sessions on startup, compact tabs, favorites bar, copy on selection, right-click paste, and link recognition |
| 4. Enable plugins | Toggle completion, file previews, IP lookup, JSON formatting, and task notifications individually |
| 5. Import connections | Bring connections over from your previous terminal. See Import from other platforms |
| 6. Cloud sync | Set up sync across devices now or come back later |
The guide preselects a light or dark theme based on your system appearance. You can change every choice later in settings, or select “Skip” in the upper-right corner at any time.
A typical workflow:
- Create a connection in the sidebar and enter the host, port, and authentication method (password / key / identity).
- Double-click the connection to open a terminal tab. On the first connection, verify the host fingerprint before choosing “Trust and continue.”
- Group connections in folders, filter by tags, and add frequent connections to favorites. The favorites bar supports shortcuts 1–9.
- Open the SFTP panel with the Files button in the terminal status bar (Cloud Term shortcut preset:
Alt+Son Windows,⌘⇧Son macOS) to manage files alongside your commands. - Enable sync in Settings → Cloud Sync to keep devices consistent. See Cloud sync.
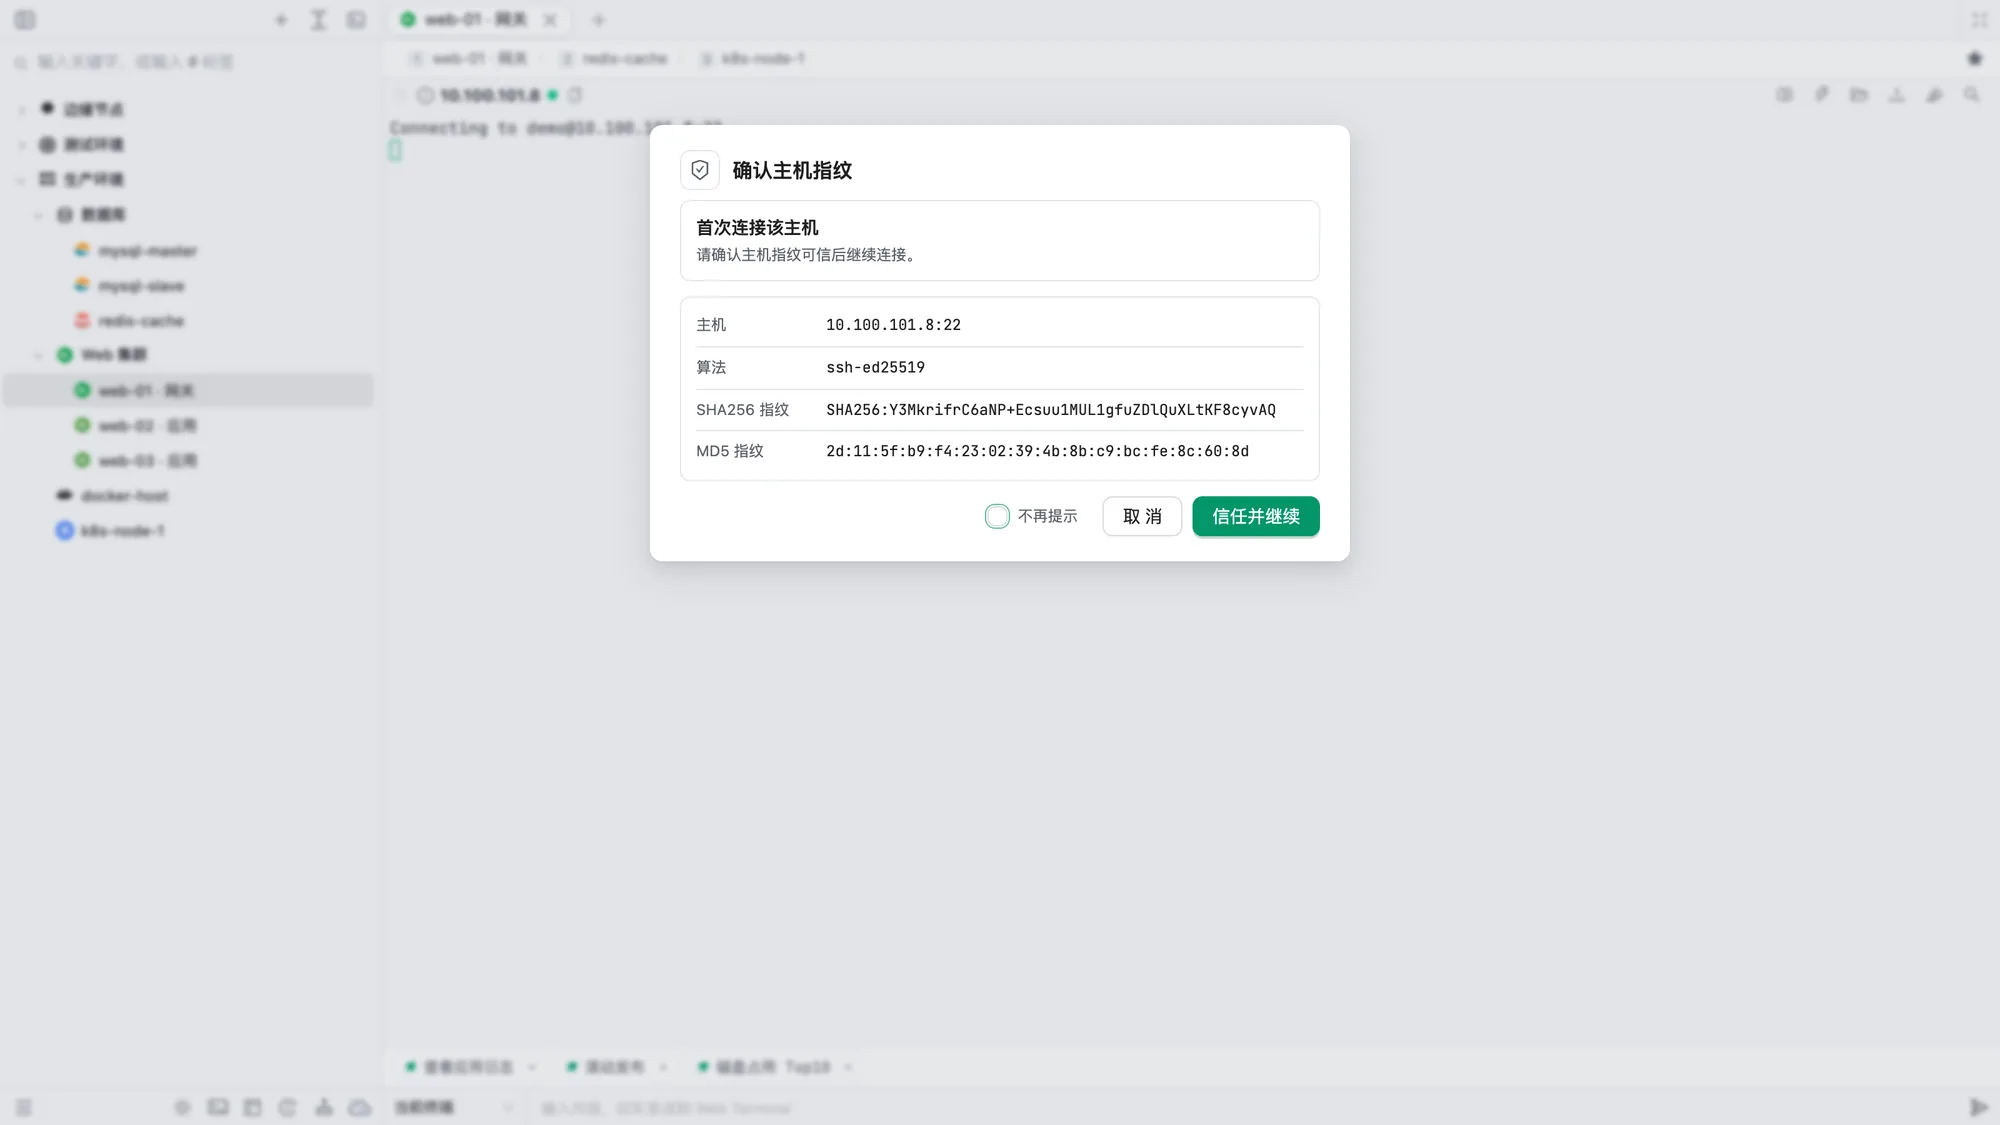
The first connection shows the host's SHA256 / MD5 fingerprint. A later change to that host's fingerprint triggers an alert to help protect against man-in-the-middle attacks.
Connection management
Connection types
Choose a protocol when creating a connection. Connections of every type live in the same connection tree:
| Protocol | Description |
|---|---|
| SSH | The default type, with the full terminal, SFTP, monitoring, tunnel, and AI features |
| Redis | Standalone, Sentinel, and Cluster modes, including internal instances reached through jump hosts or proxies. See Redis client |
| Telnet | Port 23 by default, with UTF-8 / GBK / Big5 / Windows-1252 encoding, line ending, and local echo options. Traffic is unencrypted, and you sign in from the terminal |
| Serial | Device, baud rate, data bits, parity, stop bits, and flow control. Desktop apps use local serial ports; the web app can use Web Serial or serial bridges exposed by the backend |
| RDP | Save a remote desktop's host, port, and username, then open it with the system Remote Desktop client on Windows / macOS desktop apps |
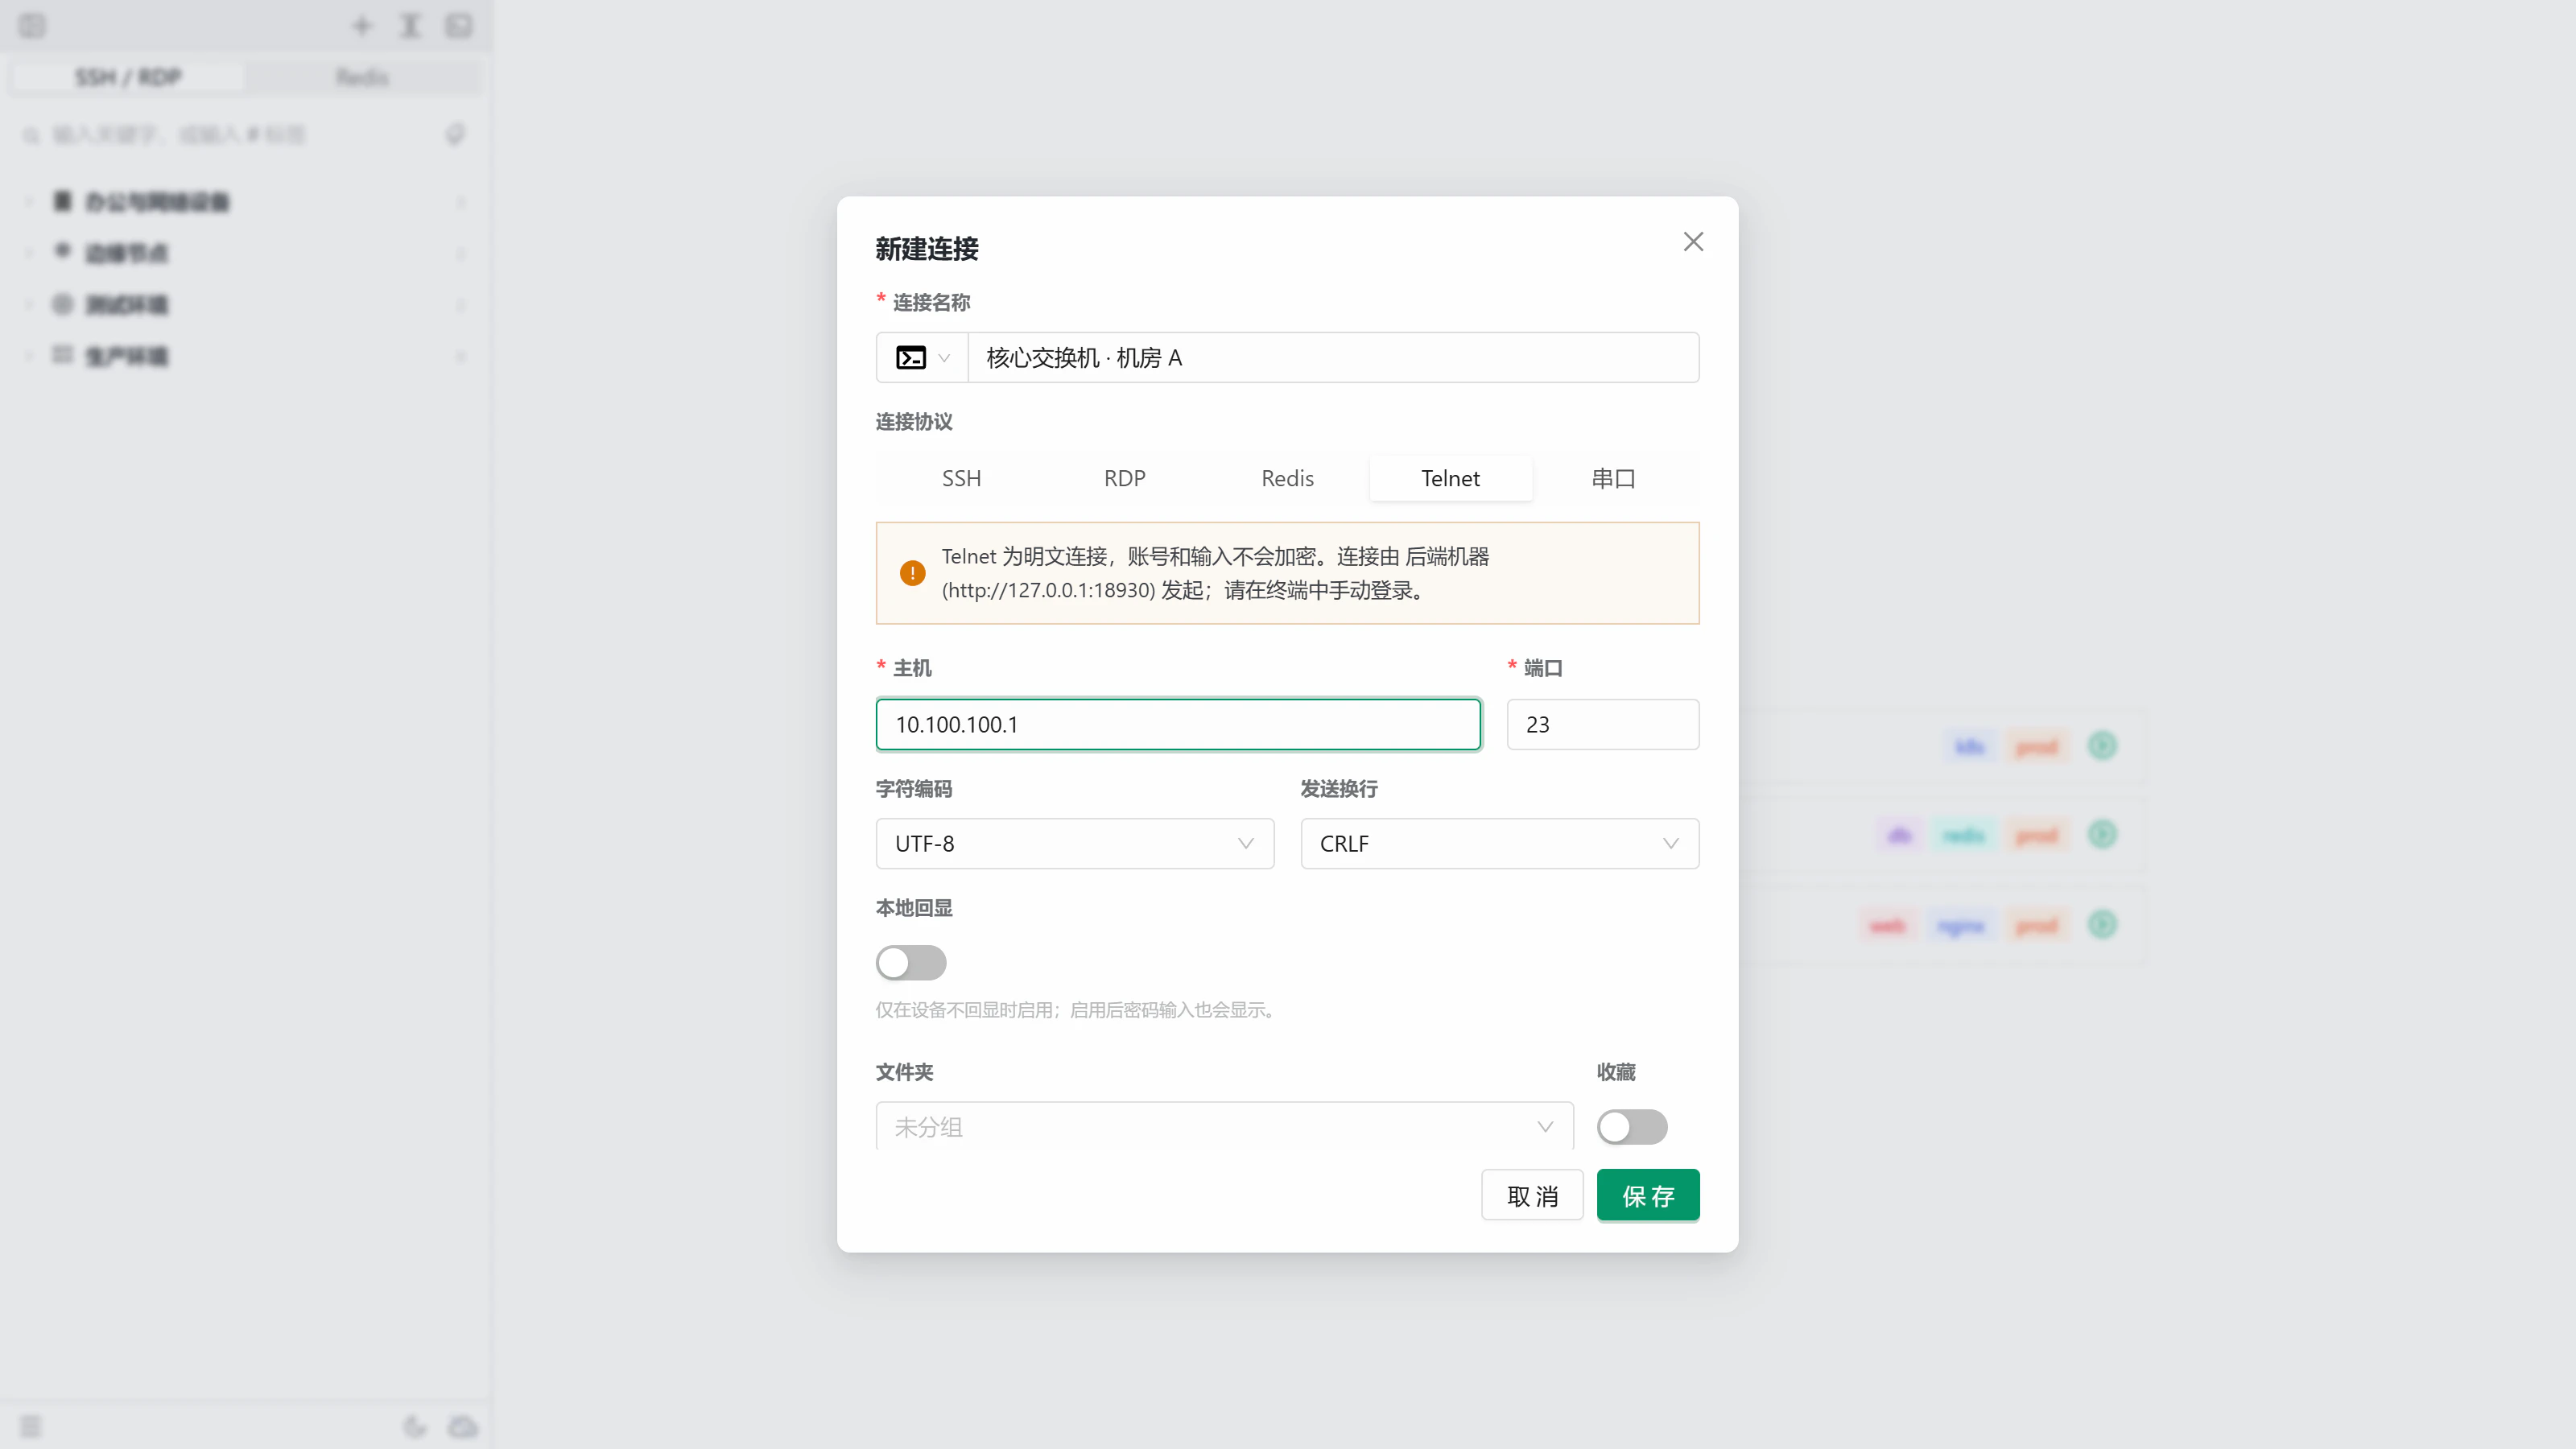
When the sidebar has both SSH and Redis connections, an “SSH / RDP” and “Redis” switch appears at the top. Each page keeps its own search keyword and tag filter.
Create connections and choose a connection method
New connections support three connection methods:
| Method | Description |
|---|---|
| Direct | Connect directly to the target host; the default method |
| SSH jump host | Choose a saved connection and reuse its address and credentials. Multi-hop chains are supported: a jump host can have its own jump host |
| Proxy | Use a saved proxy from Settings → Proxies. Updating that proxy applies to every connection that references it |
Supported authentication methods:
- Password: stored encrypted; saved passwords appear as masked placeholders
- Key: paste or upload an SSH private key, optionally with a passphrase. Saved private keys are never shown again; click the mask to replace one. Advanced options also support SSH certificates
- Identity: reuse credentials from Settings → Identities; selecting an identity fills in the username
- No authentication specified: try the private keys in the local
~/.sshdirectory
When a server requires OTP or other multi-step interactive authentication, the terminal shows each prompt as the server sends it, including on multi-hop jump hosts. Answers are never saved or added to command history. Select “Test” before saving to check connectivity and the authentication method that worked.
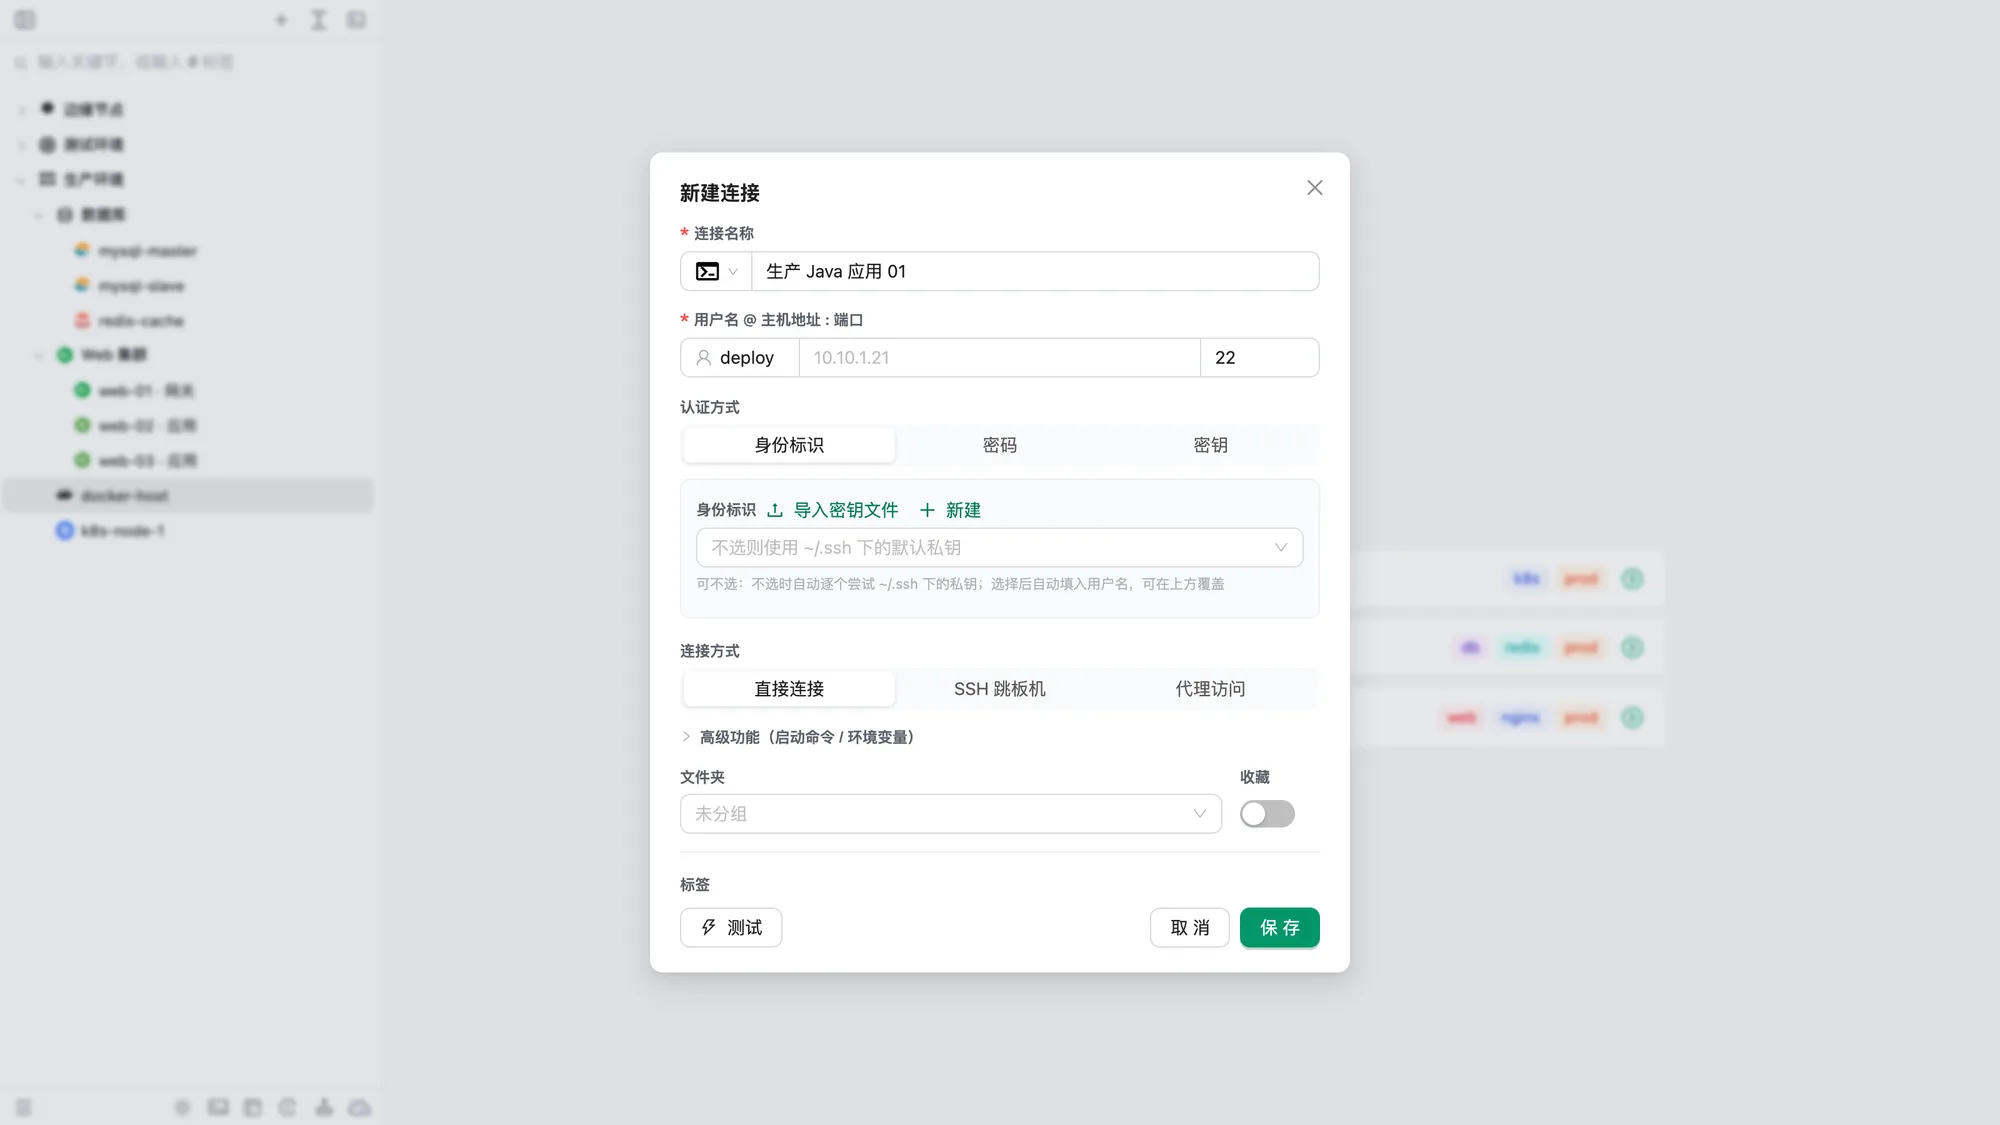
You can also choose a connection icon (built-in icons or online icon search), notes, tags, folder, and favorite status. Missing tags are created when you save.
Startup commands and environment variables
Expand Advanced features (startup command / environment variables) in the connection form to prepare each host automatically when you connect:
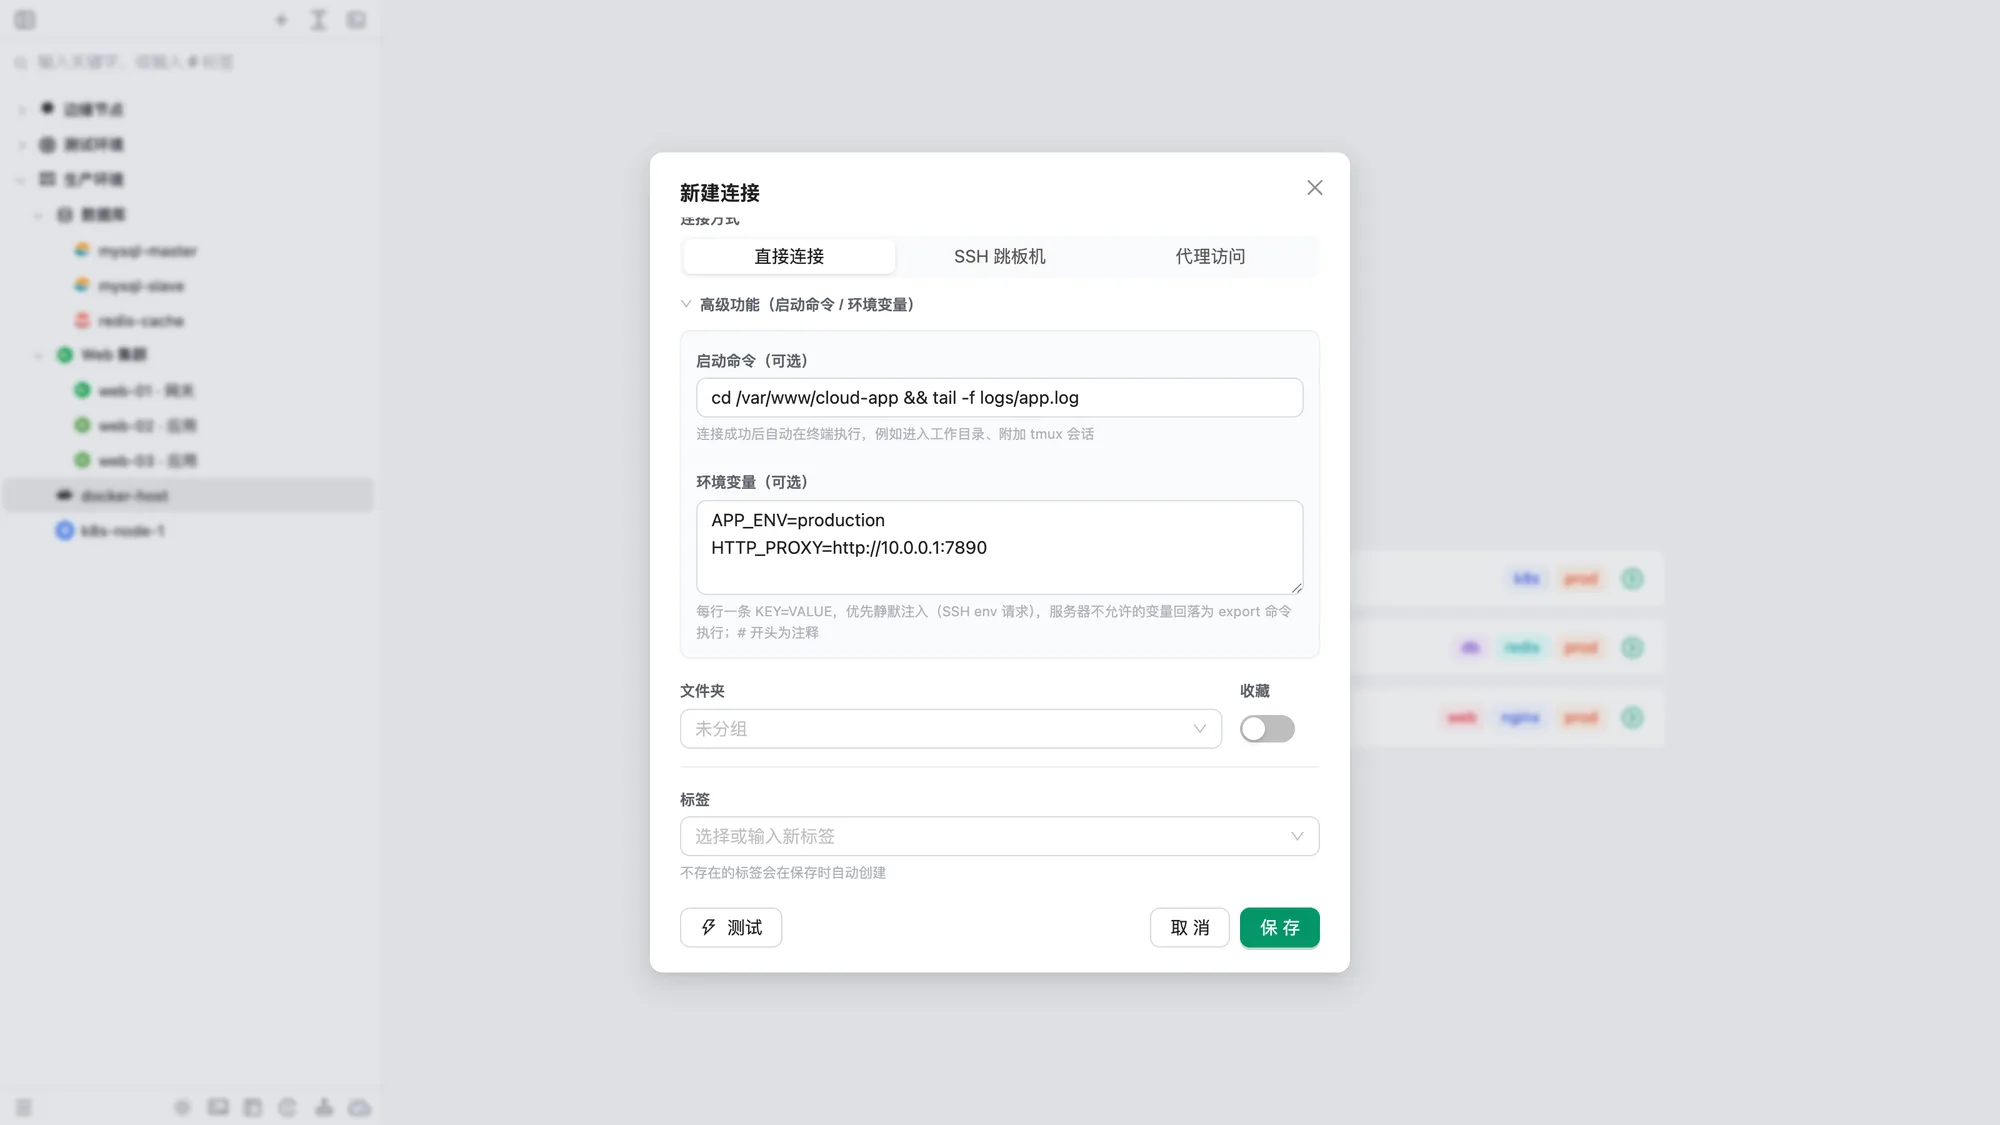
- Startup command: a single command executed after connecting, such as
cd /var/www && tail -f logs/app.logortmux attach -t deploy. It behaves like a command you typed and appears in the terminal. A leading space is added so shells configured withHISTCONTROL=ignorespacecan keep it out of history. - Environment variables: one
KEY=VALUEper line; lines starting with#are comments. Variables are first sent silently using SSH env requests. Variables rejected by the server'ssshdAcceptEnvallowlist fall back to anexportcommand. Keys must start with a letter or underscore and are validated on save.
These settings apply only to the interactive terminal. They do not affect SFTP, monitoring, or jump host connections.
Automatic reconnection
Turn on Reconnect automatically in an SSH connection's advanced settings (off by default) to retry when a connected session drops unexpectedly:
- By default it retries every 5 seconds, up to 10 times. Set the interval from 1 to 3600 seconds and the attempts from 1 to 1000; 0 means unlimited
- The terminal shows when the next attempt happens and how many remain. Press
Ctrl+Cwhile waiting to cancel. Background retries never switch your current tab or split pane - Initial connection failures, authentication failures, and a normal remote
exitdo not trigger reconnection - After reconnecting, including pressing Enter to reconnect manually, the previous screen text, colors, and scrollback are restored before a separator and the new session's output
Organize the sidebar
- Folders: nested folders, drag-and-drop moves, and custom icons
- Drag to reorder: drop a connection before or after another, or into another folder; drag several selected connections together while keeping their order
- Tags: assign multiple tags; enter
#tagin search or select “Filter by tag” in the search box. Search also matches names, hosts, and pinyin; use↑↓to choose a result and Enter to open it - Favorites: favorite connections appear in the top bar, which collapses overflow into a searchable panel. With the Cloud Term shortcut preset, open them with
Ctrl+1–9on Windows or⌃1–9on macOS - Copy and paste: copy selected connections with
Ctrl/Cmd+C/Vinto another folder, with jump host references updated automatically. Edit tags directly from the context menu - Bulk actions:
Shift+clickselects a range;Ctrl/Cmd+clickadds or removes individual selections. Open, favorite, or delete connections in bulk - Server wiki: maintain a Markdown document for each connection with deployment notes or other information
- Temporary terminals: create a one-time connection without saving it
Identities and saved proxies
- Identities (Settings → Identities): centrally manage reusable username/password, SSH key, or key/passphrase credentials. Updating an identity updates every connection that references it. “Apply to connections” changes identity bindings in bulk
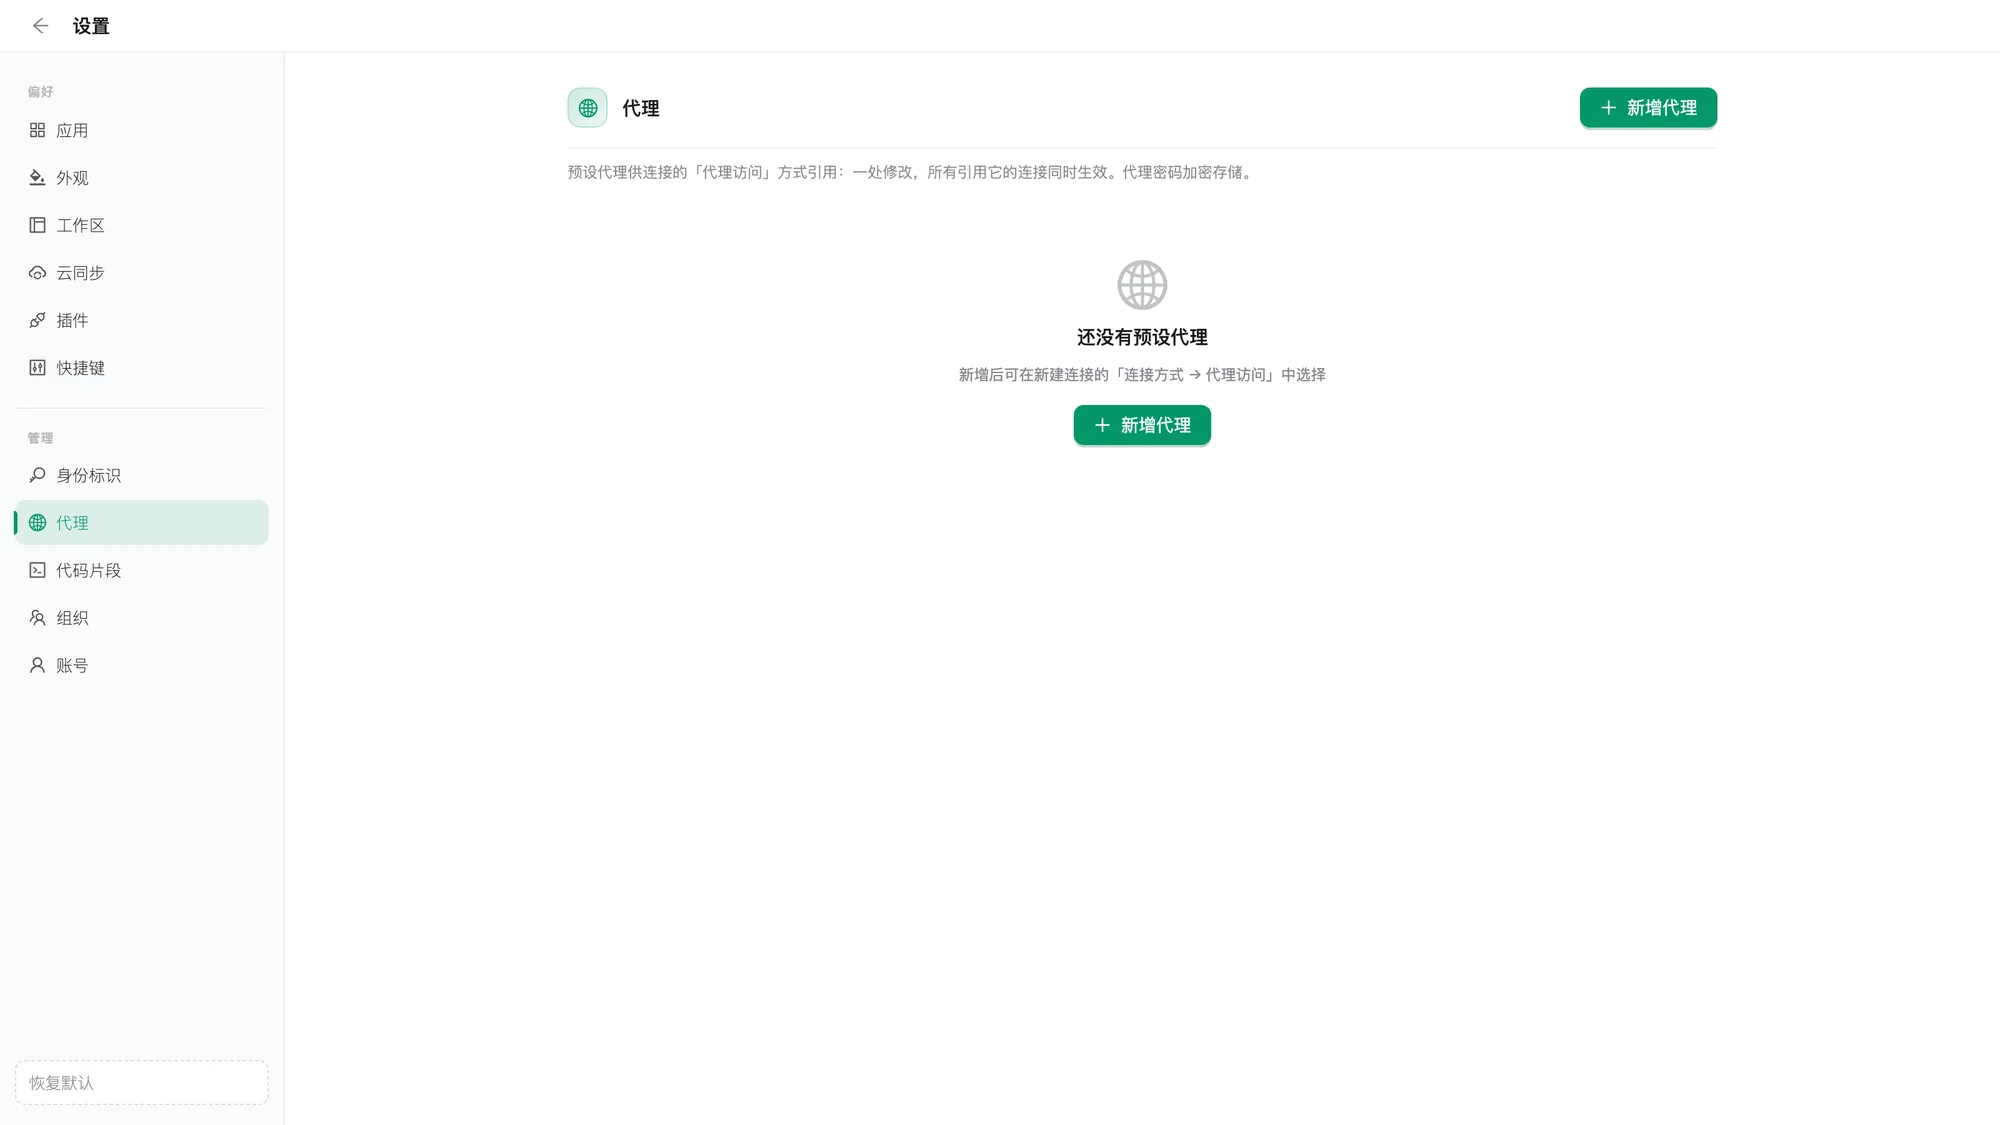
- Saved proxies (Settings → Proxies): manage HTTP / SOCKS5 type, address, port, and optional credentials. Passwords are encrypted; connections reference these entries through the Proxy method. Test connectivity for one, all, or unsaved proxies; the test connects to a target host and port through the proxy and shows the time taken or the reason it failed
| Identities | Saved proxies |
|---|---|
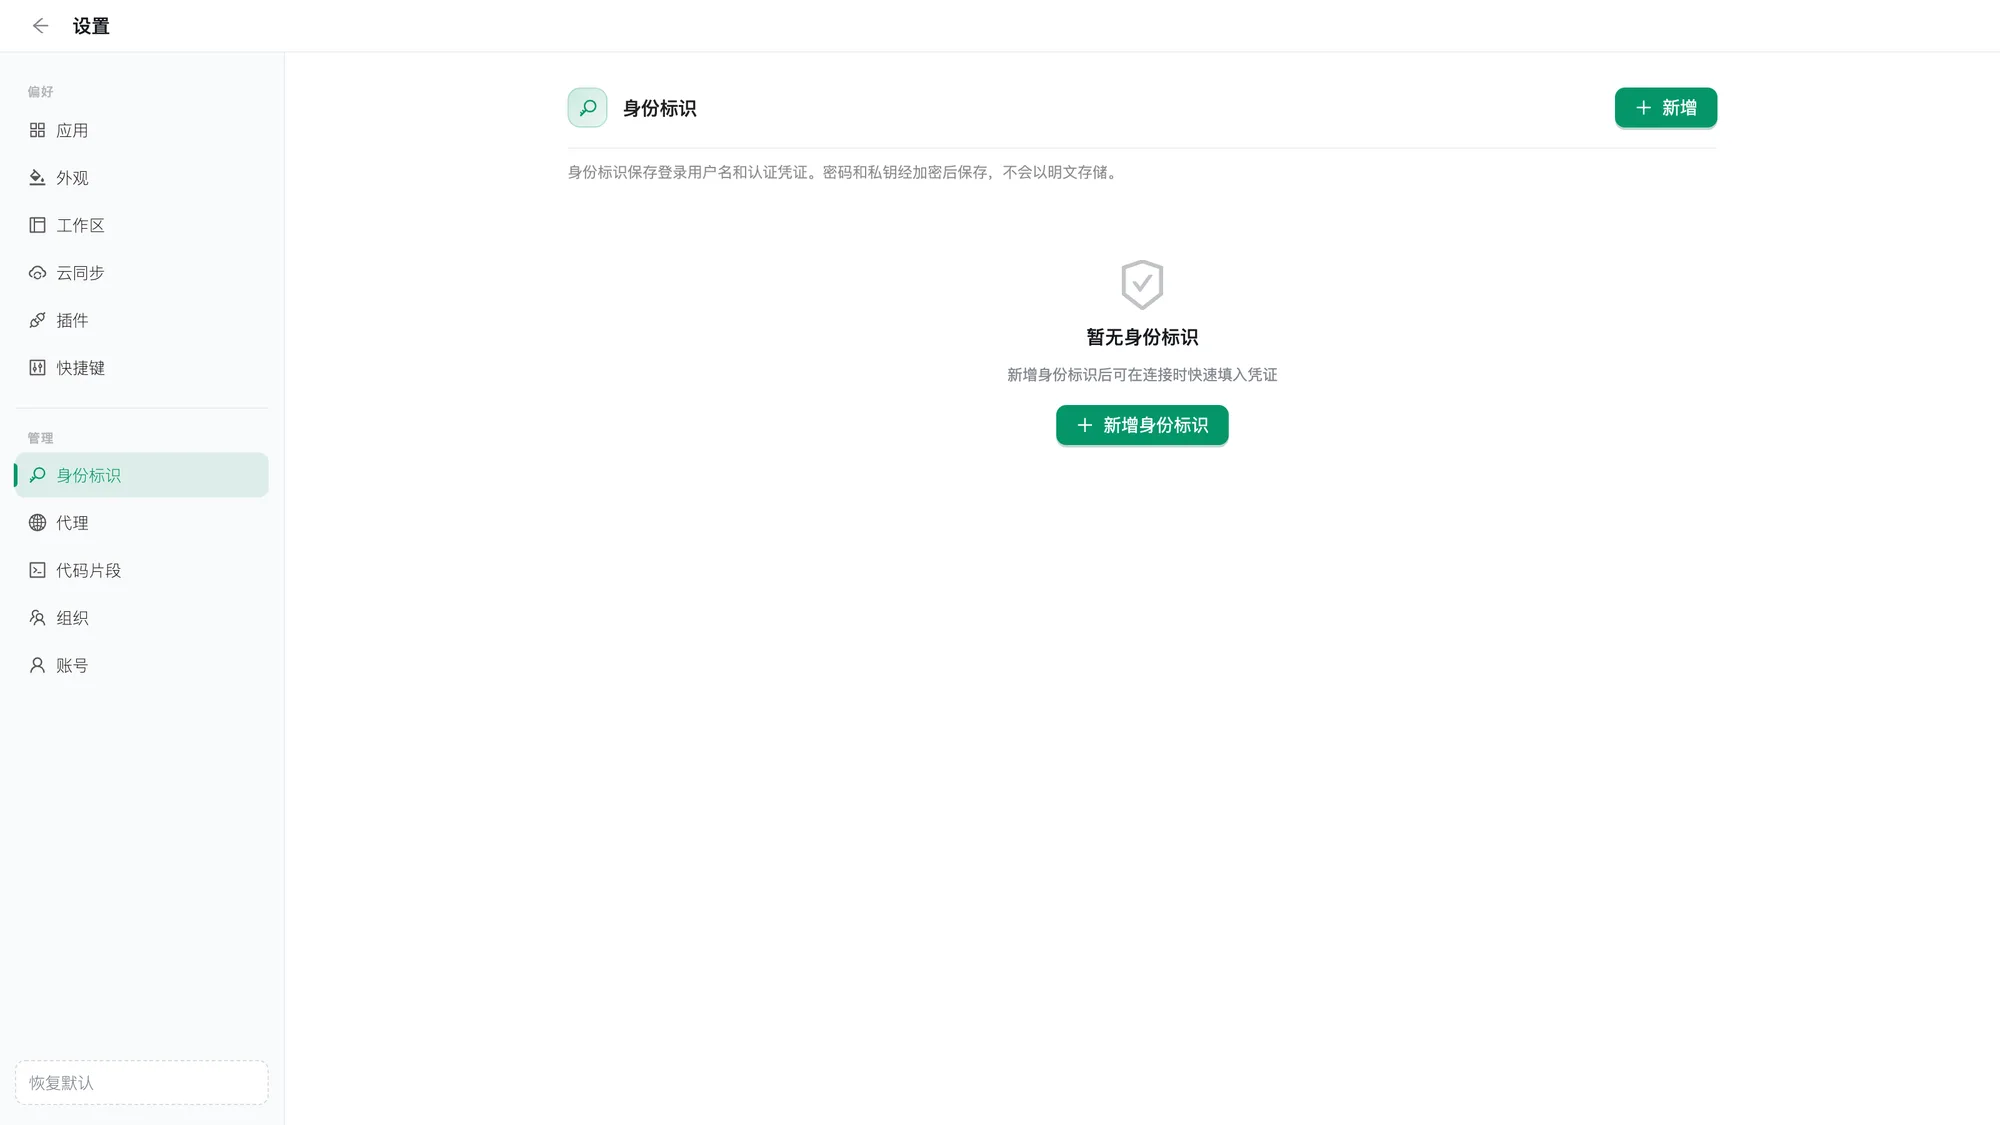 |  |
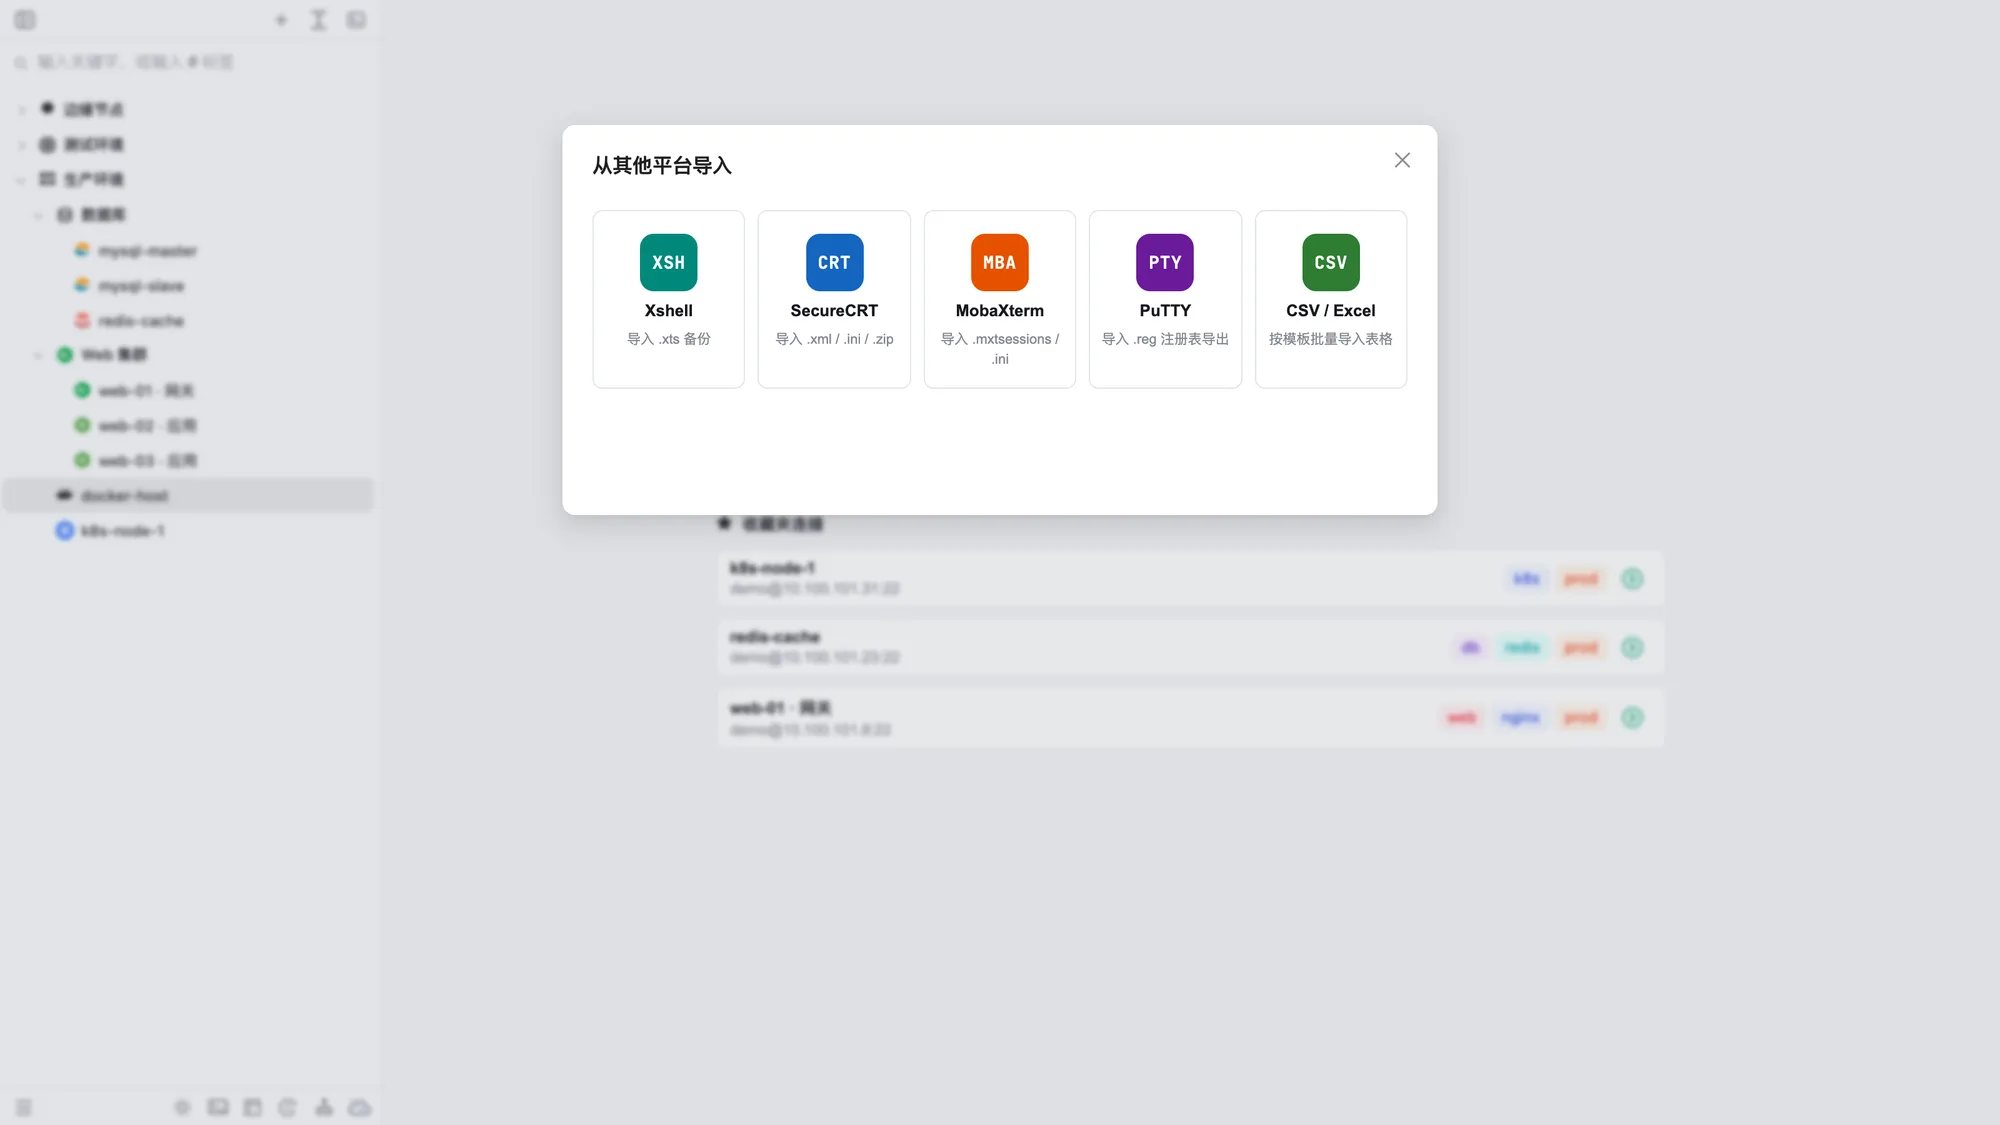
Import from other platforms
Sidebar + → Import from other platforms supports:
| Source | Formats |
|---|---|
| Xshell | .xts backups / .zip |
| SecureCRT | .xml, .ini, or a configuration directory packaged as .zip |
| MobaXterm | .mxtsessions / .ini |
| PuTTY / KiTTY | .reg registry exports / .zip; on Windows, sessions can be read directly from the registry |
| FinalShell | .zip / .json |
| WindTerm | user.sessions / .json |
| electerm | .json |
| OpenSSH | ~/.ssh/config, including ProxyJump and common ProxyCommand forms |
| CSV / Excel | Bulk import using the downloadable template; separate nested folders with / and tags with commas |
The import wizard can scan default locations of installed clients. Imports include hosts, ports, usernames, and folder structures, and keep recognizable HTTP / SOCKS5 proxies and SSH jump routes, adding required jump hosts automatically. Choose which sessions to import and add passwords or private keys by username. Problem routes, such as missing proxies, missing jump hosts, loops, or more than five hops, are clearly flagged and imported as direct connections only after you confirm.
Redis client
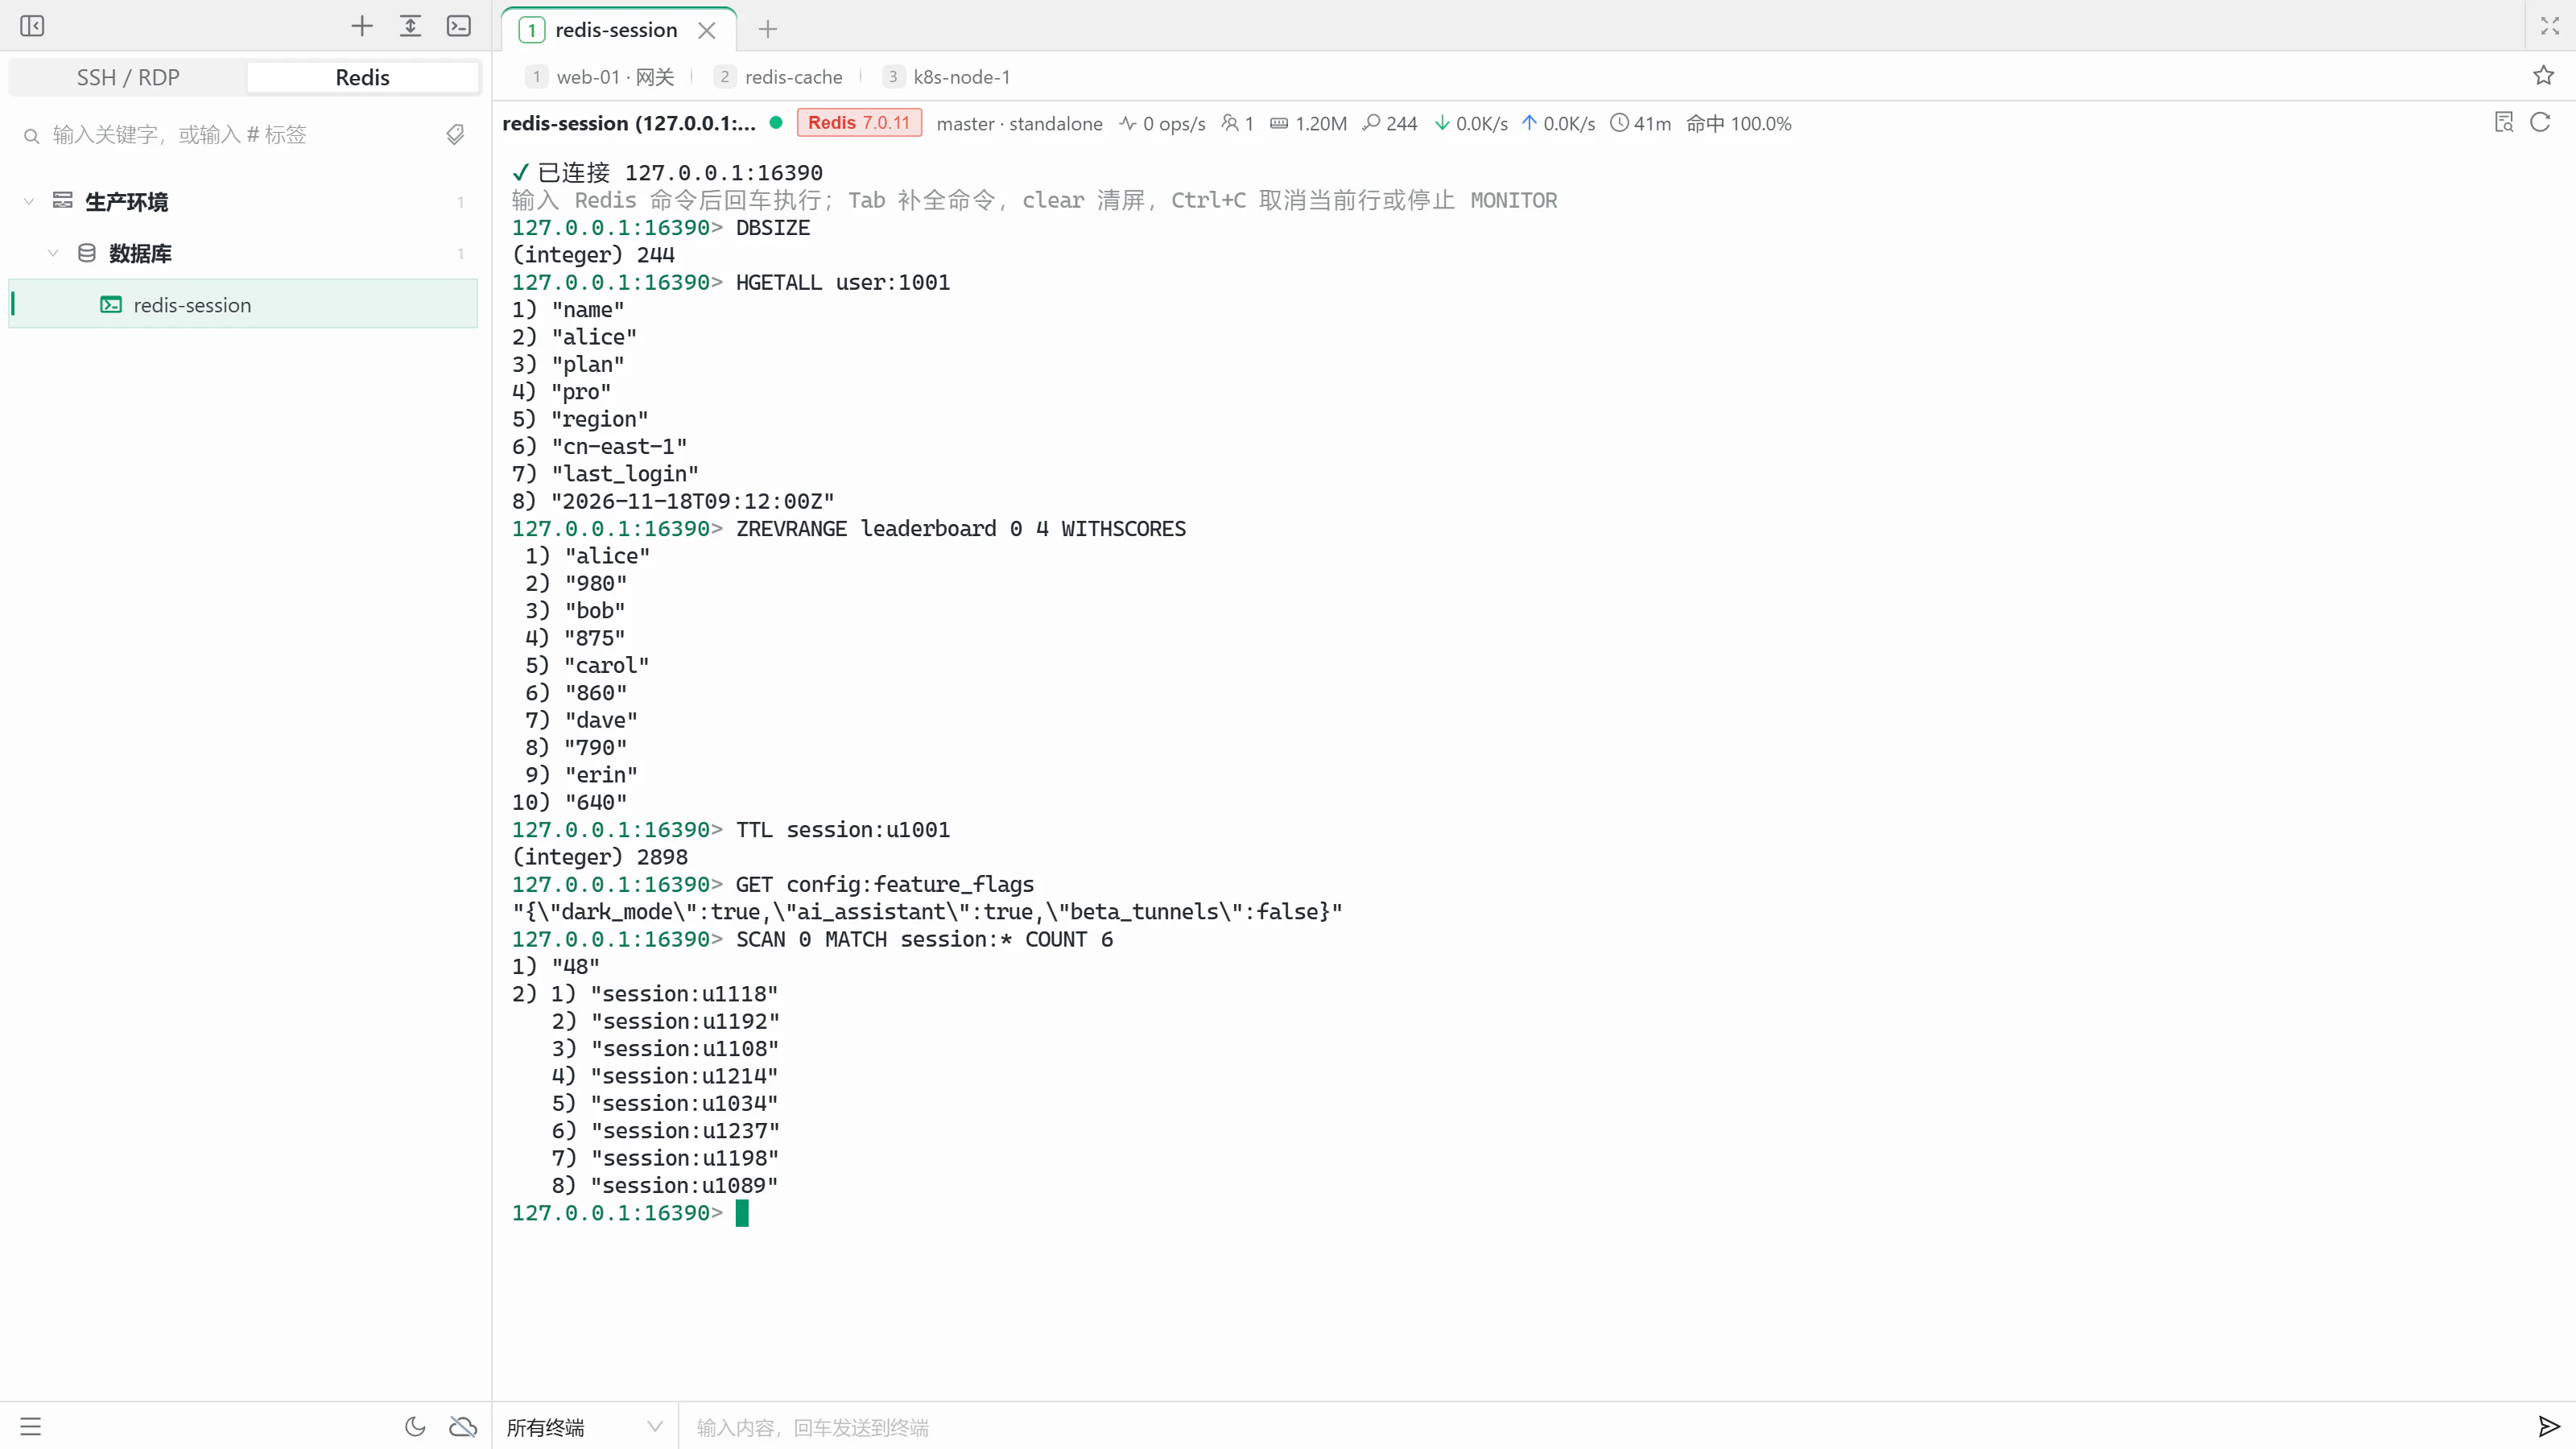
Redis connections support standalone, Sentinel, and Cluster modes and can reach internal instances through SSH jump hosts or proxies:
- Topology: expand a connection in the sidebar to see Sentinel primaries and replicas or Cluster shards, and double-click a node to open its terminal. Right-click a master name, shard, or the Sentinel group to open several nodes in focused view
- redis-cli style terminal: complete commands with
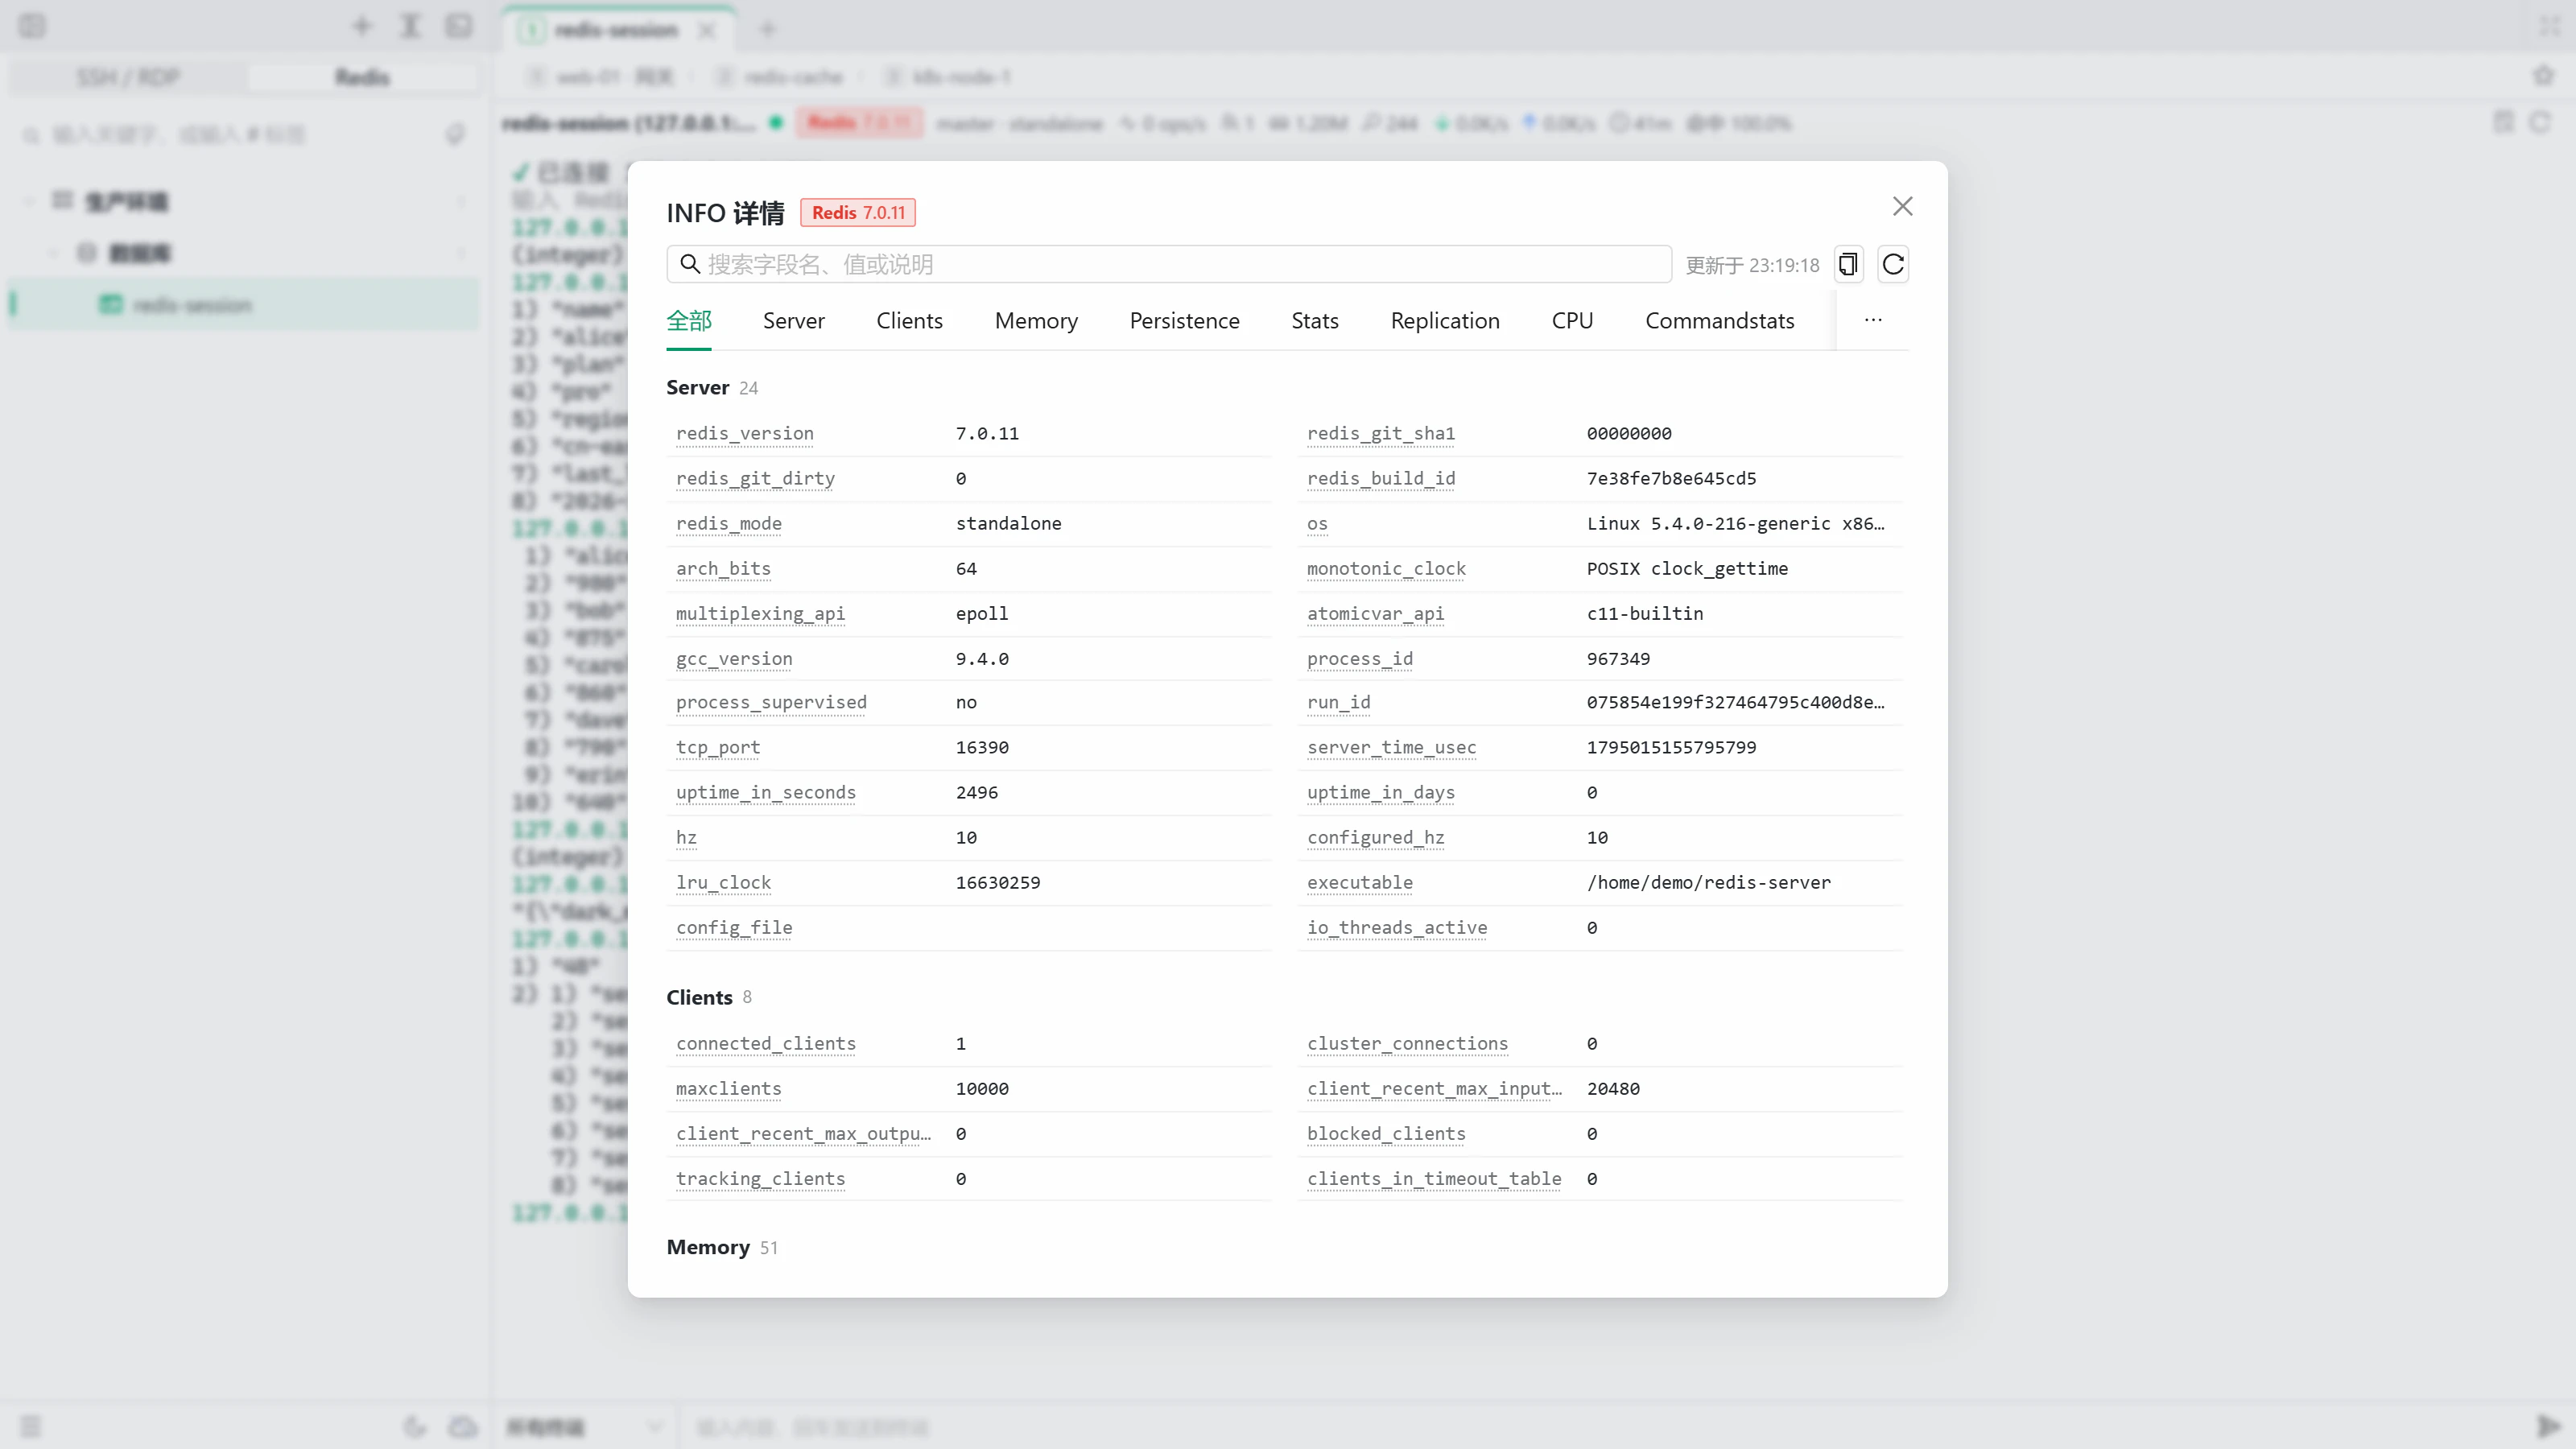
Tab, move the cursor with the arrow keys,Home/End, word jumps, or a mouse click, and edit inline withCtrl+A/E/U/K. Multi-line pastes wait for each reply before sending the next line - INFO status bar: refreshes every 5 seconds with server type and version, role, operations per second, clients, memory, keys, network traffic, uptime, and hit rate (compatible with Kvrocks and PikiwiDB). Click it to browse, search, refresh, and copy
INFO ALLby section, with field descriptions on hover - Live MONITOR: run
MONITORon a separate connection and chain several| grepfilters on the backend (regular expressions, case-insensitive, and inverted matches). PressCtrl+Cto stop - Copy connection commands: right-click a Redis connection or topology node to copy the matching
redis-clicommand - Sensitive arguments in commands such as
AUTHandACL SETUSERare redacted before they are saved to history
| Redis terminal and INFO status bar | INFO details |
|---|---|
 |  |
Terminal experience
Tabs and split panes
- Open multiple tabs and child terminals within each tab. Detach a child terminal into its own tab or pop it out into a separate window. Popping out or dragging out moves the existing session, keeping running programs and output, and you can later restore it to a tab
- Drag to split: drag a tab to the edge of the terminal panel; switch between focused and split views. On desktop, drag a tab outside the window to create a new window
- Status at a glance: tab number badges show connected, connecting (blinking orange), and disconnected (gray) sessions, and background tabs signal new output. Toggle numbers and icons separately in Workspace settings → Layout
- Tab context menus can close other tabs, tabs to the left or right, disconnected tabs, or all tabs, and duplicate, rename, or locate the current connection. Optionally confirm before closing a tab
- Connection picker: search open tabs (including split-pane terminals) and saved connections together, then jump straight to your choice
- Broadcast input: send text from the bottom composer to the current terminal, the grouped terminals, or all terminals. Regular tabs default to all terminals and grouped tabs to the group; press
Alt+↑/↓in the composer to switch - If a connection drops, press Enter when prompted to reconnect, or turn on automatic reconnection
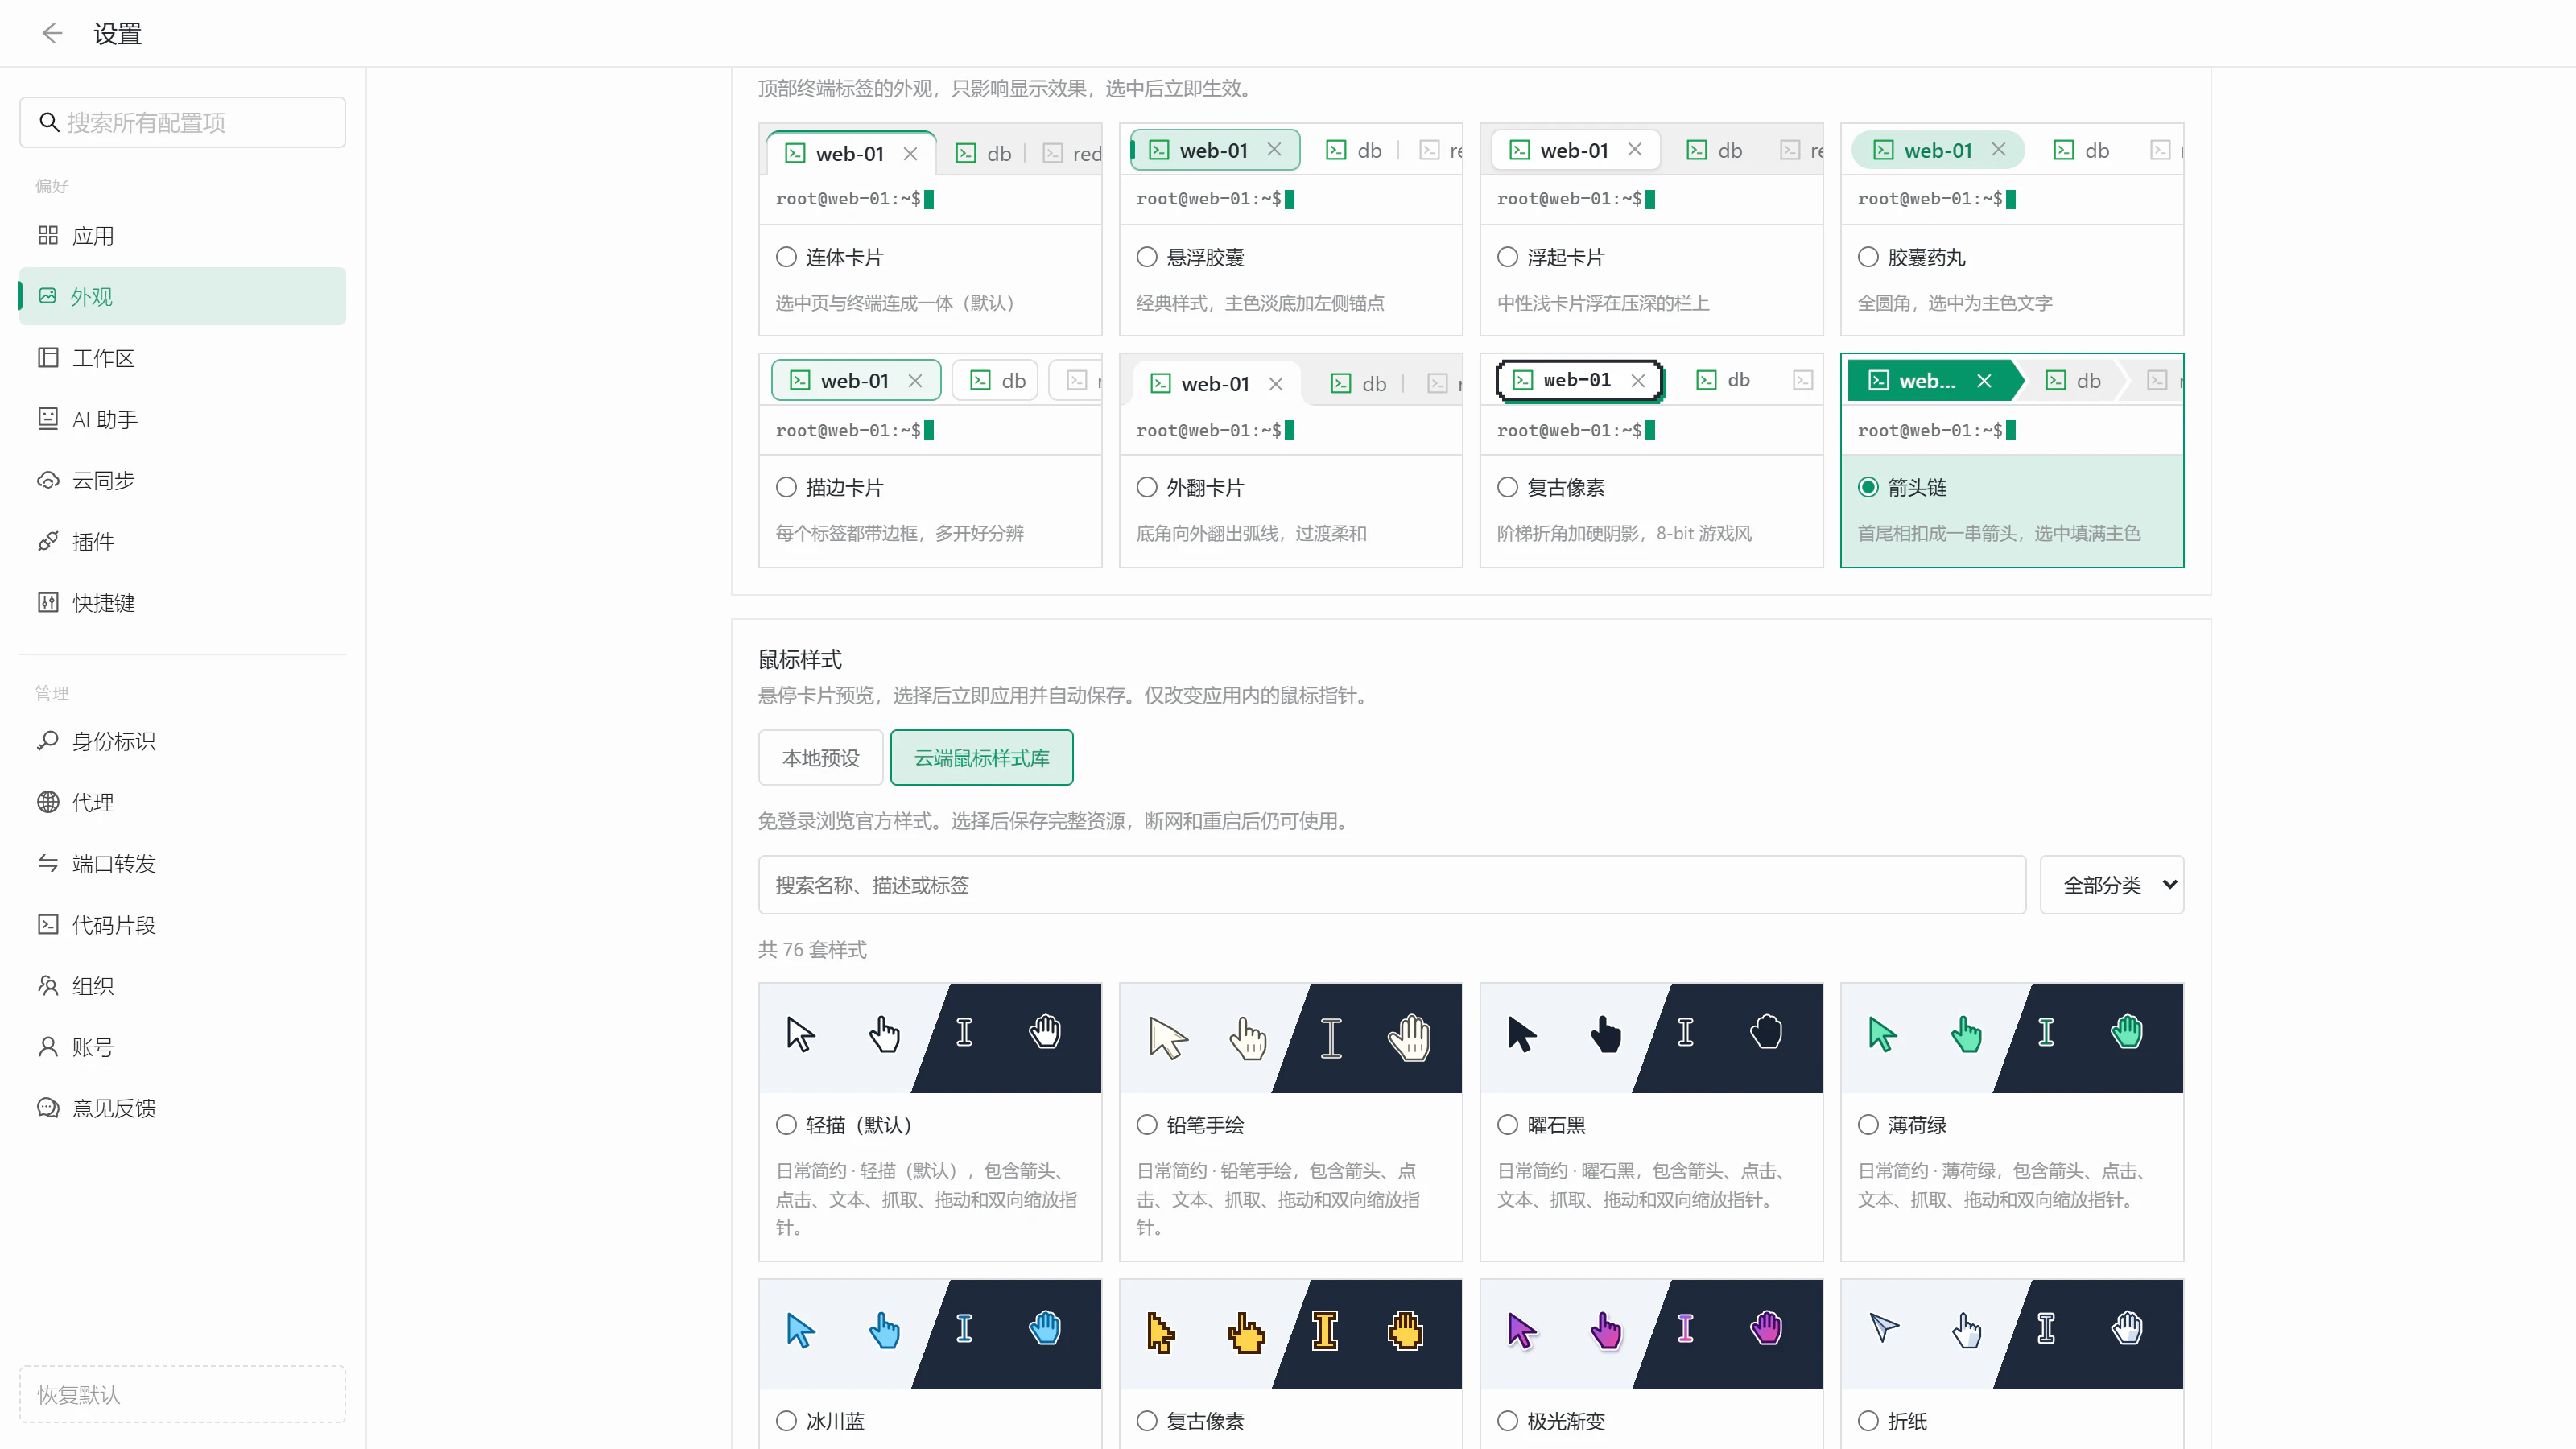
Tab styles
Settings → Appearance → Tab style (also in Workspace settings) offers eight tab styles with live preview cards. Your choice applies immediately:
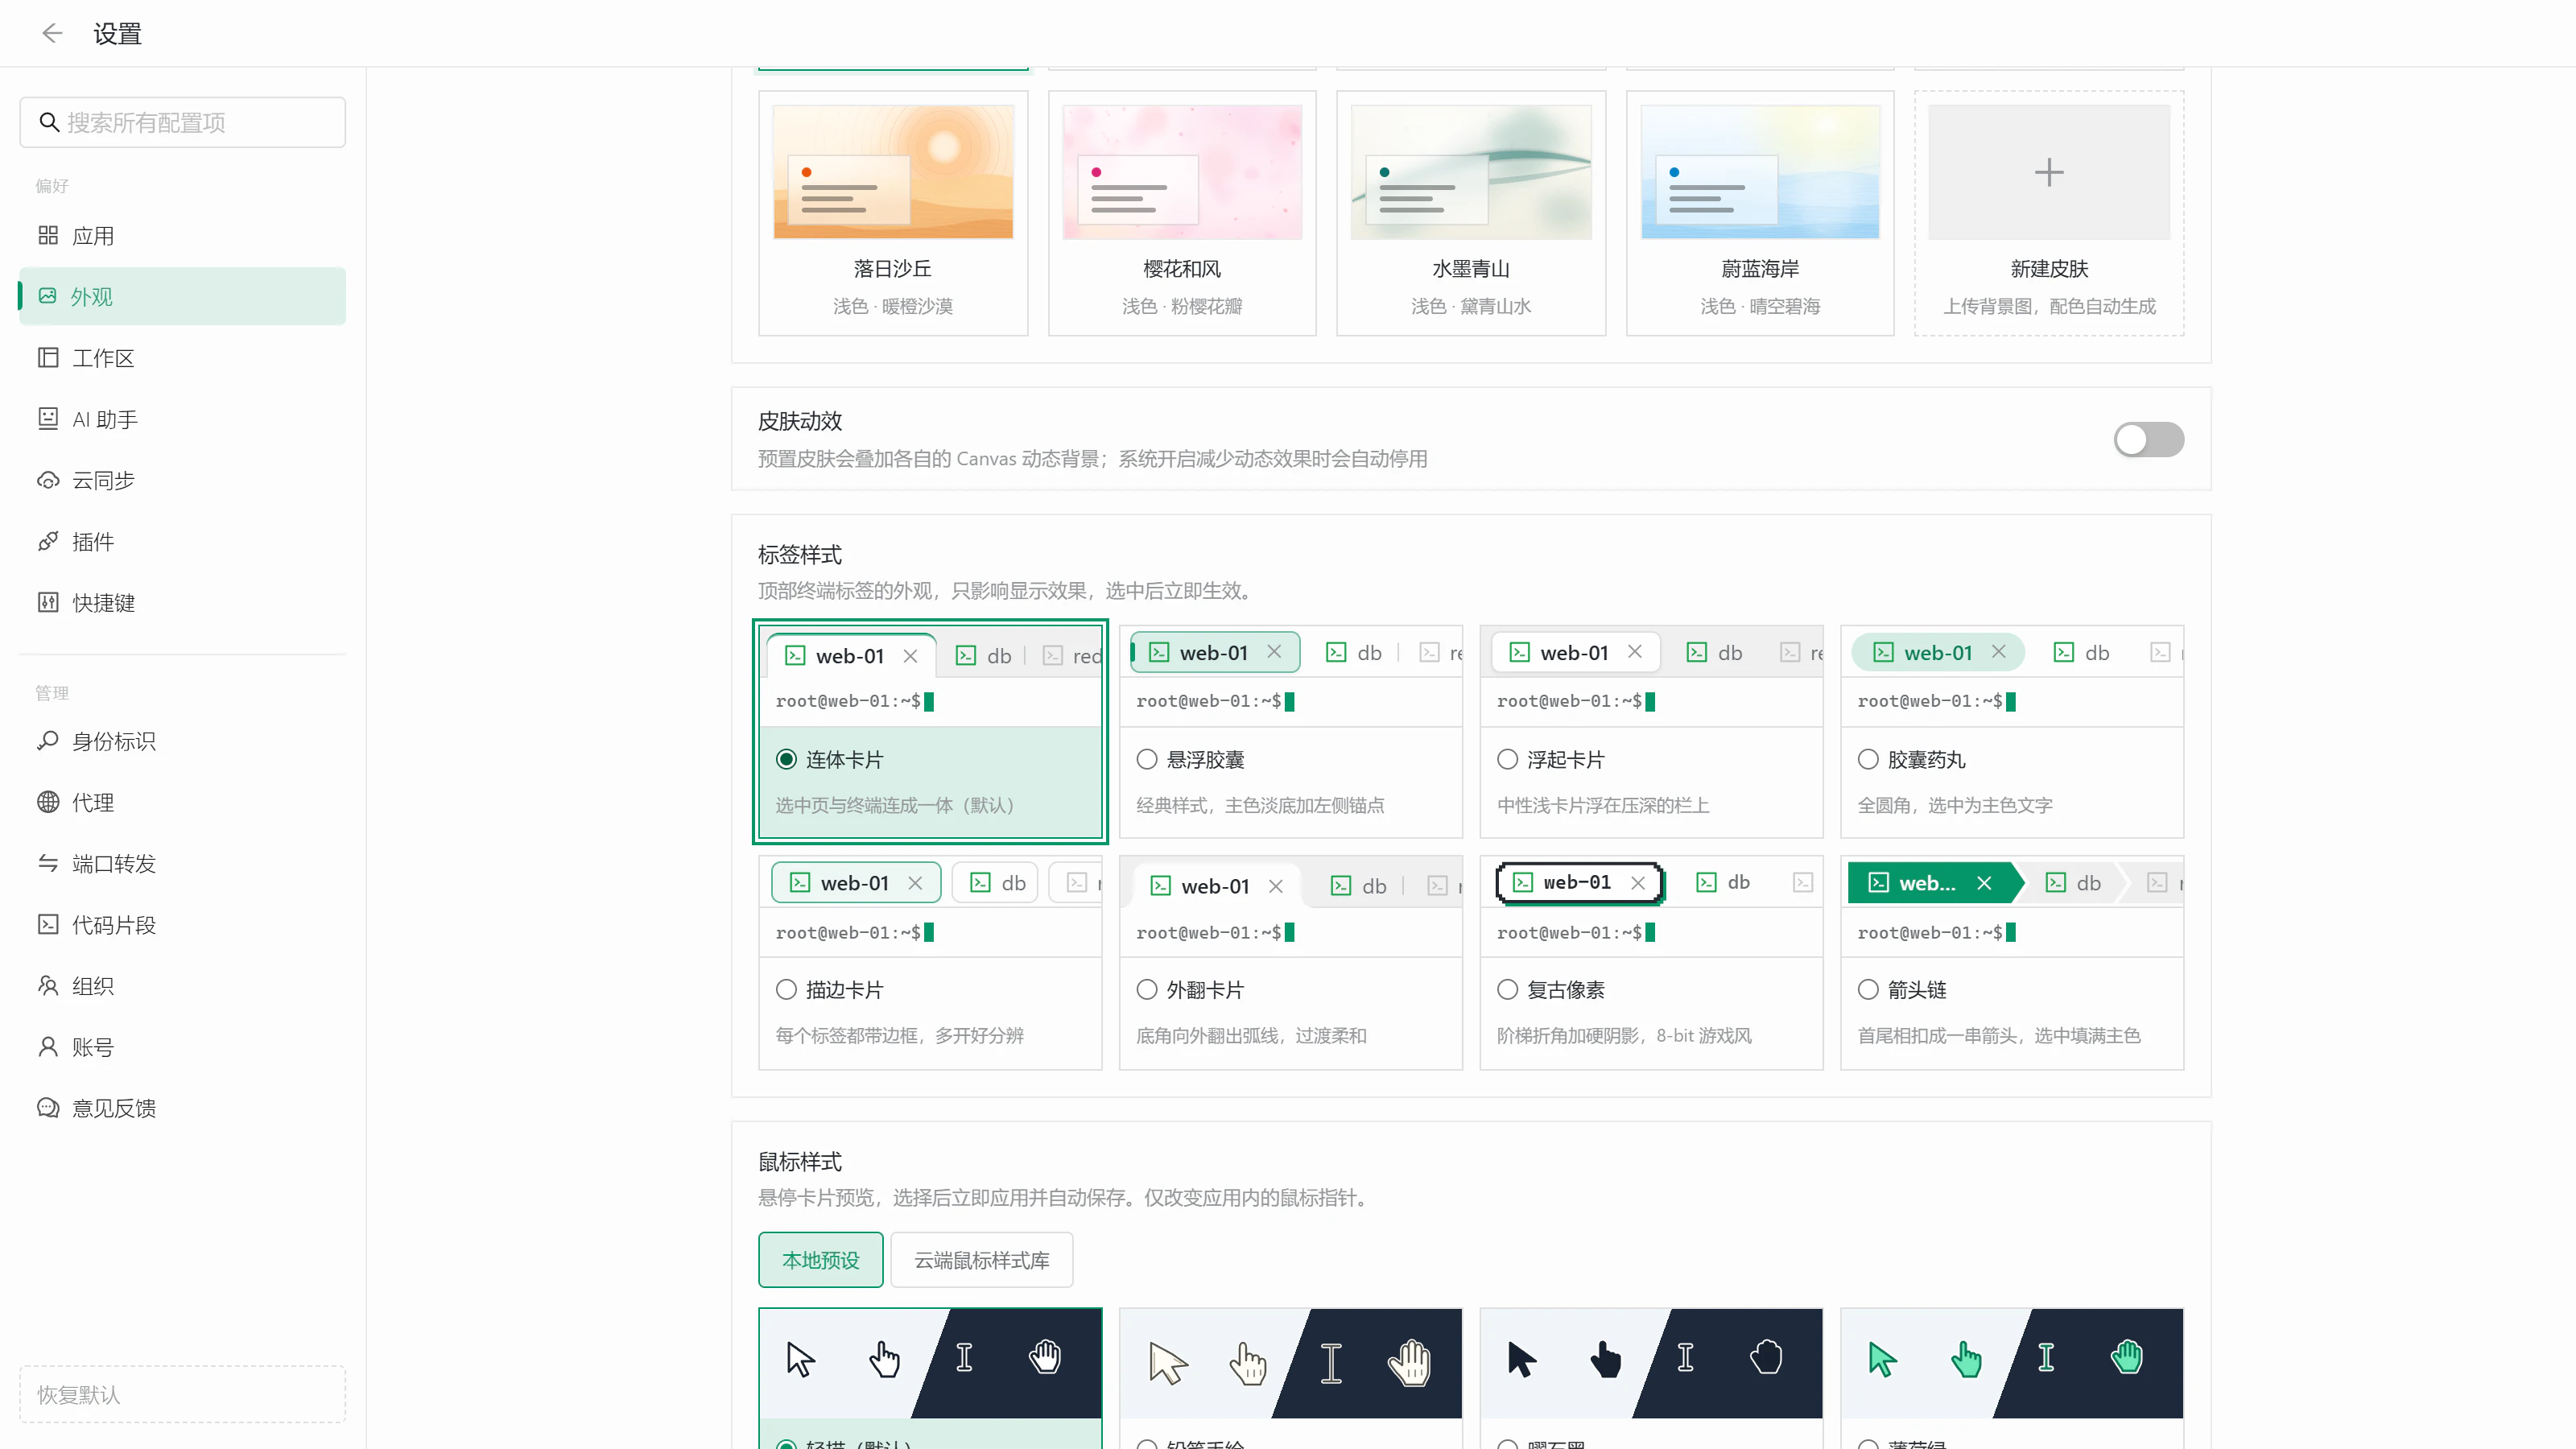
| Style | Look |
|---|---|
| Joined card (default) |  |
| Floating capsule |  |
| Raised card |  |
| Pill |  |
| Outlined card |  |
| Flared card |  |
| Retro pixel |  |
| Chevron chain |  |
Live system monitoring
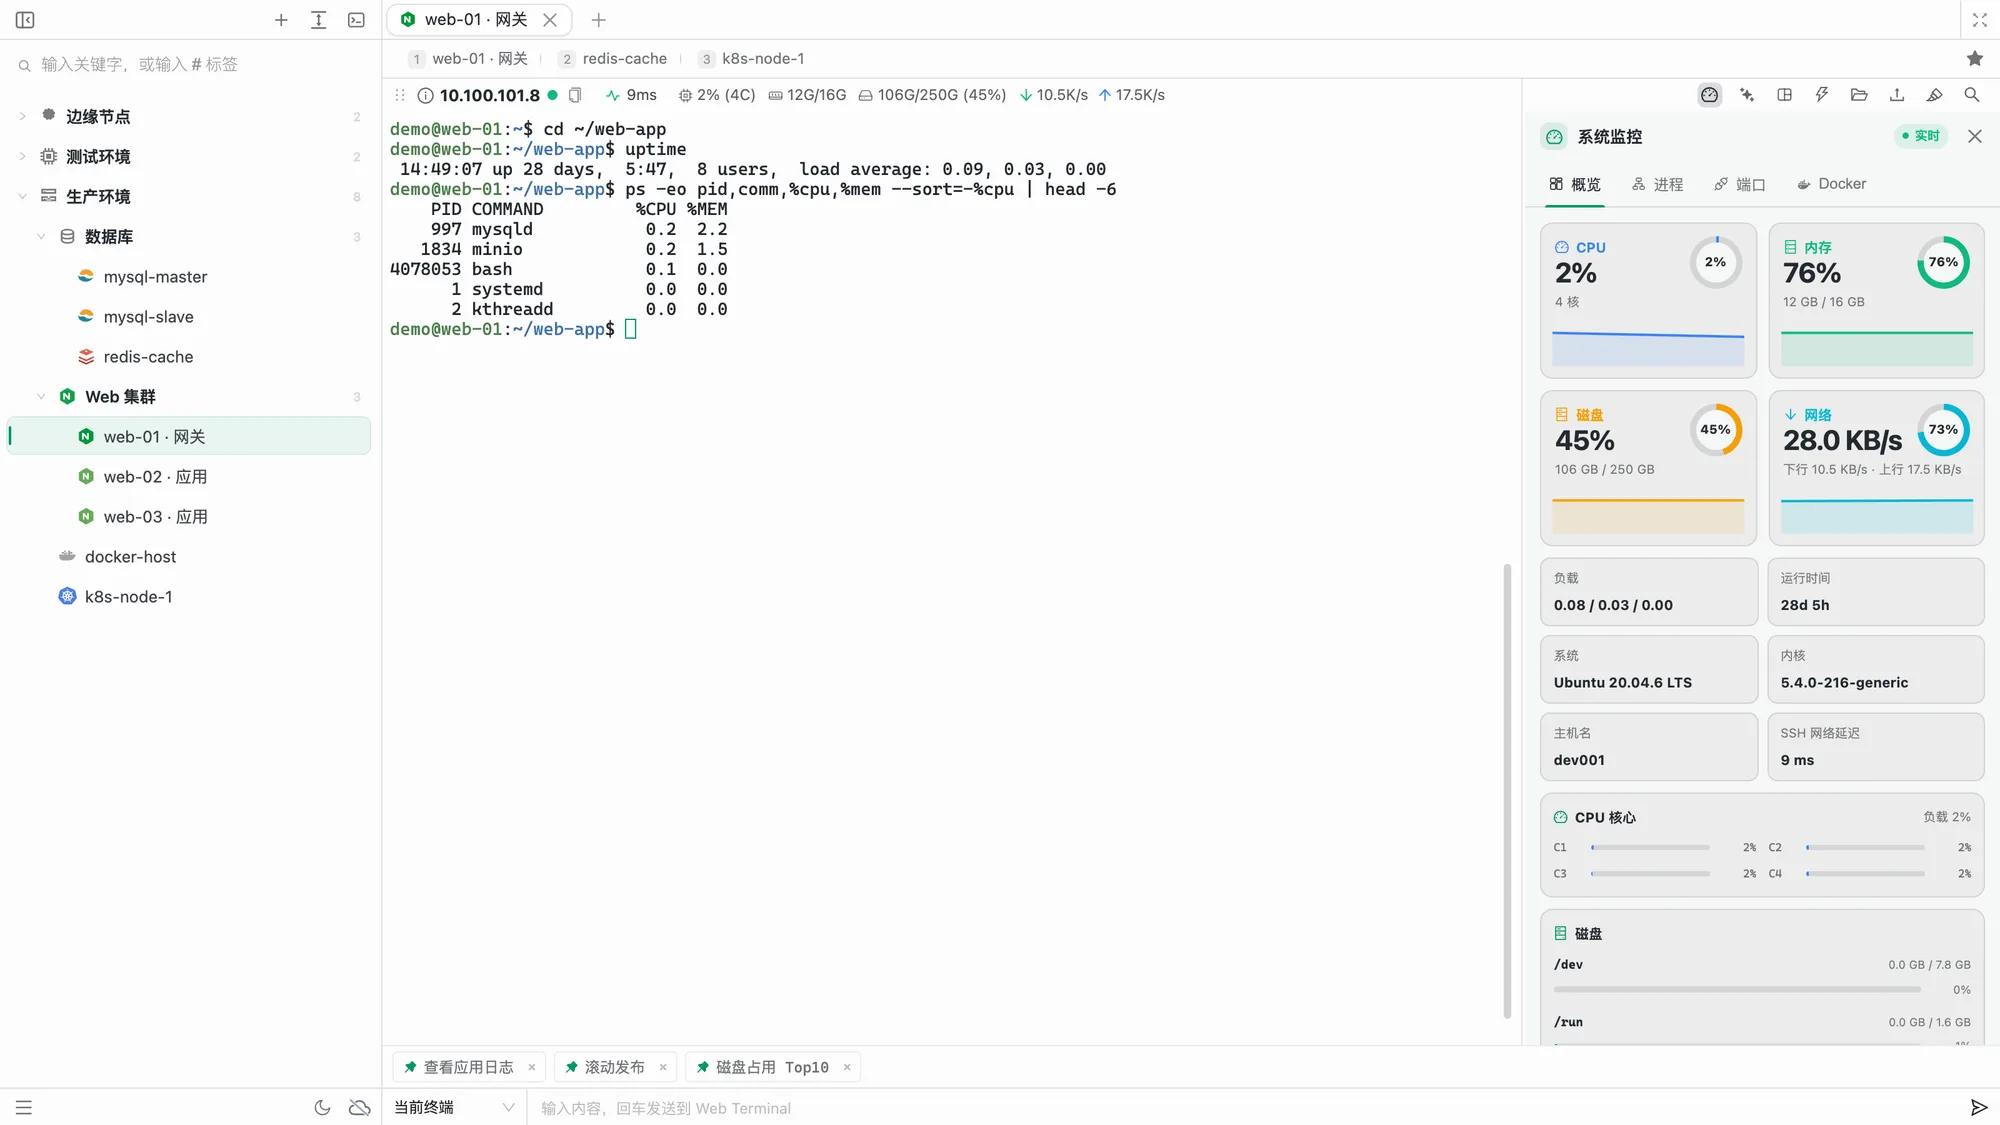
After connecting, the status bar above the terminal shows common metrics. Click any metric or System Monitor on the right to open the full panel:
- SSH latency: checked about every 10 seconds. Click to see a five-minute chart and minimum / maximum values
- Overview: total and per-core CPU usage, memory, disks, network traffic, system load, uptime, hostname, and kernel version
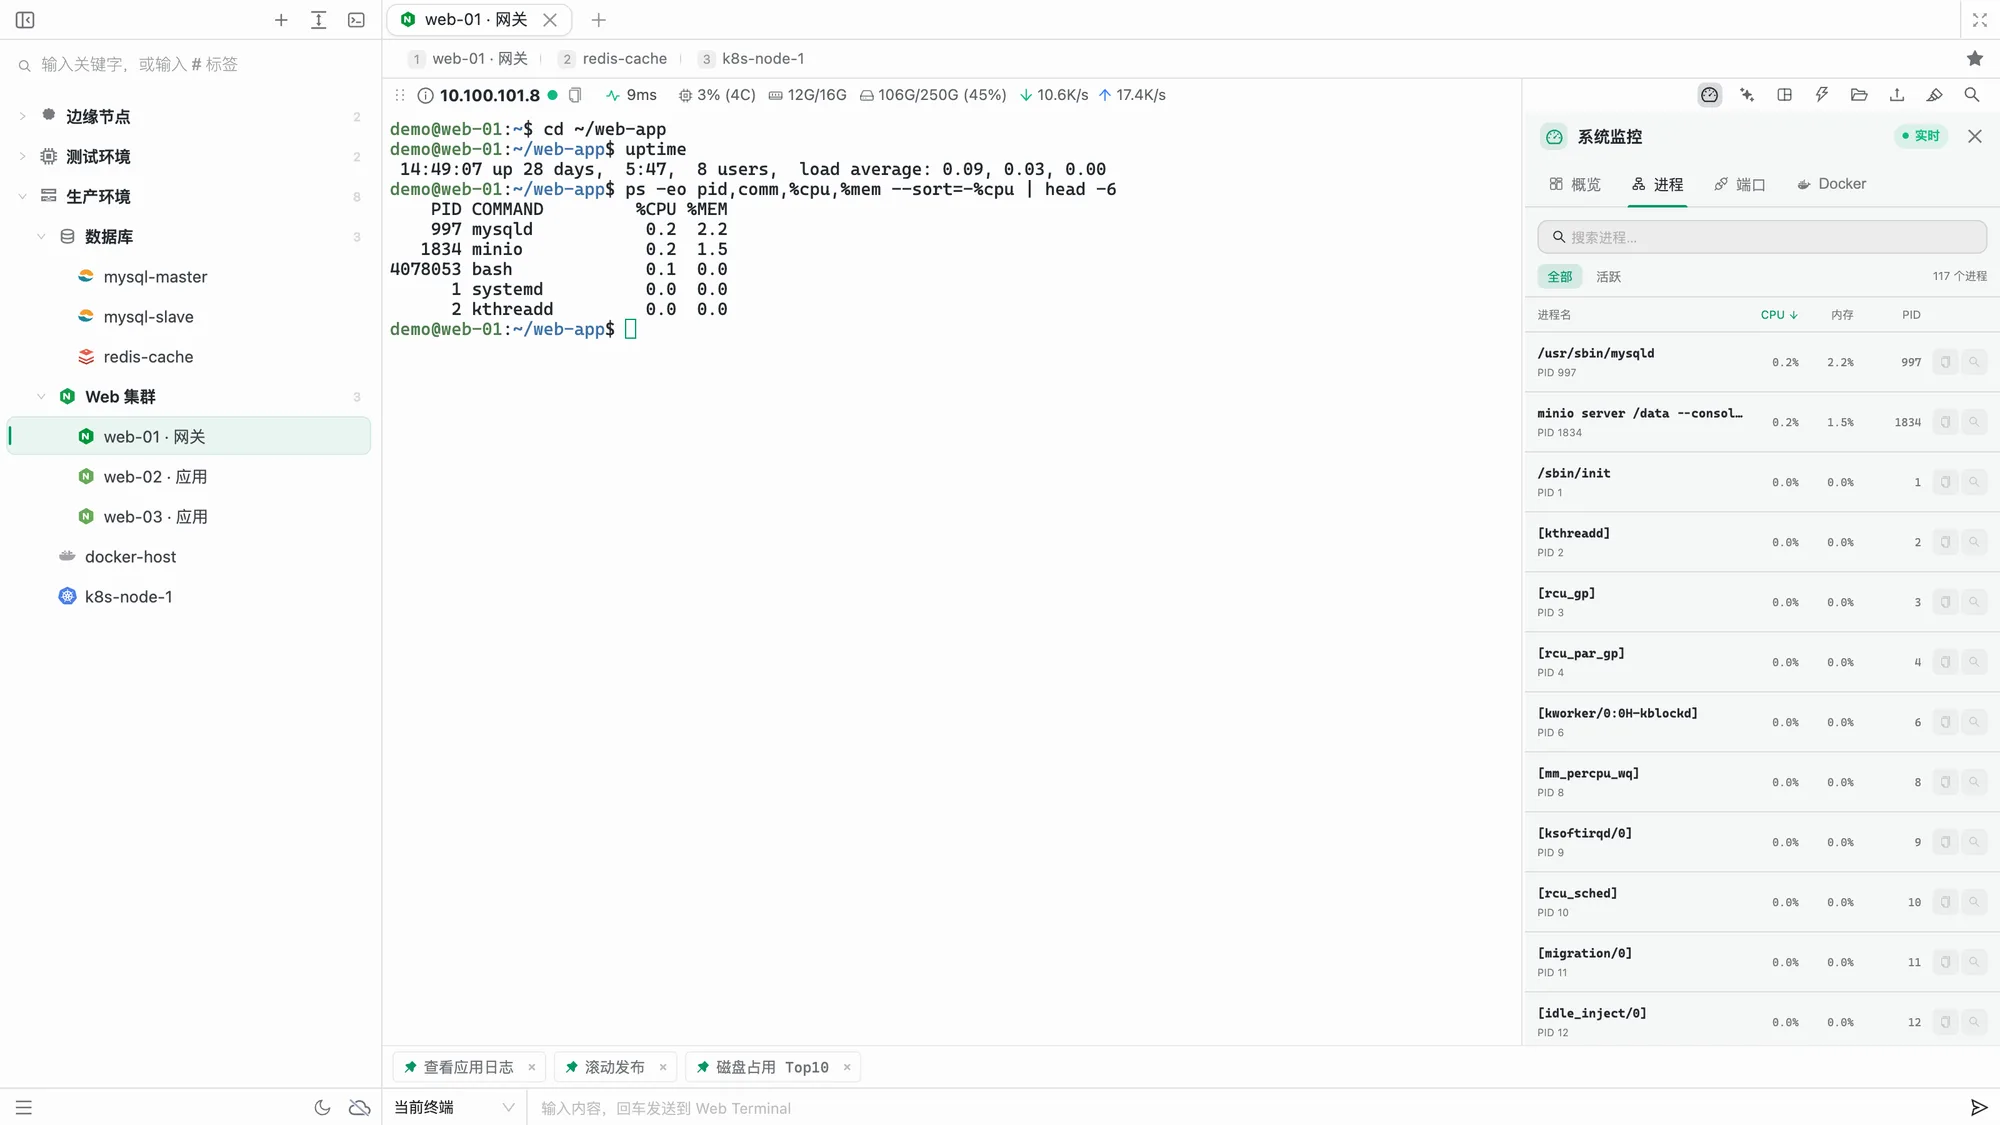
- Processes: search all or active processes, sort ascending or descending by command, CPU, memory, or PID, copy PIDs, or send a query command to the current terminal
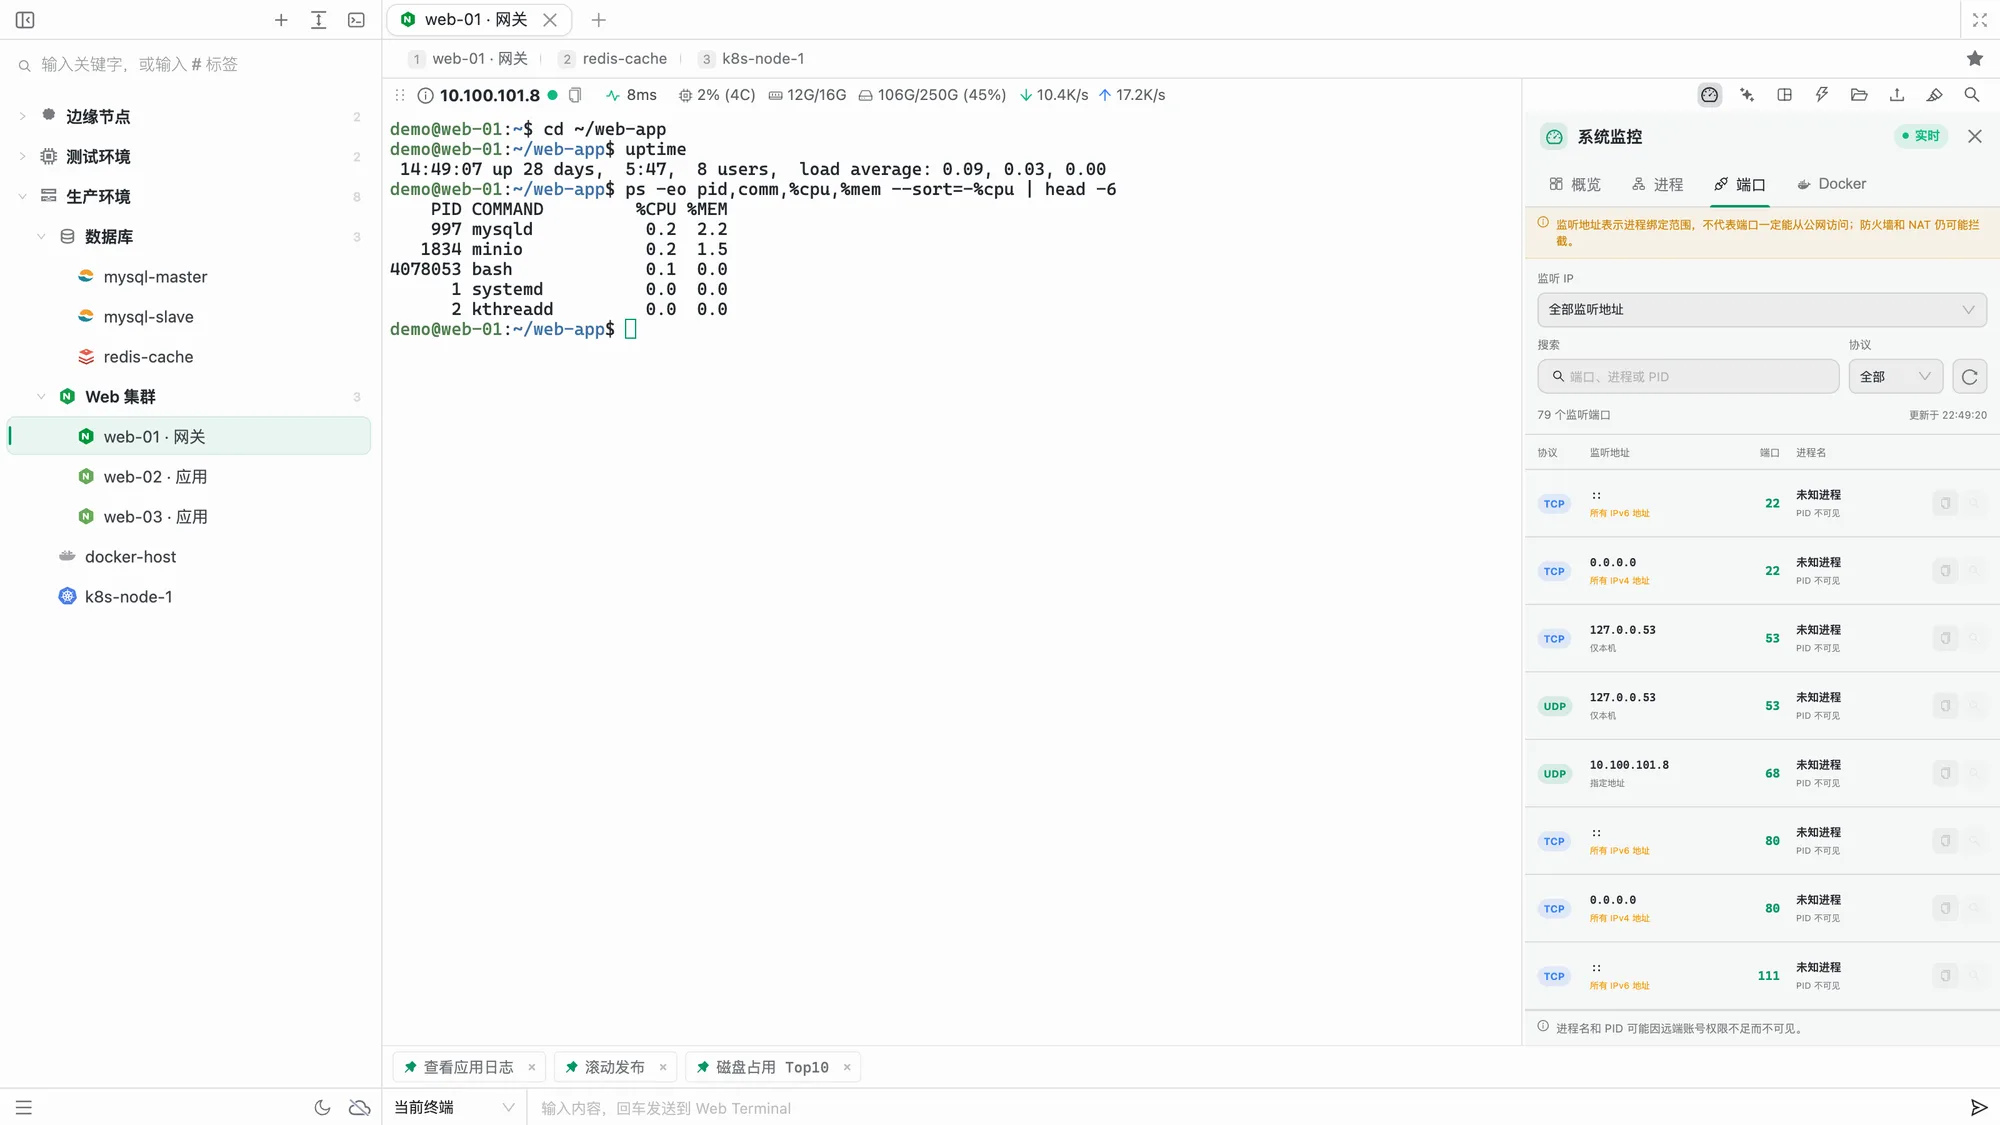
- Ports: queried only when opening the tab or refreshing manually. Filter by listening IP, TCP / UDP, port, process, and PID, with clear distinctions between all interfaces, loopback, and specific addresses
- Docker: search running containers by name, image, ID, or status. View container details (state, health checks, environment variables, mounts, networks, and the full
inspectJSON), rebuild adocker runcommand from the configuration, follow logs (docker logs -f) or open a shell (docker exec -it) in the owning terminal, and stop or restart containers after confirmation - If a regular user cannot access Docker, passwordless sudo is tried automatically, or you can enter a password in the panel. The password stays only in the current terminal session's memory
- If collection fails, refresh manually; it also retries every 5 seconds without reconnecting the terminal
A listening address indicates where a process binds; it does not guarantee public access. Firewalls, cloud security groups, and NAT can still block traffic. Process names and PIDs may be unavailable if the remote account lacks permission.
| System overview | Sortable processes | On-demand port queries |
|---|---|---|
 |  |  |
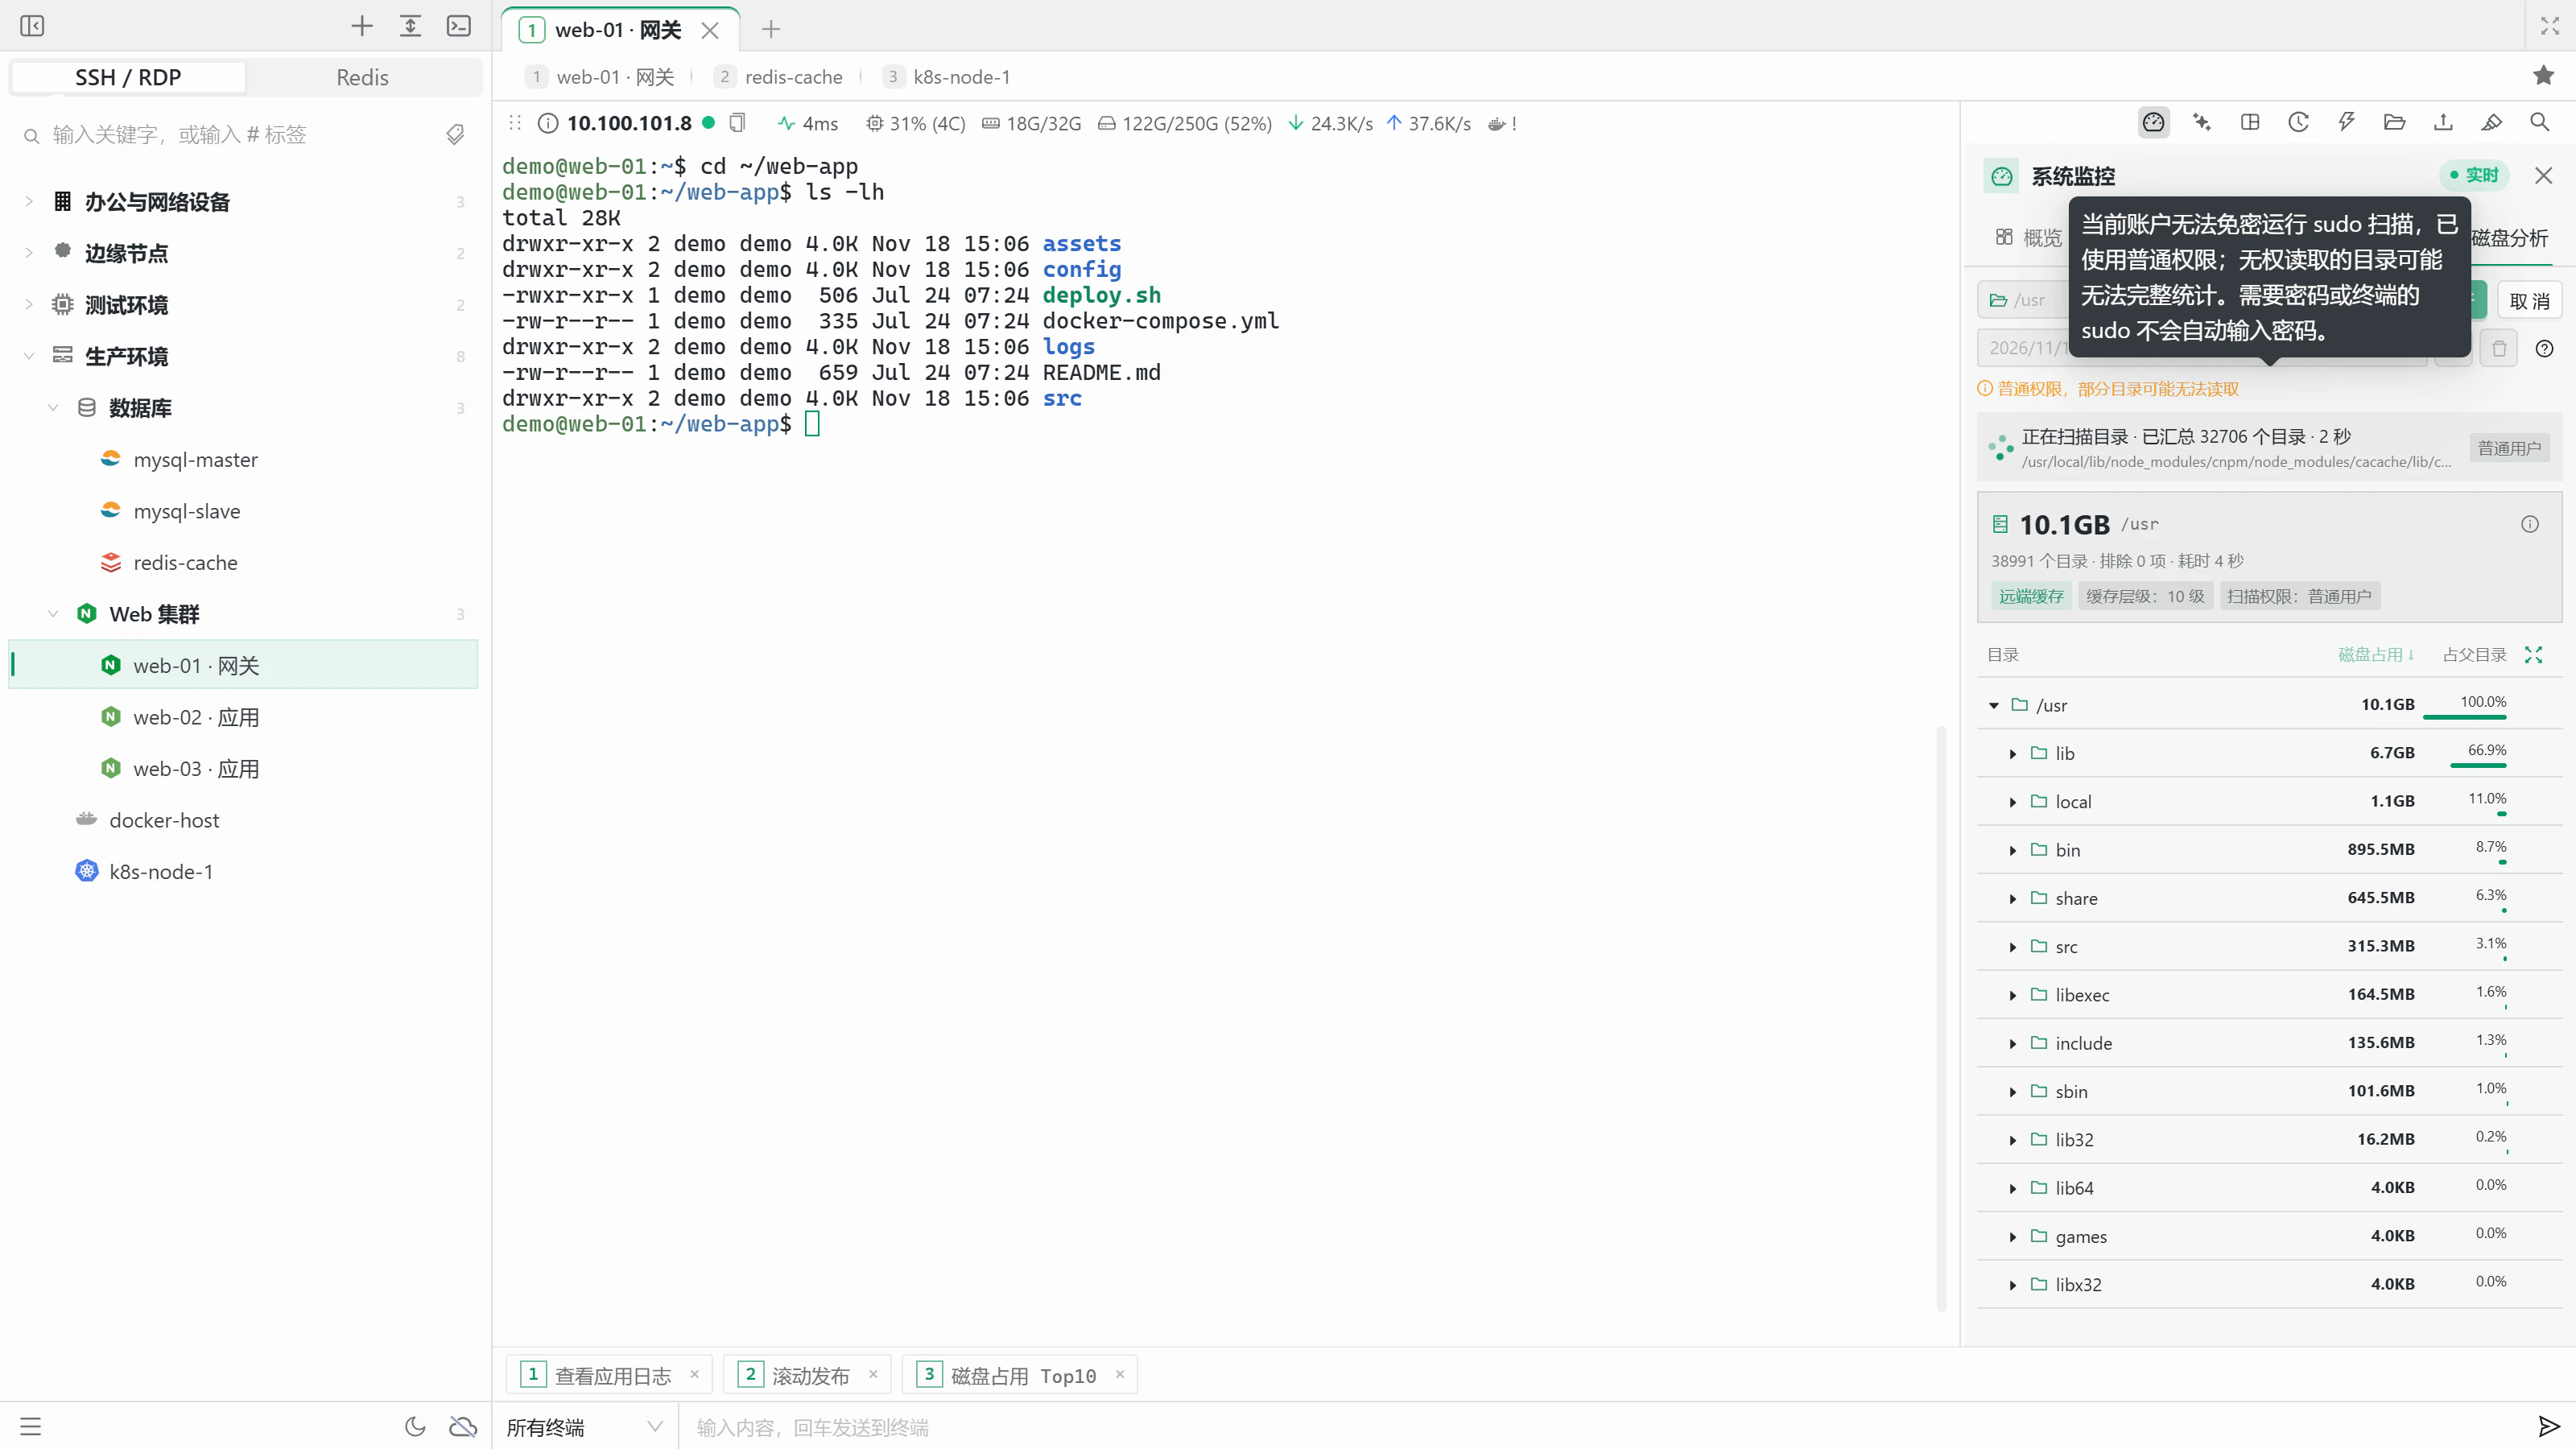
Disk analysis
The Disk analysis tab in System Monitor analyzes directory usage on Linux hosts on demand, starting from the current terminal directory:
- Scanning starts after you authorize it and uses standard system commands, so no Python or ncdu is required. Root scans directly; other users use passwordless sudo when available
- Results appear as a directory tree with usage, share of the parent, and direct usage. Sort ascending or descending, and expand the results to full screen
- Ten levels of detail are saved by default (
0saves all levels); deeper directories are analyzed when you open them, up to 1000 subdirectories per page - Records are saved in the current SSH user's
~/.cloudTerm/disk-analysis/on the target host, so the last 50 analyses are available from any device. Refresh them or delete them after confirming - Analysis continues in the background after you close the panel or switch tabs, and Task Notifications tells you when it finishes
Terminal AI assistant
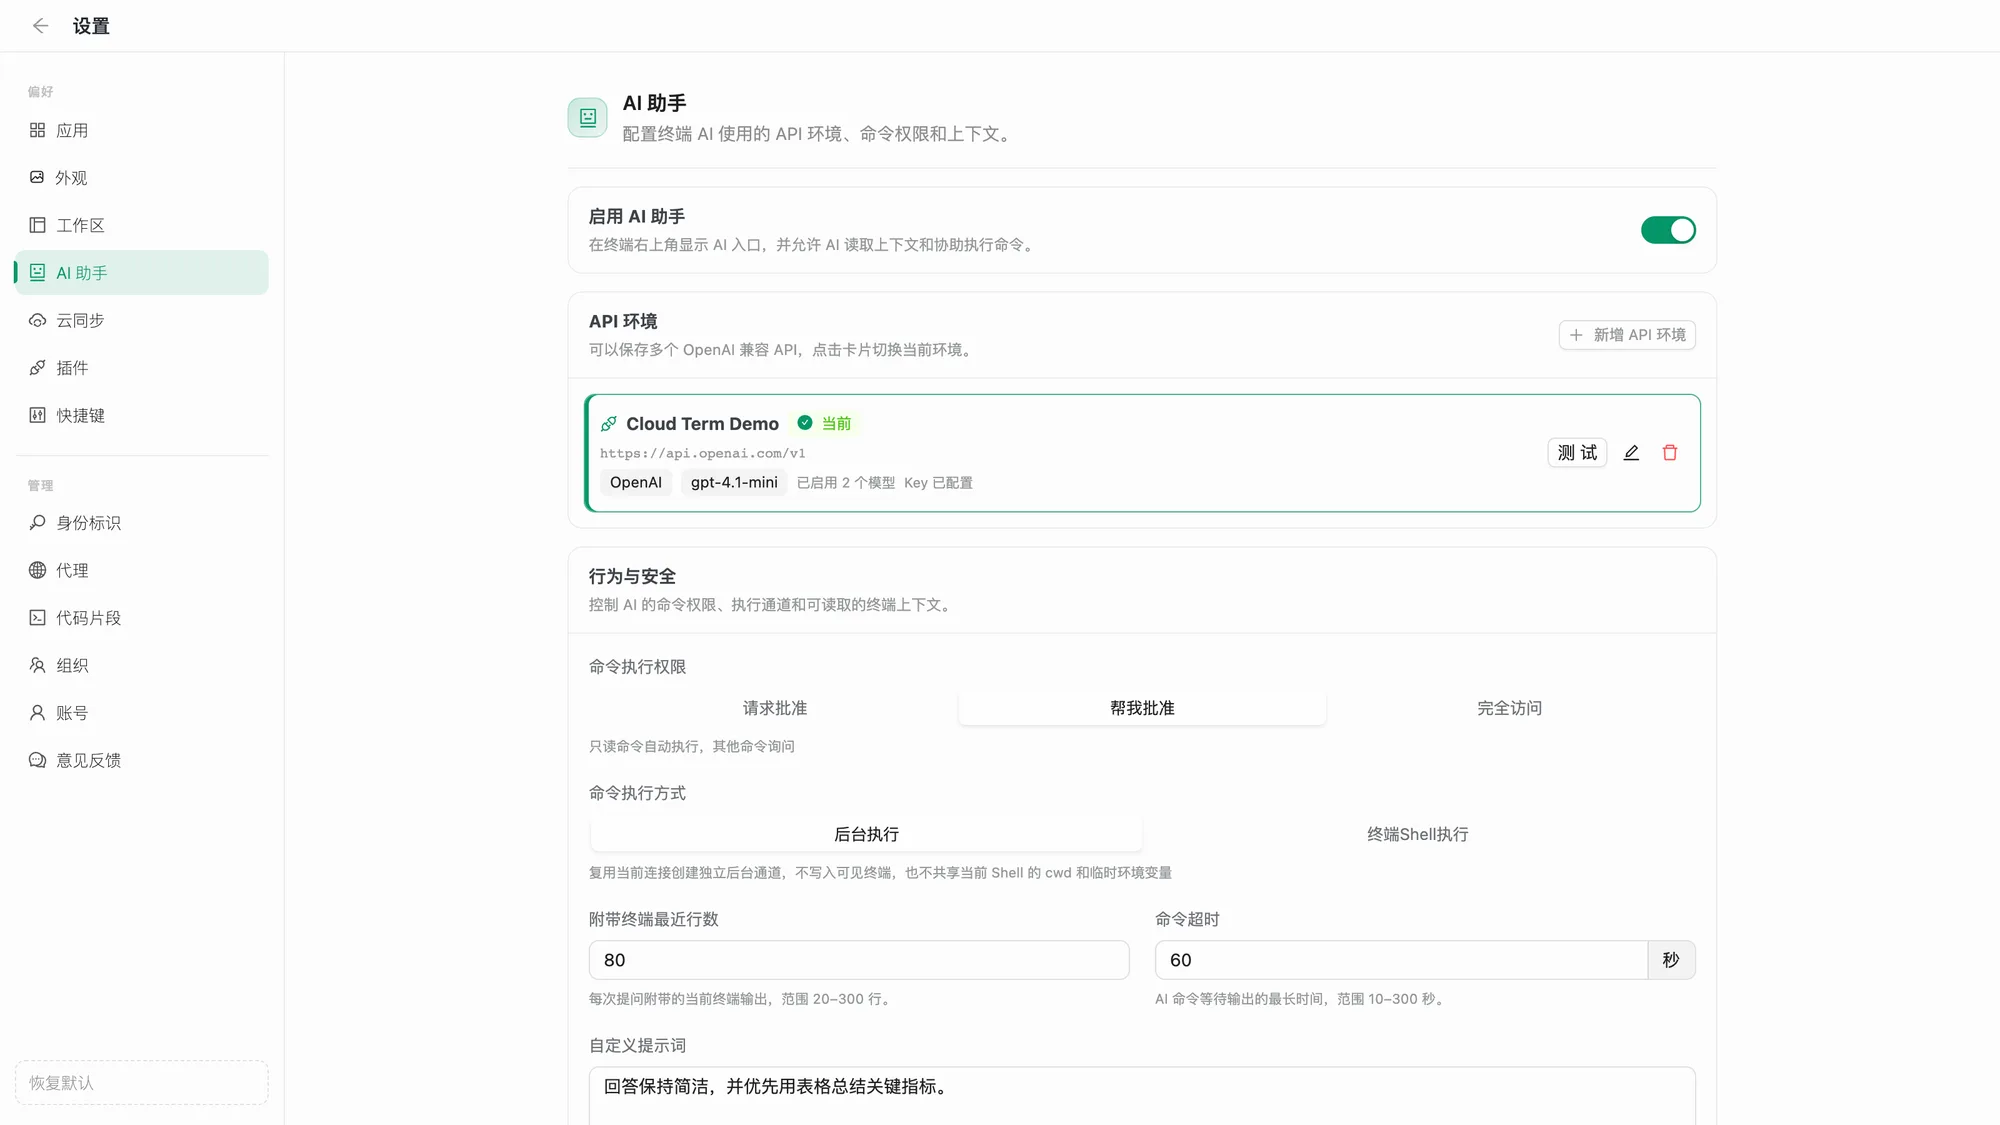
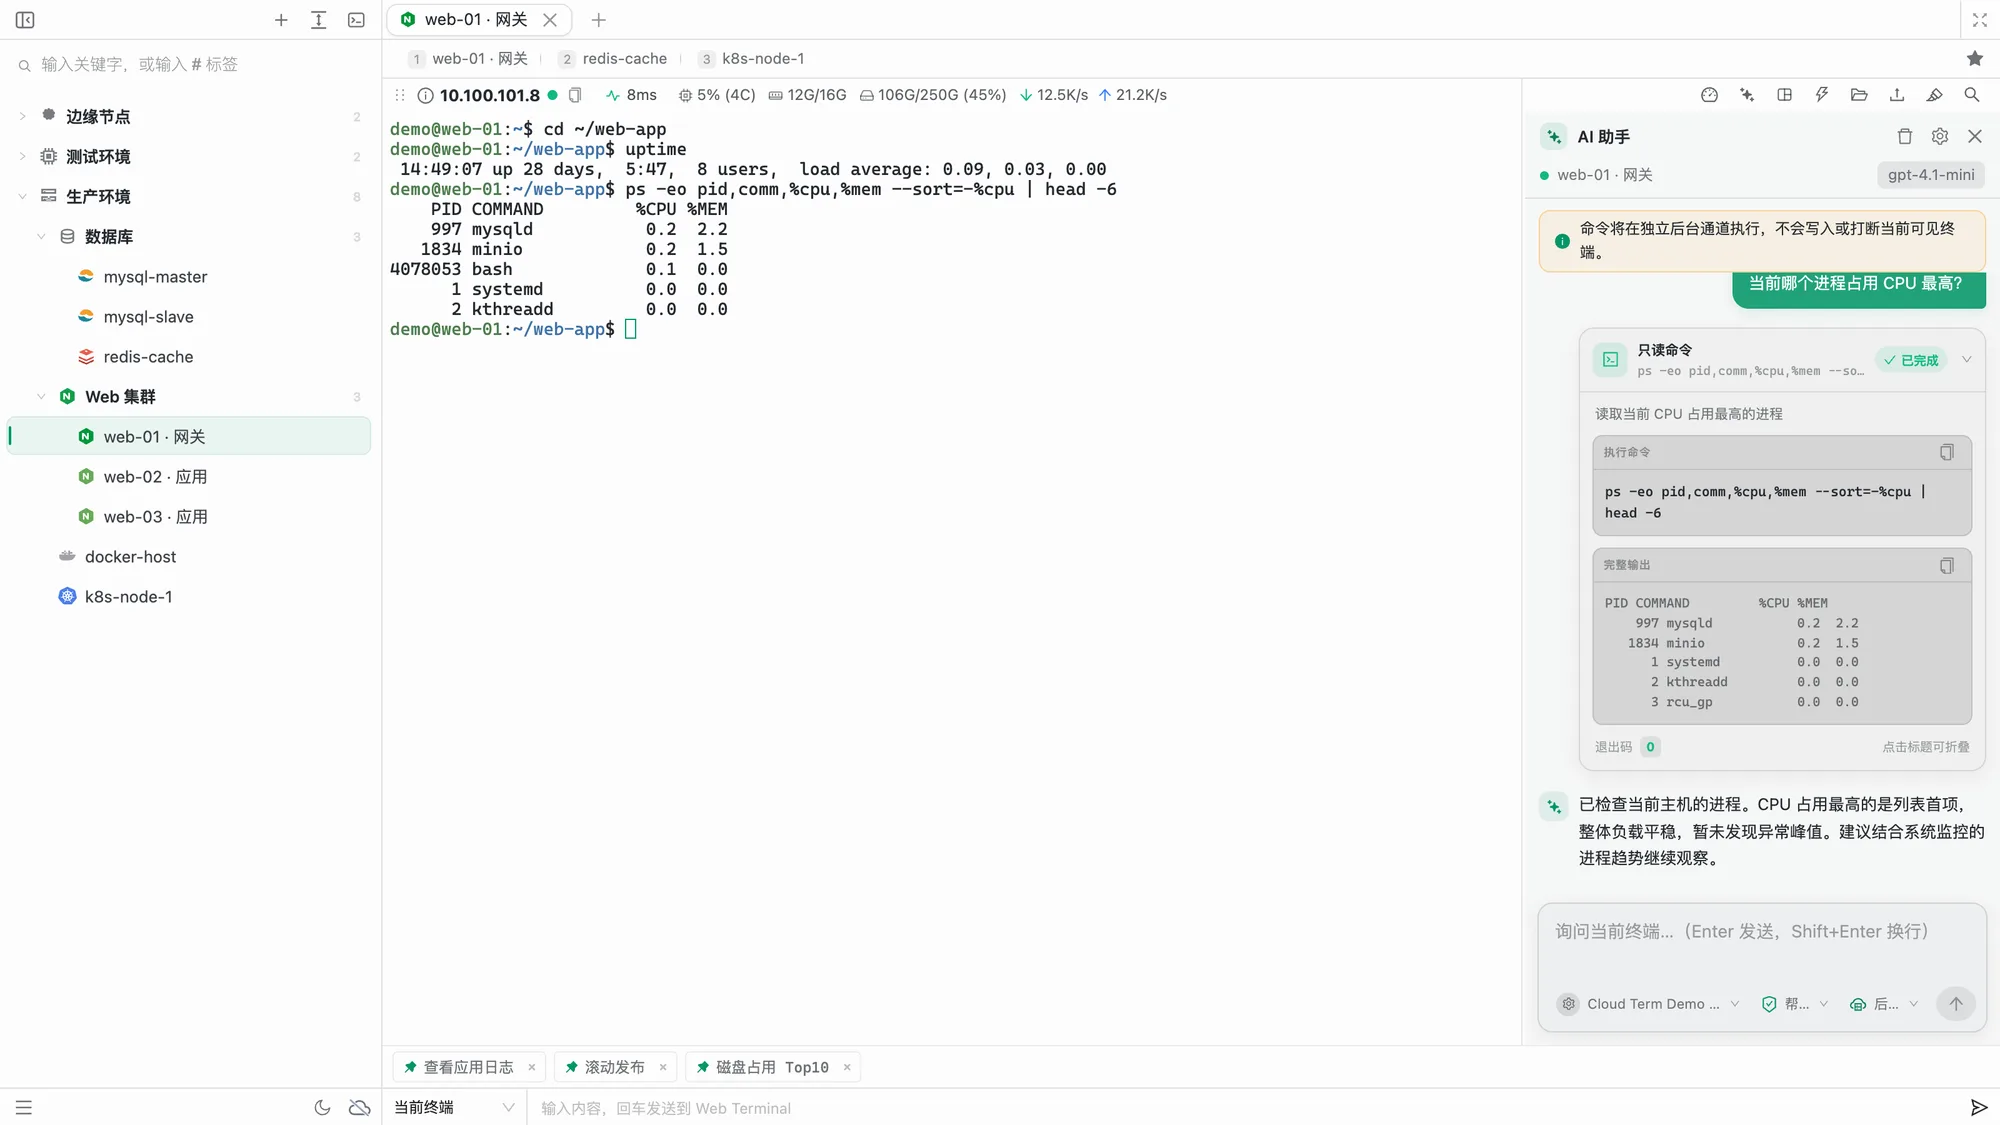
The AI button in the upper-right corner works with the current connection and terminal context. Ask questions such as “Which process uses the most CPU?” or “Where could I reclaim disk space?” When live host information is needed, the model proposes and runs a terminal command, then uses its full output to answer.
- Multiple API environments: save OpenAI, DeepSeek, Moonshot, OpenRouter, or any OpenAI Chat Completions-compatible endpoint, and fetch, enable, and switch models for each
- Two execution modes: background execution opens a separate channel on the current connection without interrupting the visible terminal; terminal shell execution shares the current
cwd, aliases, and temporary environment variables - Three permission levels: ask every time, automatically approve read-only commands, or full access. Commands whose safety cannot be established are treated as potentially modifying the system
- Context controls: configure the number of recent terminal lines to include, command timeouts, and custom instructions. Clear the conversation or stop a response at any time
- Credential storage: production Windows / macOS clients use system credential storage; the web app uses storage in the current browser. Enabling “App settings” in cloud sync includes AI environments and API keys in the end-to-end encrypted snapshot
| AI assistant settings | Context, commands, and results |
|---|---|
 |  |
Custom APIs used by the web app must allow browser requests through CORS. Desktop clients make native requests and are not subject to browser CORS restrictions.
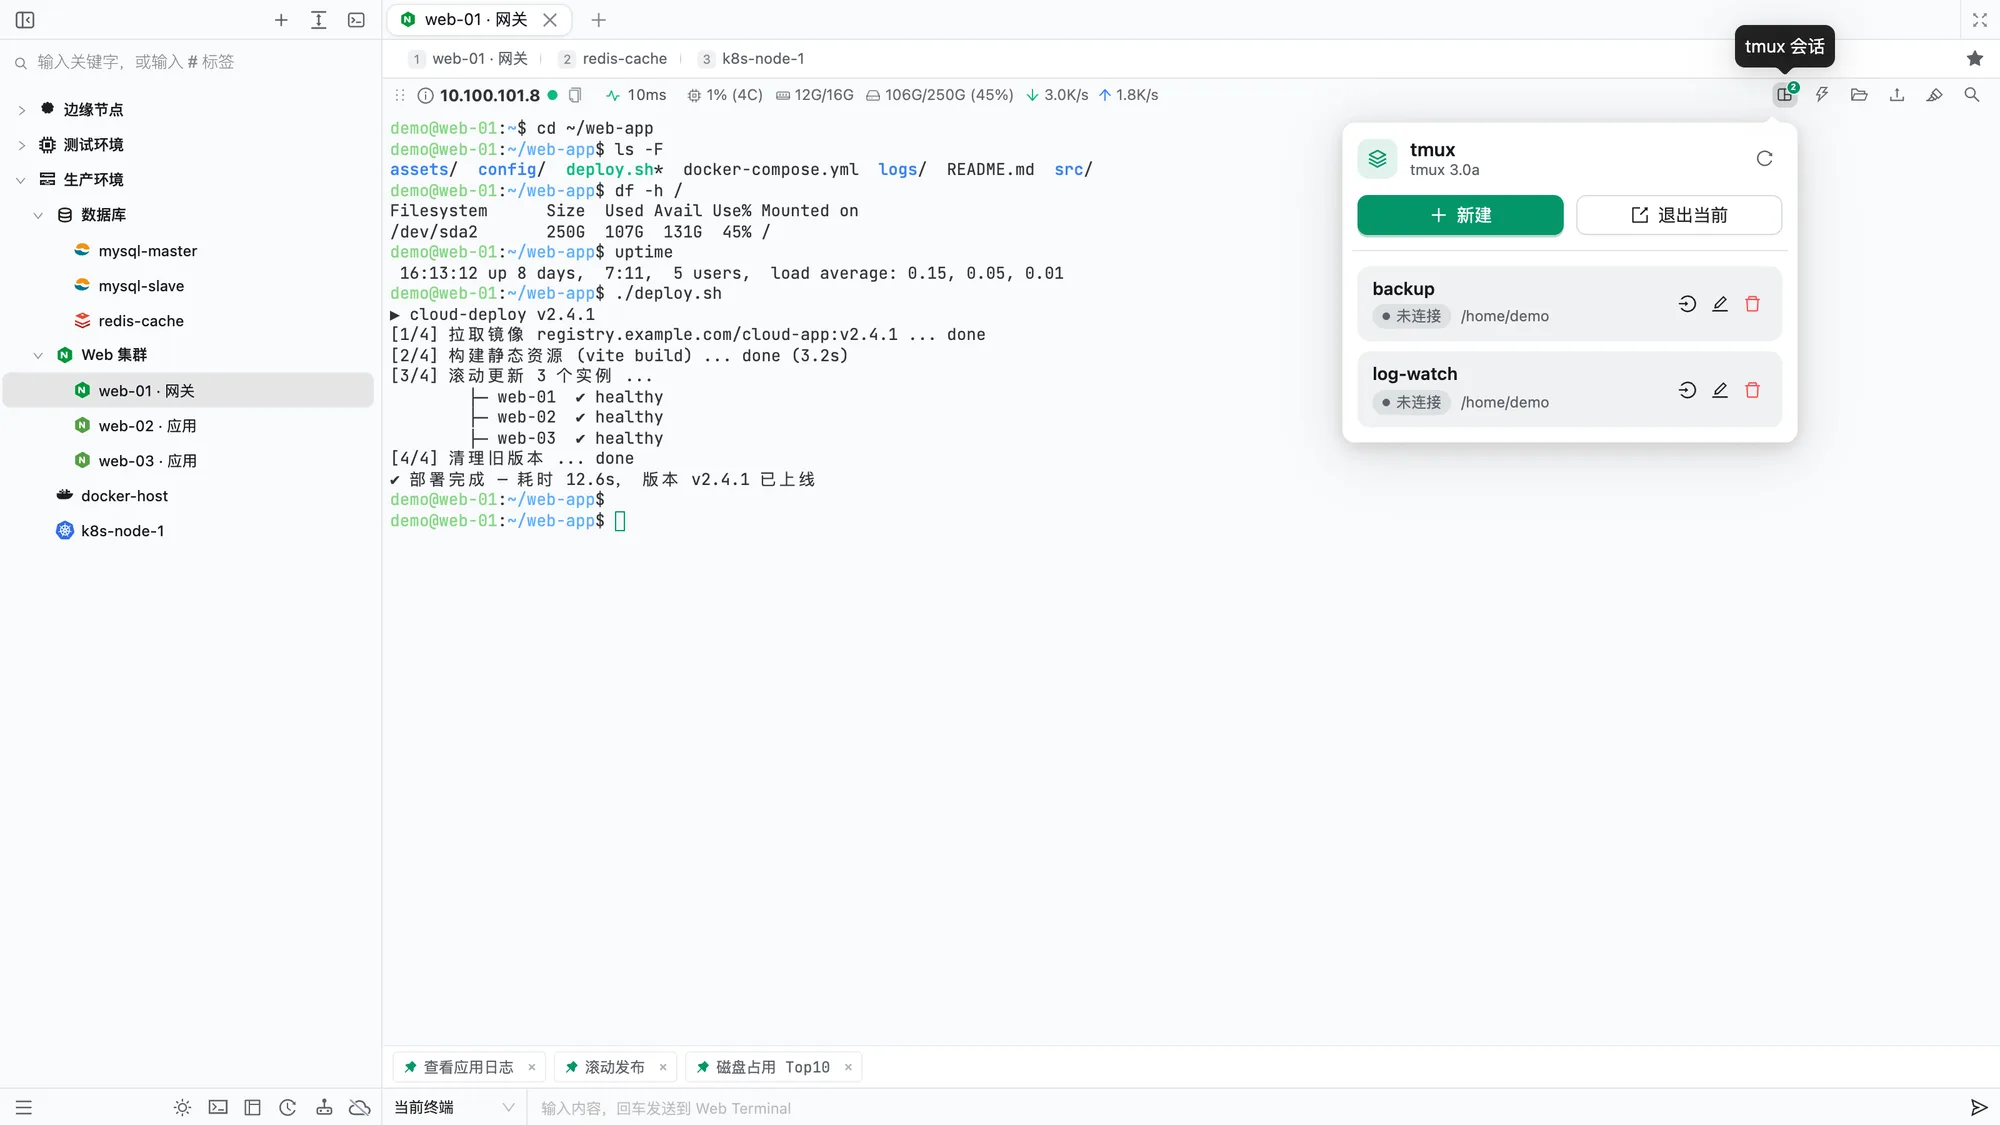
tmux session management
On remote hosts with tmux installed, use the terminal toolbar to list, create, attach, detach, rename, or kill sessions. This makes long-running tasks easier to manage across SSH disconnections.
Selection and context menus
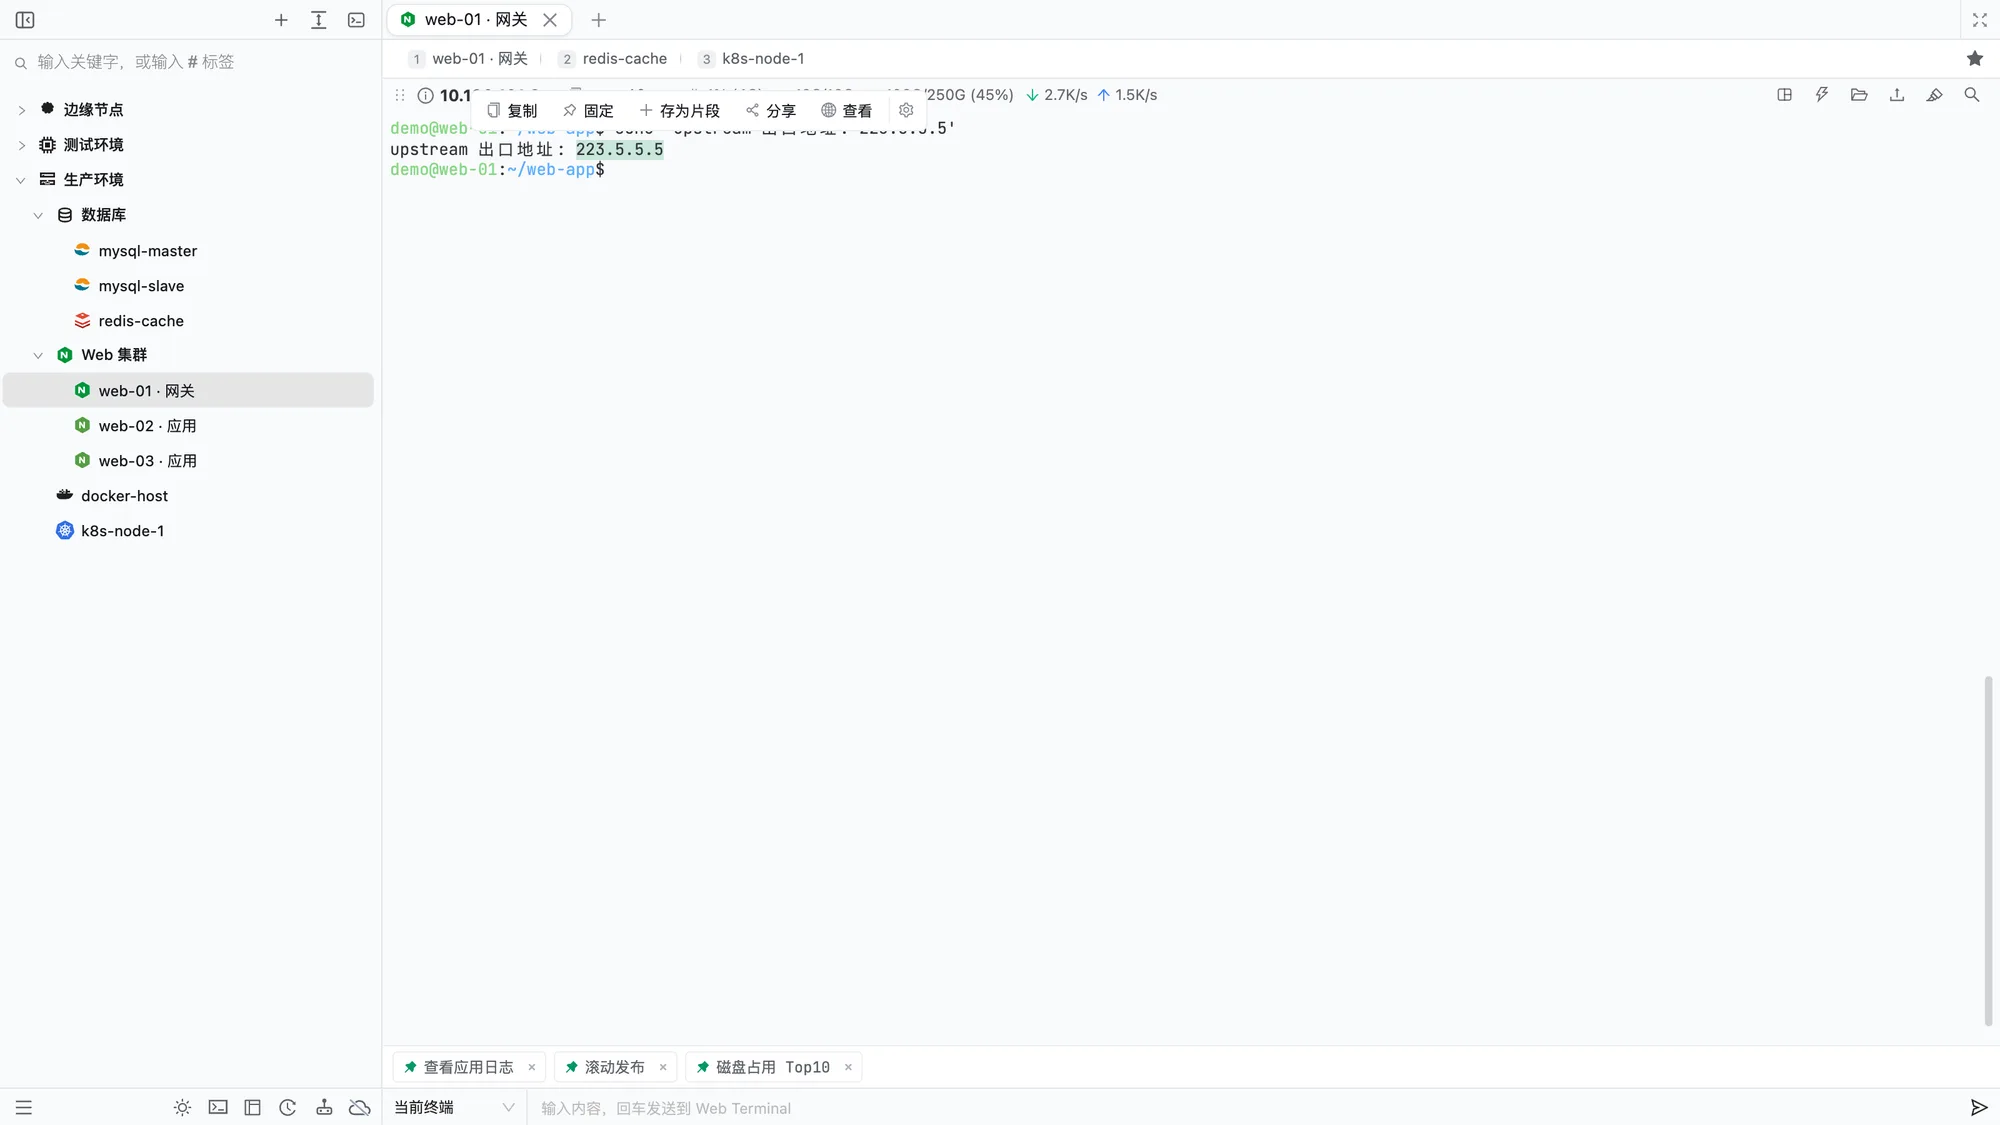
Selecting terminal text opens a quick menu with Copy, Pin, Save as snippet, and Share as image. With IP Lookup enabled, selecting an IP also offers “View”; with JSON Formatter enabled, selecting JSON offers “Format.” Choose which buttons appear in settings.
Right-clicking the terminal opens the full menu: copy, pin, save as snippet, share, paste, select all, open FTP here, and open in a pop-out window. The menu avoids window edges, opening upward or leftward as needed to remain visible.
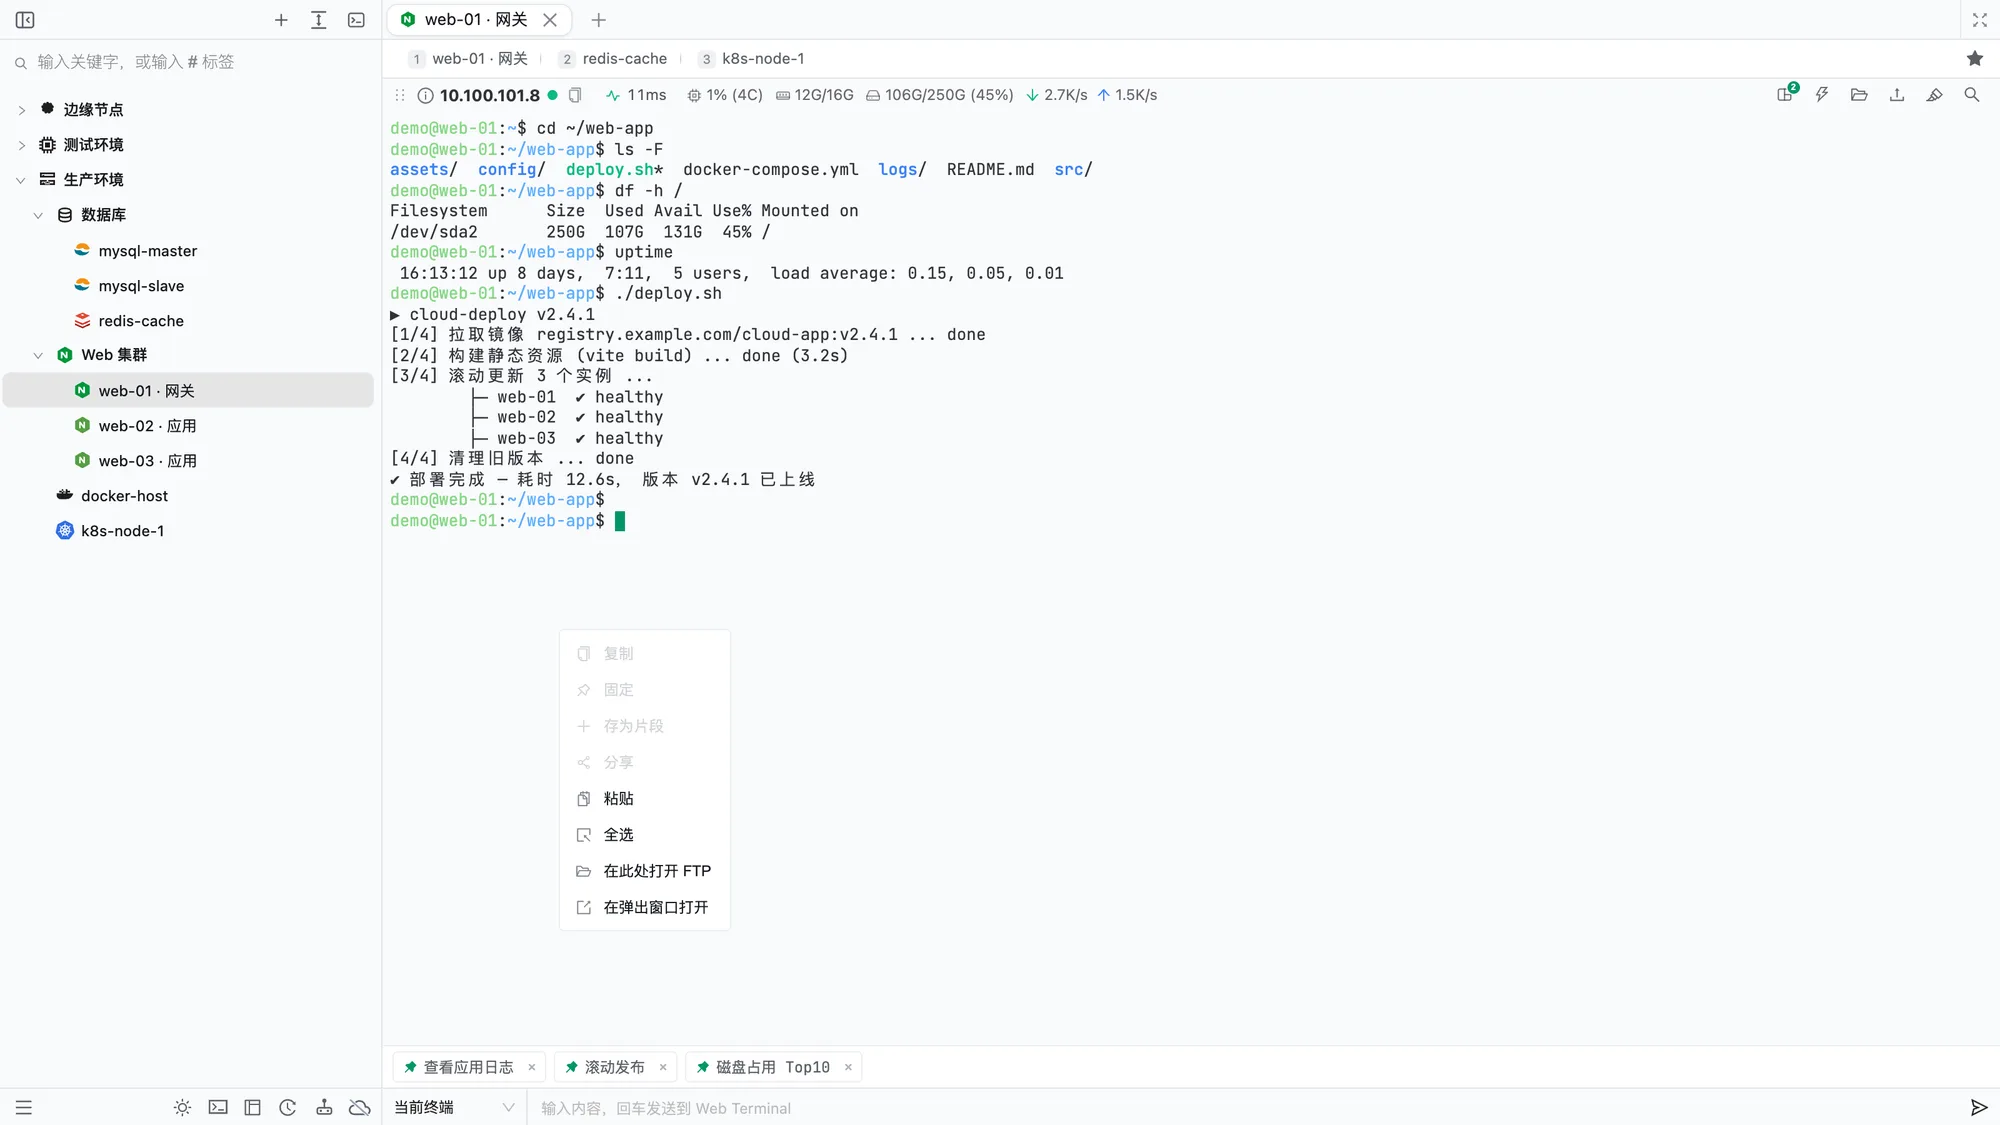
Right-click paste is disabled by default in newer versions, so right-click opens this menu. Enable it in Settings → Workspace → Terminal interaction if you prefer pasting on right-click.
Share as an image
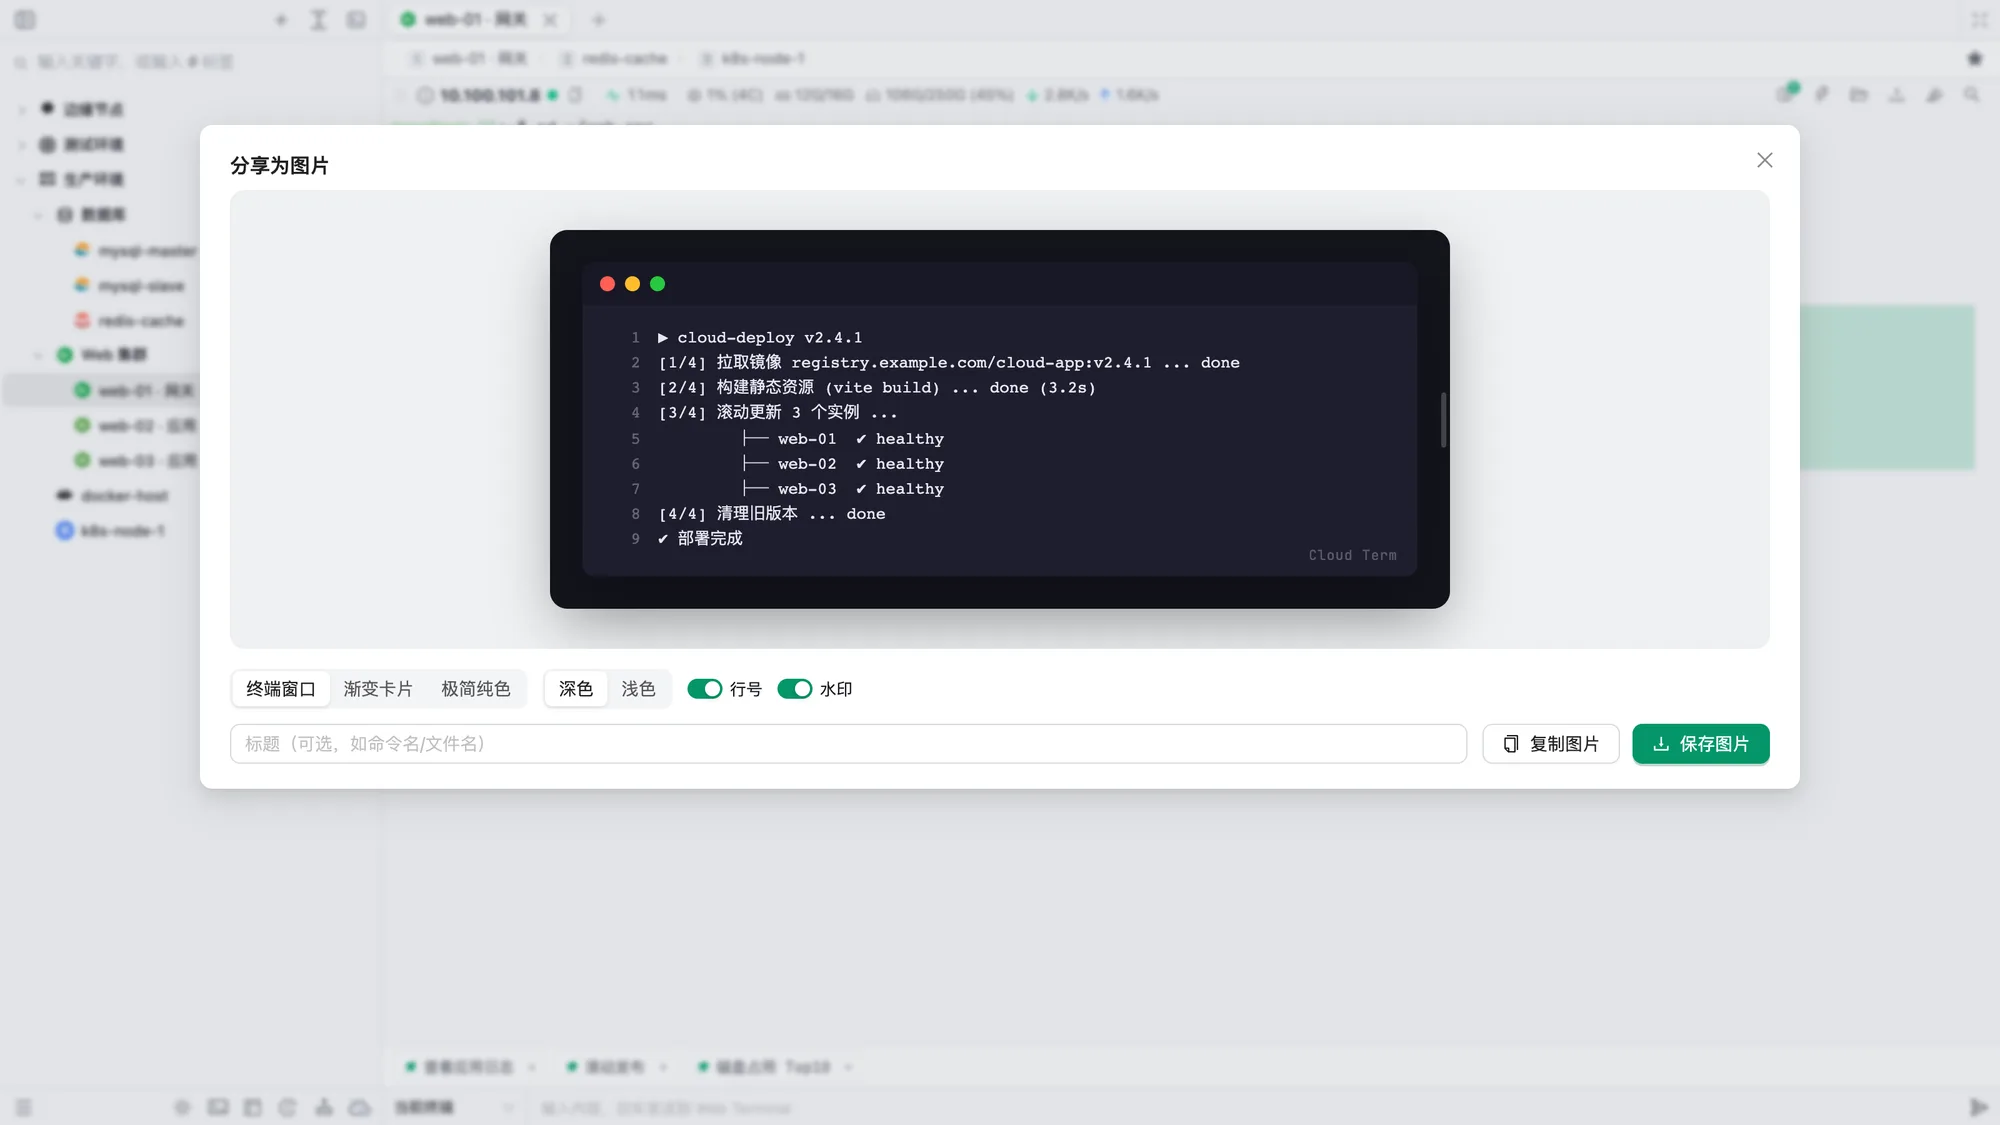
Selections become an editable code card: the language is detected and highlighted automatically (switch among 36 languages), and you can edit the text and title, add highlighter marks, or change text colors in the preview. Choose a template, light / dark colors, optional line numbers and watermark, then copy or save the image to share command output in chats or documents.
Search and keyword highlighting
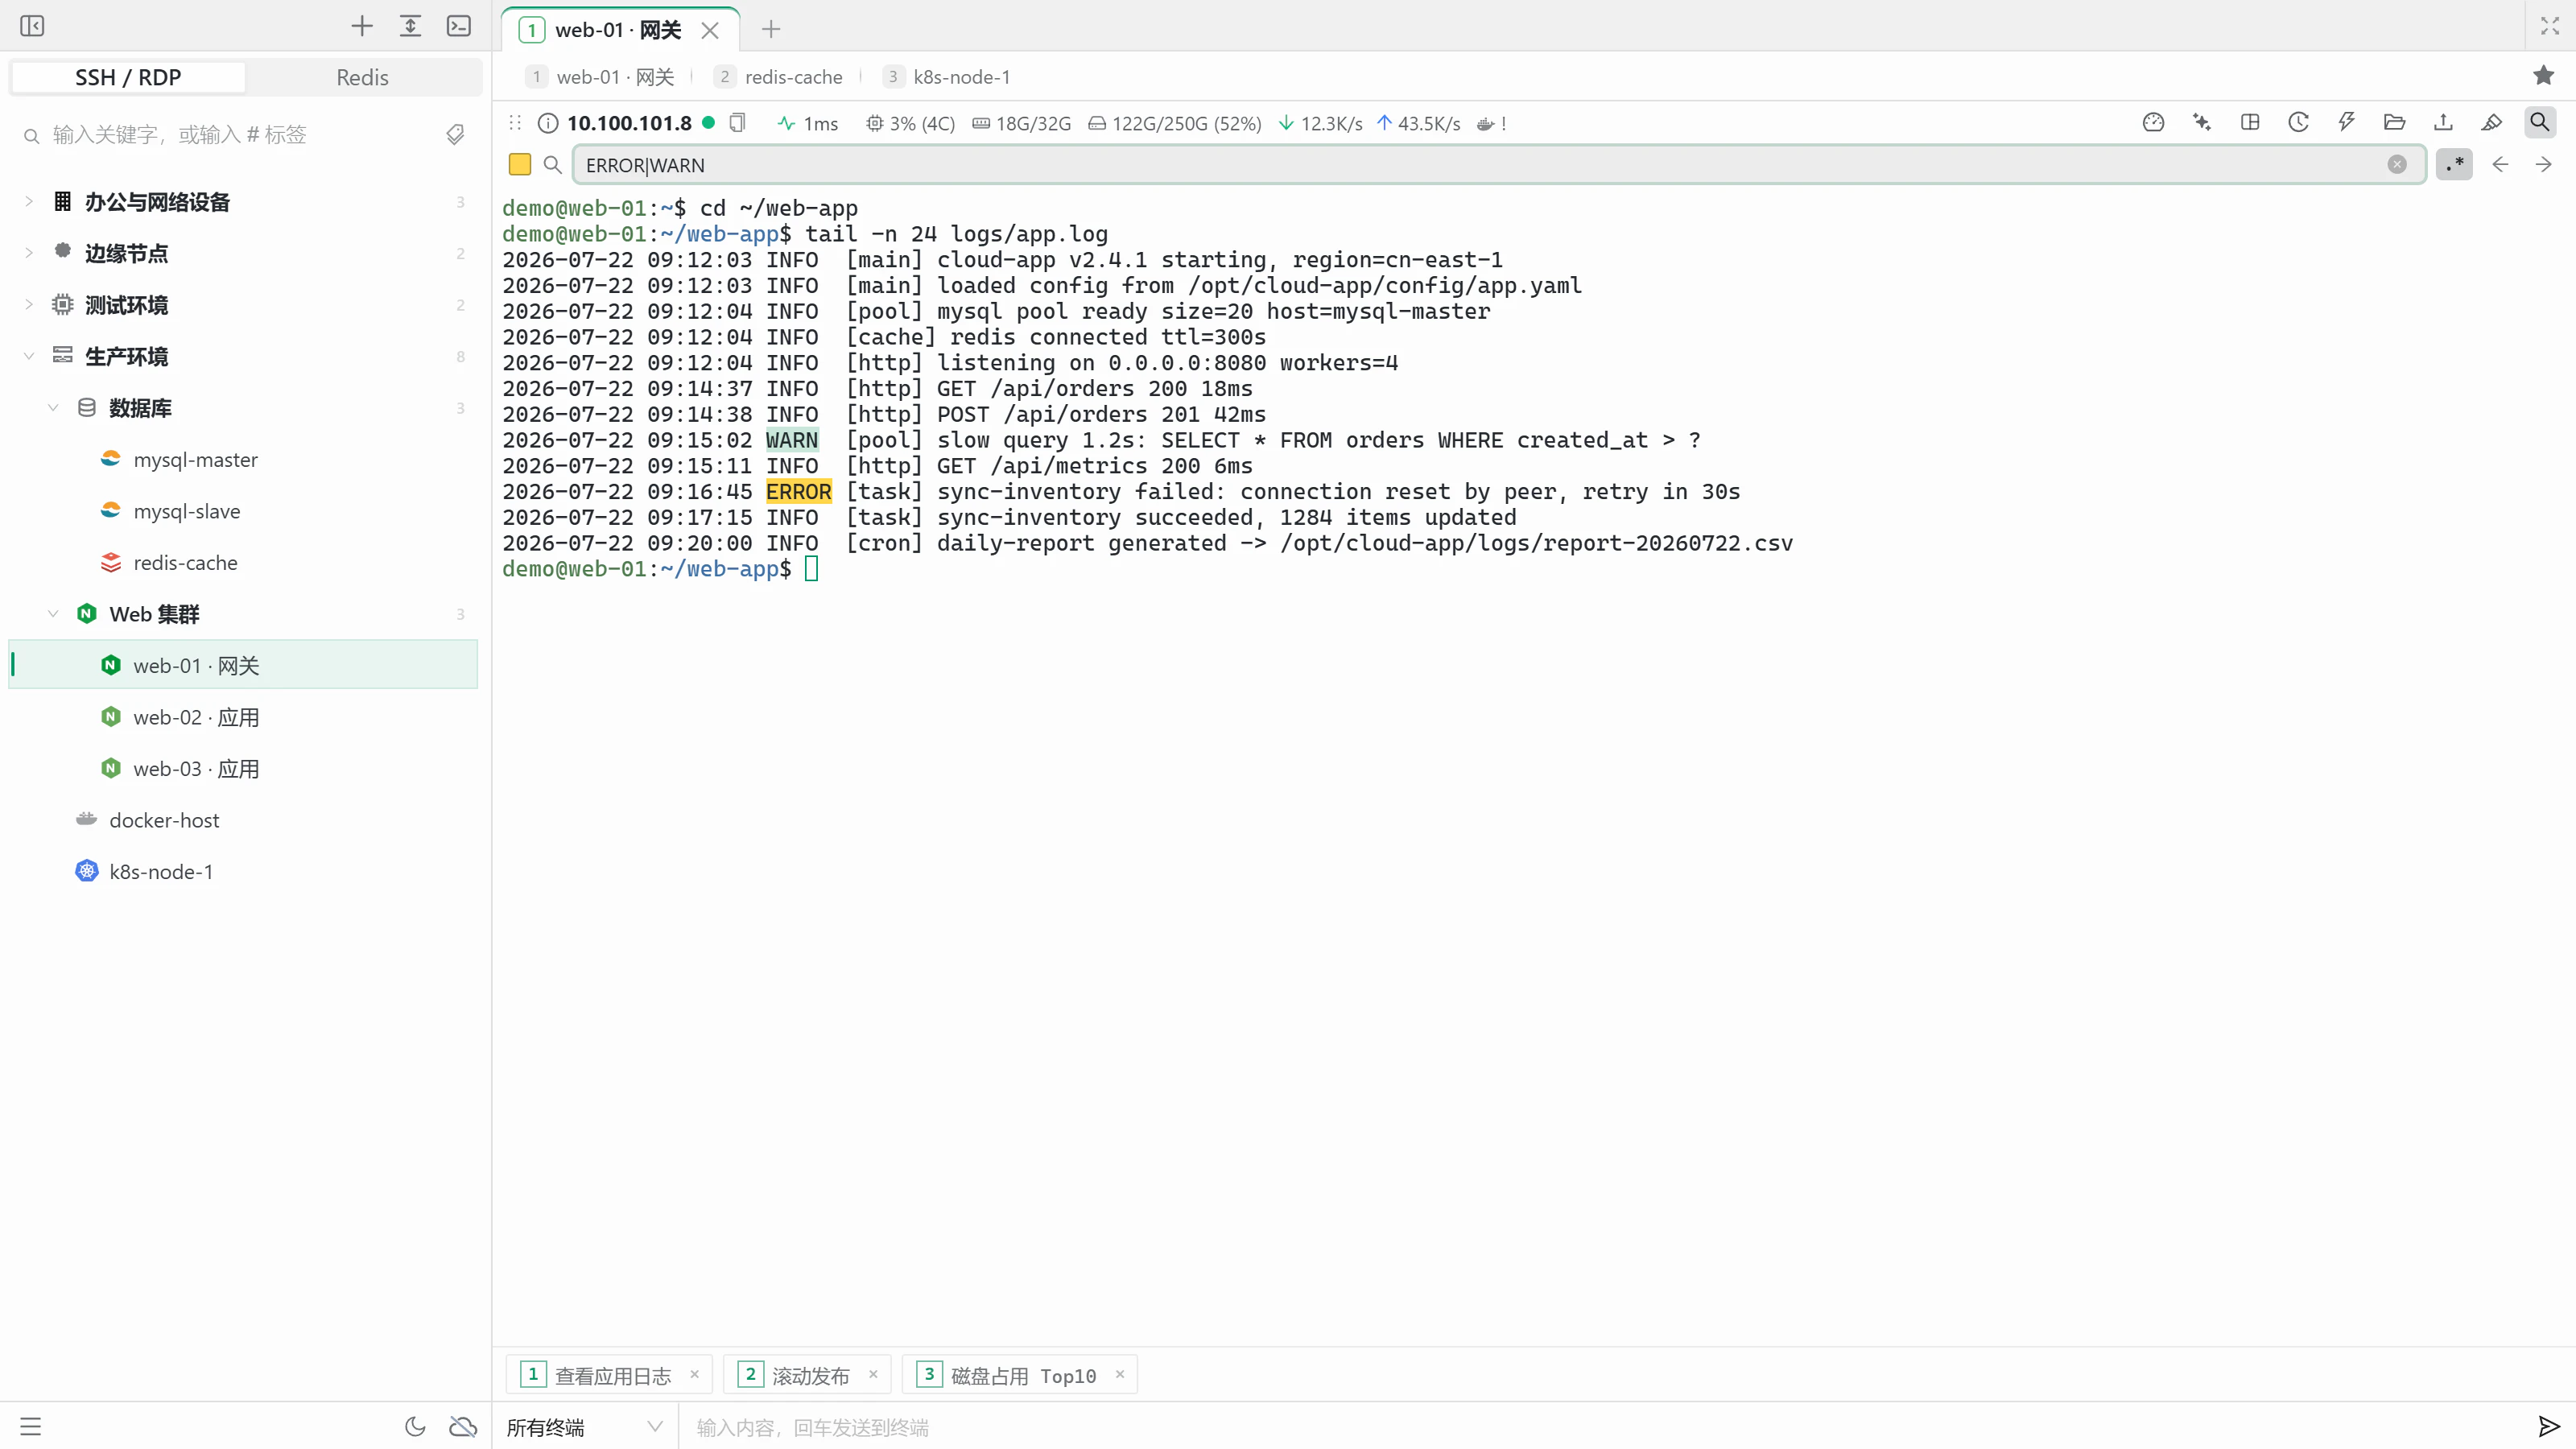
- Terminal search: select the search button in the status bar or press the search shortcut (Cloud Term preset:
Ctrl+Fon Windows,⌘Fon macOS). Selected text is filled in automatically - Regular expressions: turn on
.*to highlight several keywords at once, such aserror|warn|fail; the choice is remembered. Invalid expressions show an error and clear old highlights - Keyword highlight rules: save global rules or rules for the current host only (host rules take priority), using JavaScript regular expressions or
/pattern/flags. Hover a highlight to see the rule name and scope
Input and paste
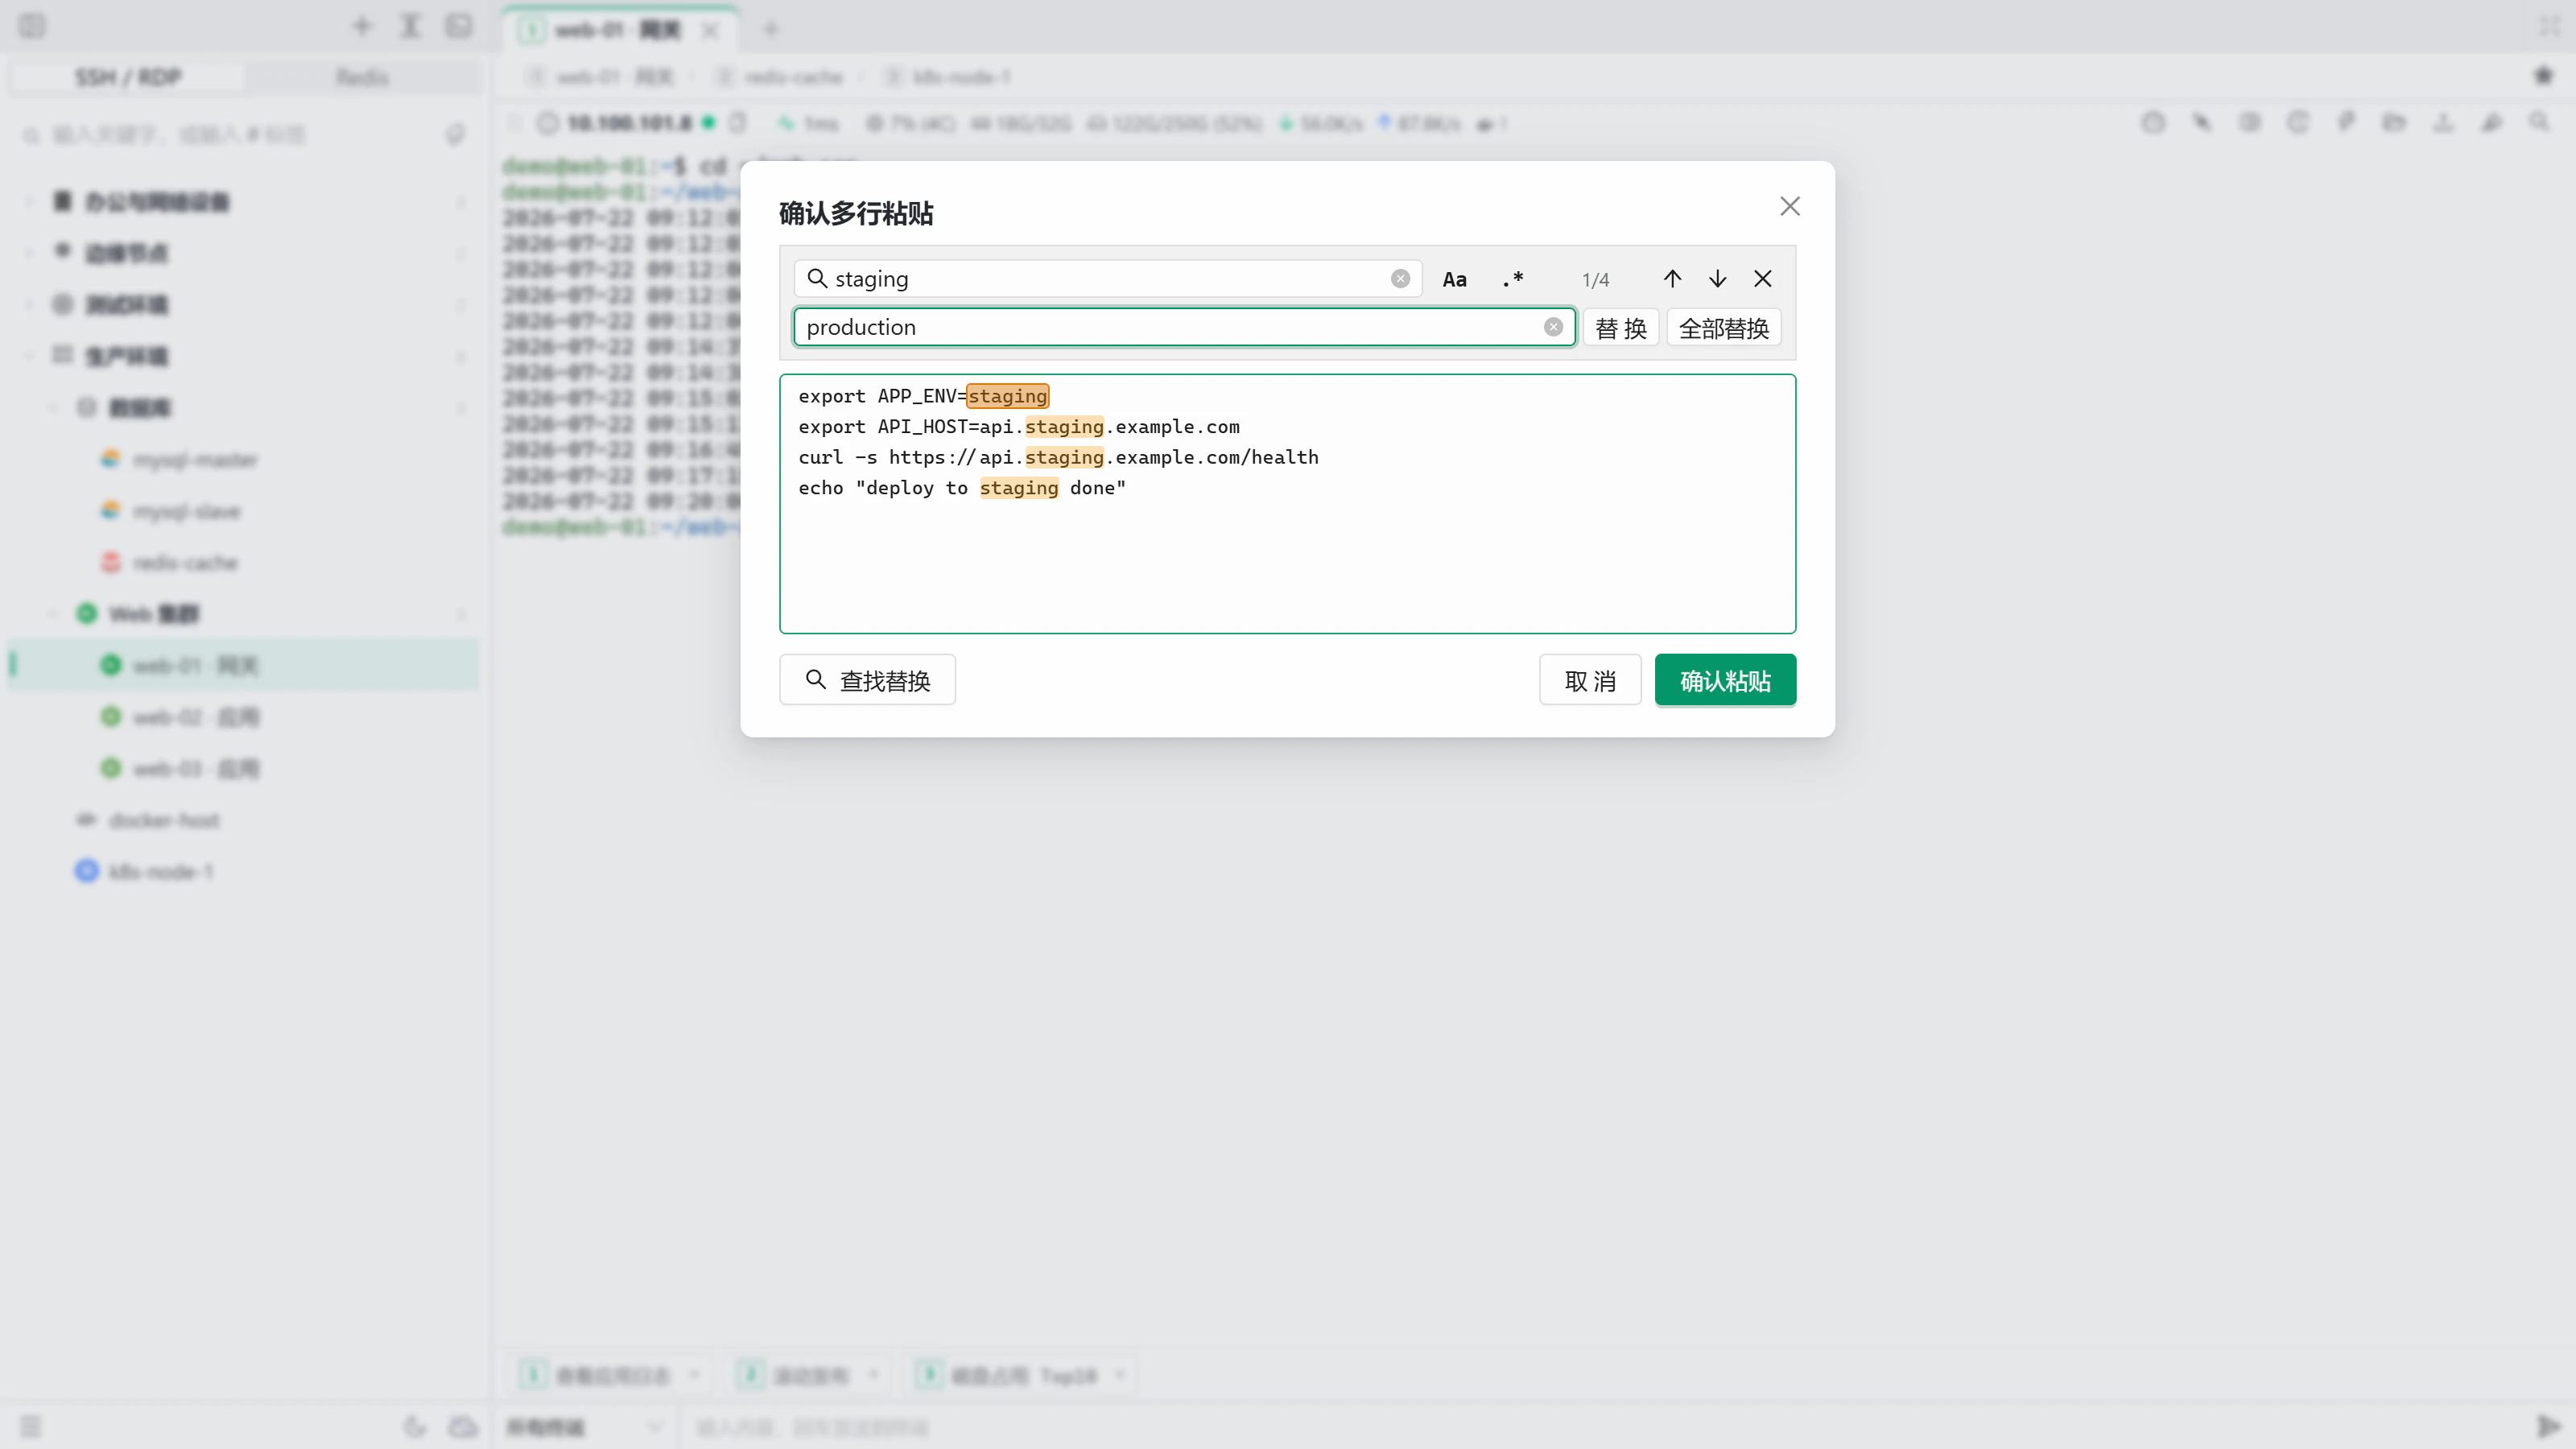
- Multiline paste confirmation: pasting more than two lines opens an editor for confirmation to avoid accidental execution. Select “Find and replace” or press
Ctrl/⌘+Fto find andCtrl+H(⌥⌘Fon macOS) to replace, with case-sensitive and regular expression options (use$1for groups) and Replace all. Changes apply only to the text being pasted - Optional right-click paste and copy on selection, both disabled by default in newer versions
- Link recognition:
Cmd/Ctrl+clickopens URLs from the terminal - Desktop apps can automatically switch the system input method to English when focusing the terminal, preventing a Chinese input method from intercepting shortcuts
File transfers
- Drag-and-drop upload: drop files into the terminal to upload to the current directory. Configure a per-file size limit and whether to hide echo during upload. Later batches queue behind a running transfer in the same terminal; close a task card to cancel it
- ZMODEM: use
rz/szwith lrzsz installed on the remote host (you are told immediately if it is missing); focus returns to the terminal after a transfer - Live progress: task cards show file number / total, transferred / total size, and current speed, and distinguish preparing, transferring, saving, completed, and failed
szdestination: choose a folder for the whole batch before downloading; existing names get a number appended. Desktop apps can remember the folder, set a default, and open it automatically or ask when the download finishes- If an upload conflicts with an existing file, overwrite it or keep both with automatic renaming
Remote file management (SFTP)
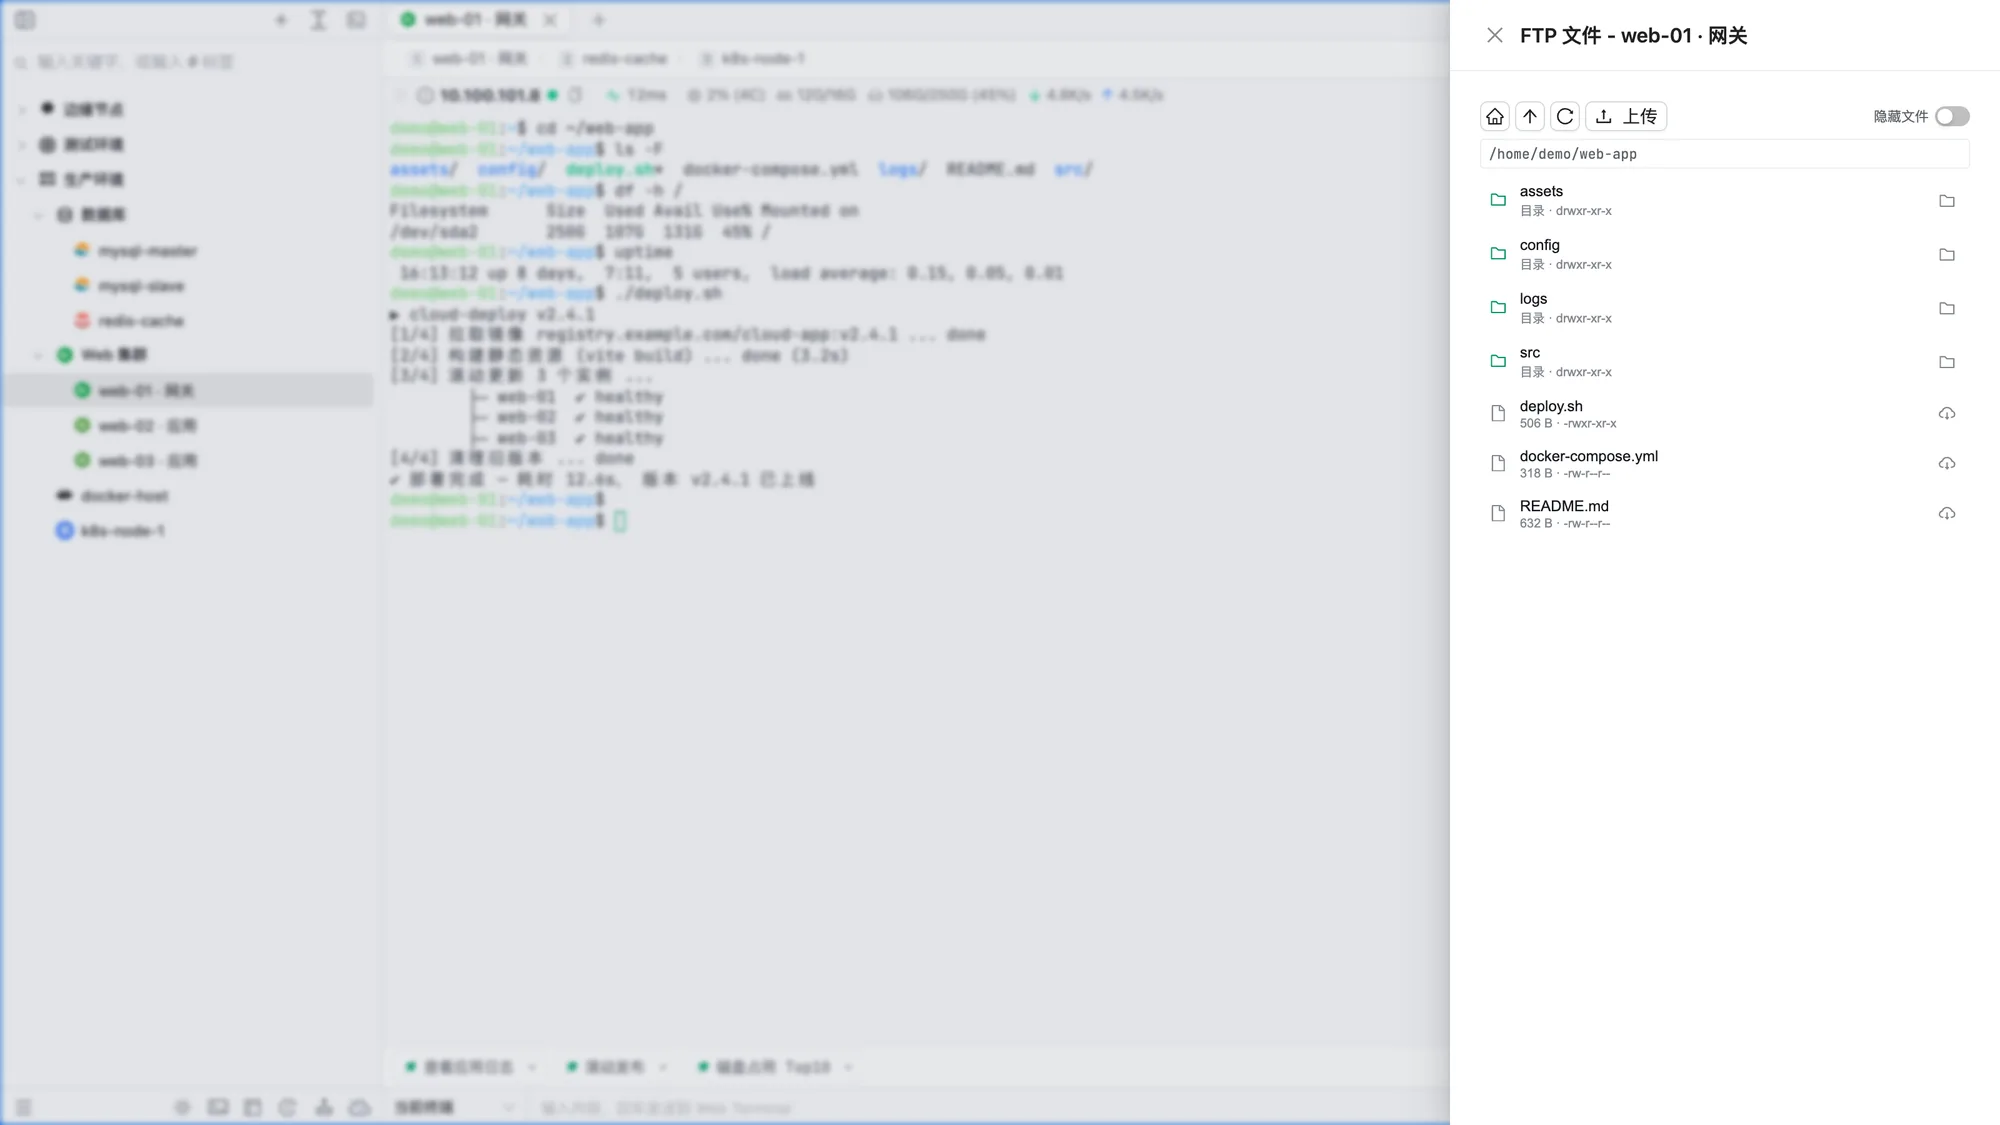
Select the Files button in the terminal status bar (Cloud Term shortcut preset: Alt+S on Windows, ⌘⇧S on macOS), or choose “Open FTP here” from the context menu:
- Edit the path directly, jump to the home or parent directory, and show or hide hidden files
- Enable directory tracking to follow the shell's
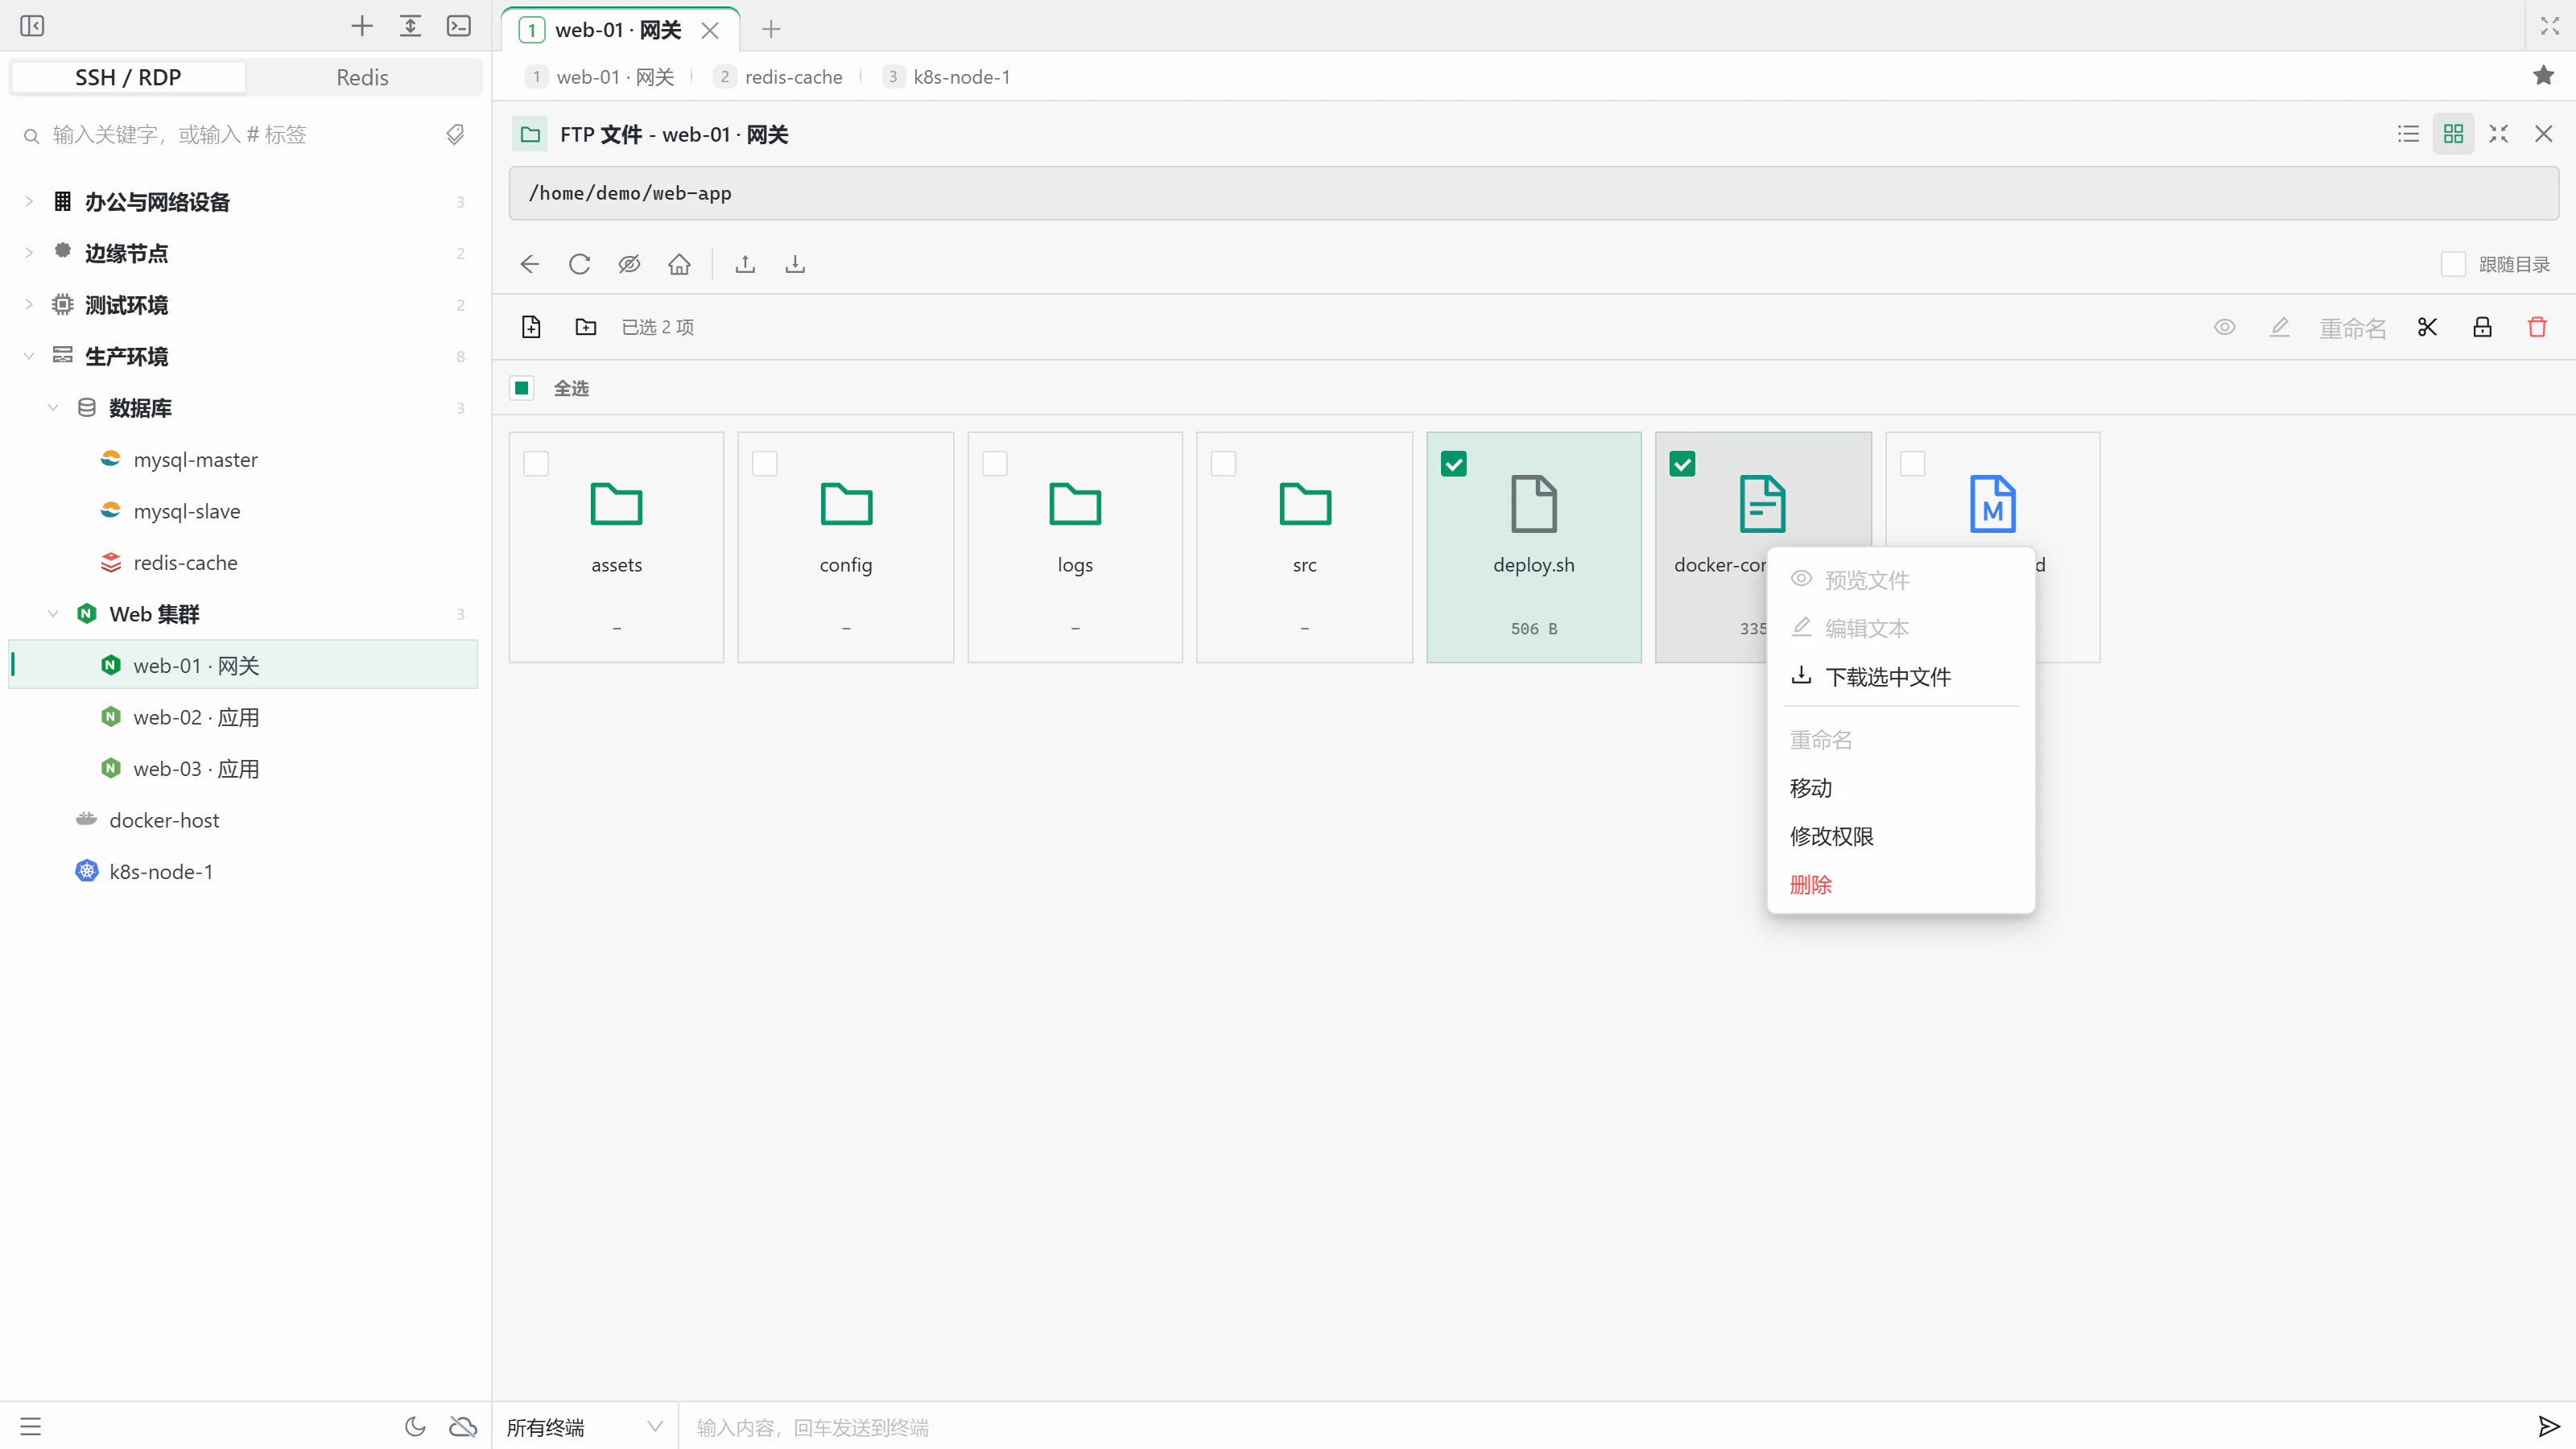
cwd. If Bash does not report its directory, you can opt to configurePROMPT_COMMANDin~/.bashrcautomatically - Switch between list and grid views, or go full screen within the terminal area without covering the tab bar or other split panes; press
Escto exit - File operations: create files and folders, rename, move, delete, and change octal permissions, with multi-select, context menus, and per-item results. Deletes and recursive changes ask first, and create / rename / move never overwrite existing items
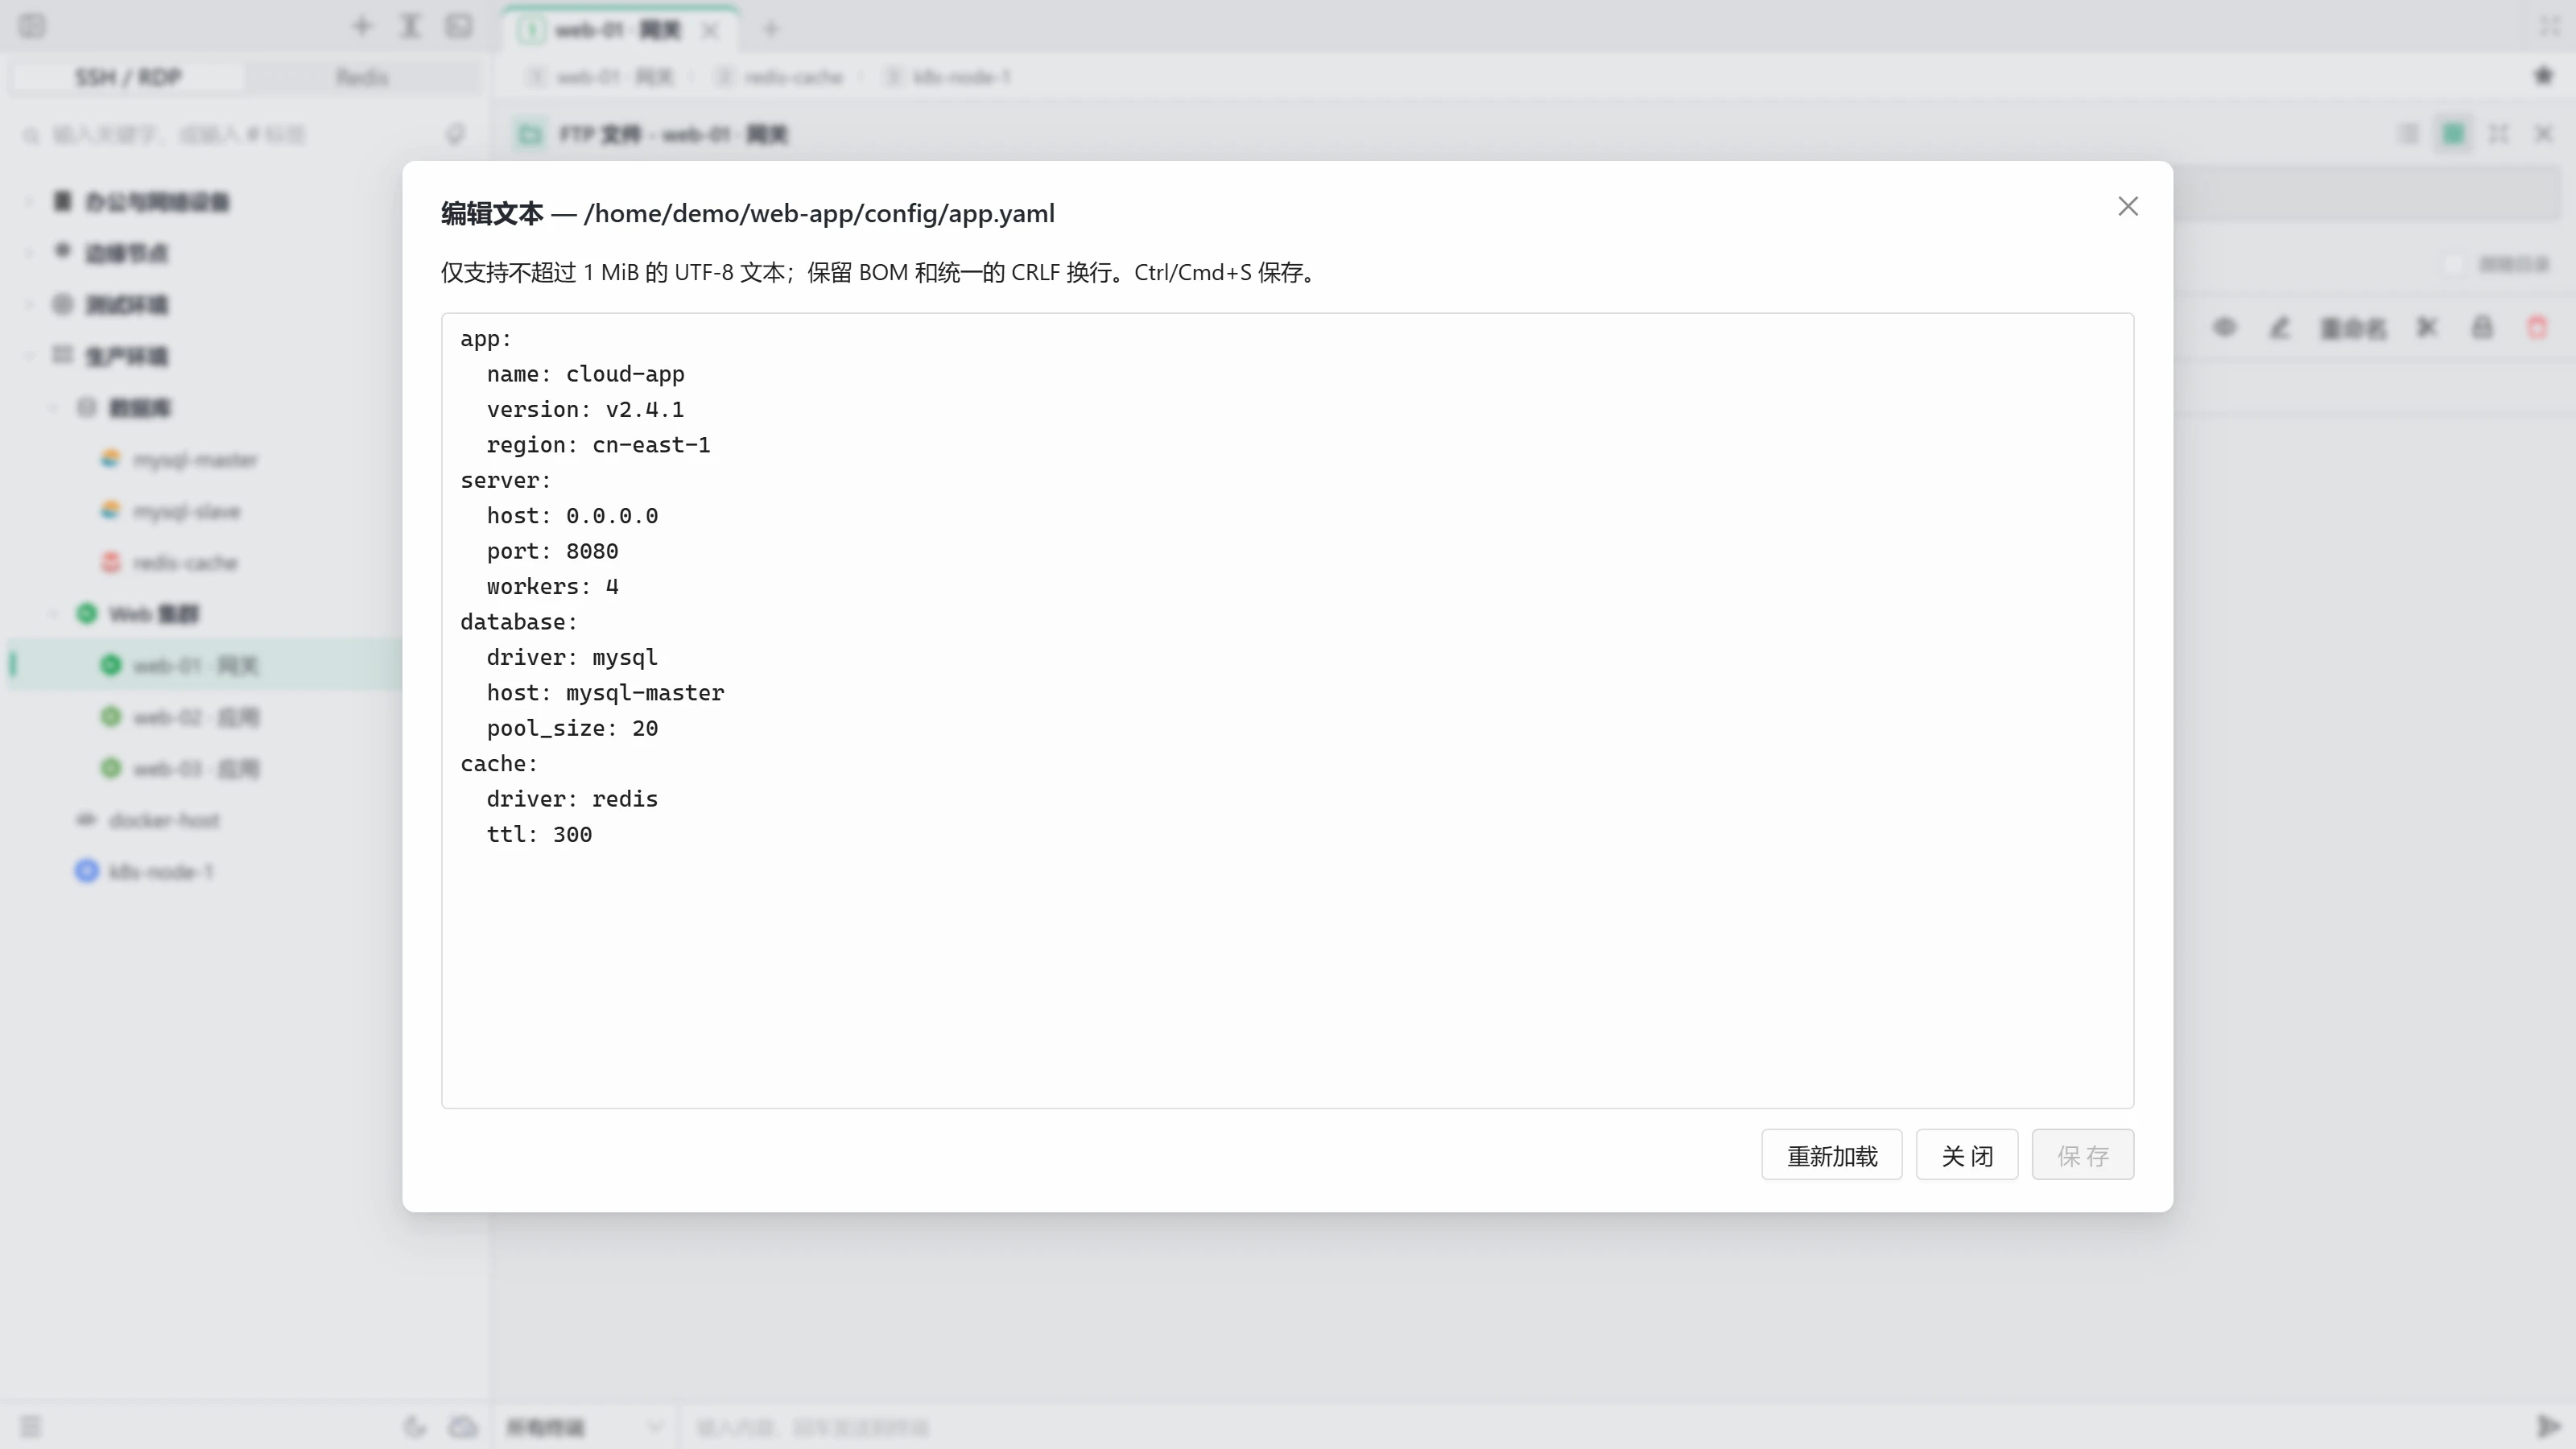
- Online editing: open UTF-8 text files up to 1 MiB and save with
Ctrl/Cmd+S. Before saving, Cloud Term checks whether the server copy changed; on conflicts it keeps your draft and lets you compare side by side - Select multiple files or all files and download in batches, with upload / download progress and results; large files download in chunks to save memory
- Reuse the SFTP connection for the panel's lifetime, avoiding another SSH handshake on each directory change
| Grid view, multi-select, and context menu | Editing a remote file |
|---|---|
 |  |
SSH tunnels
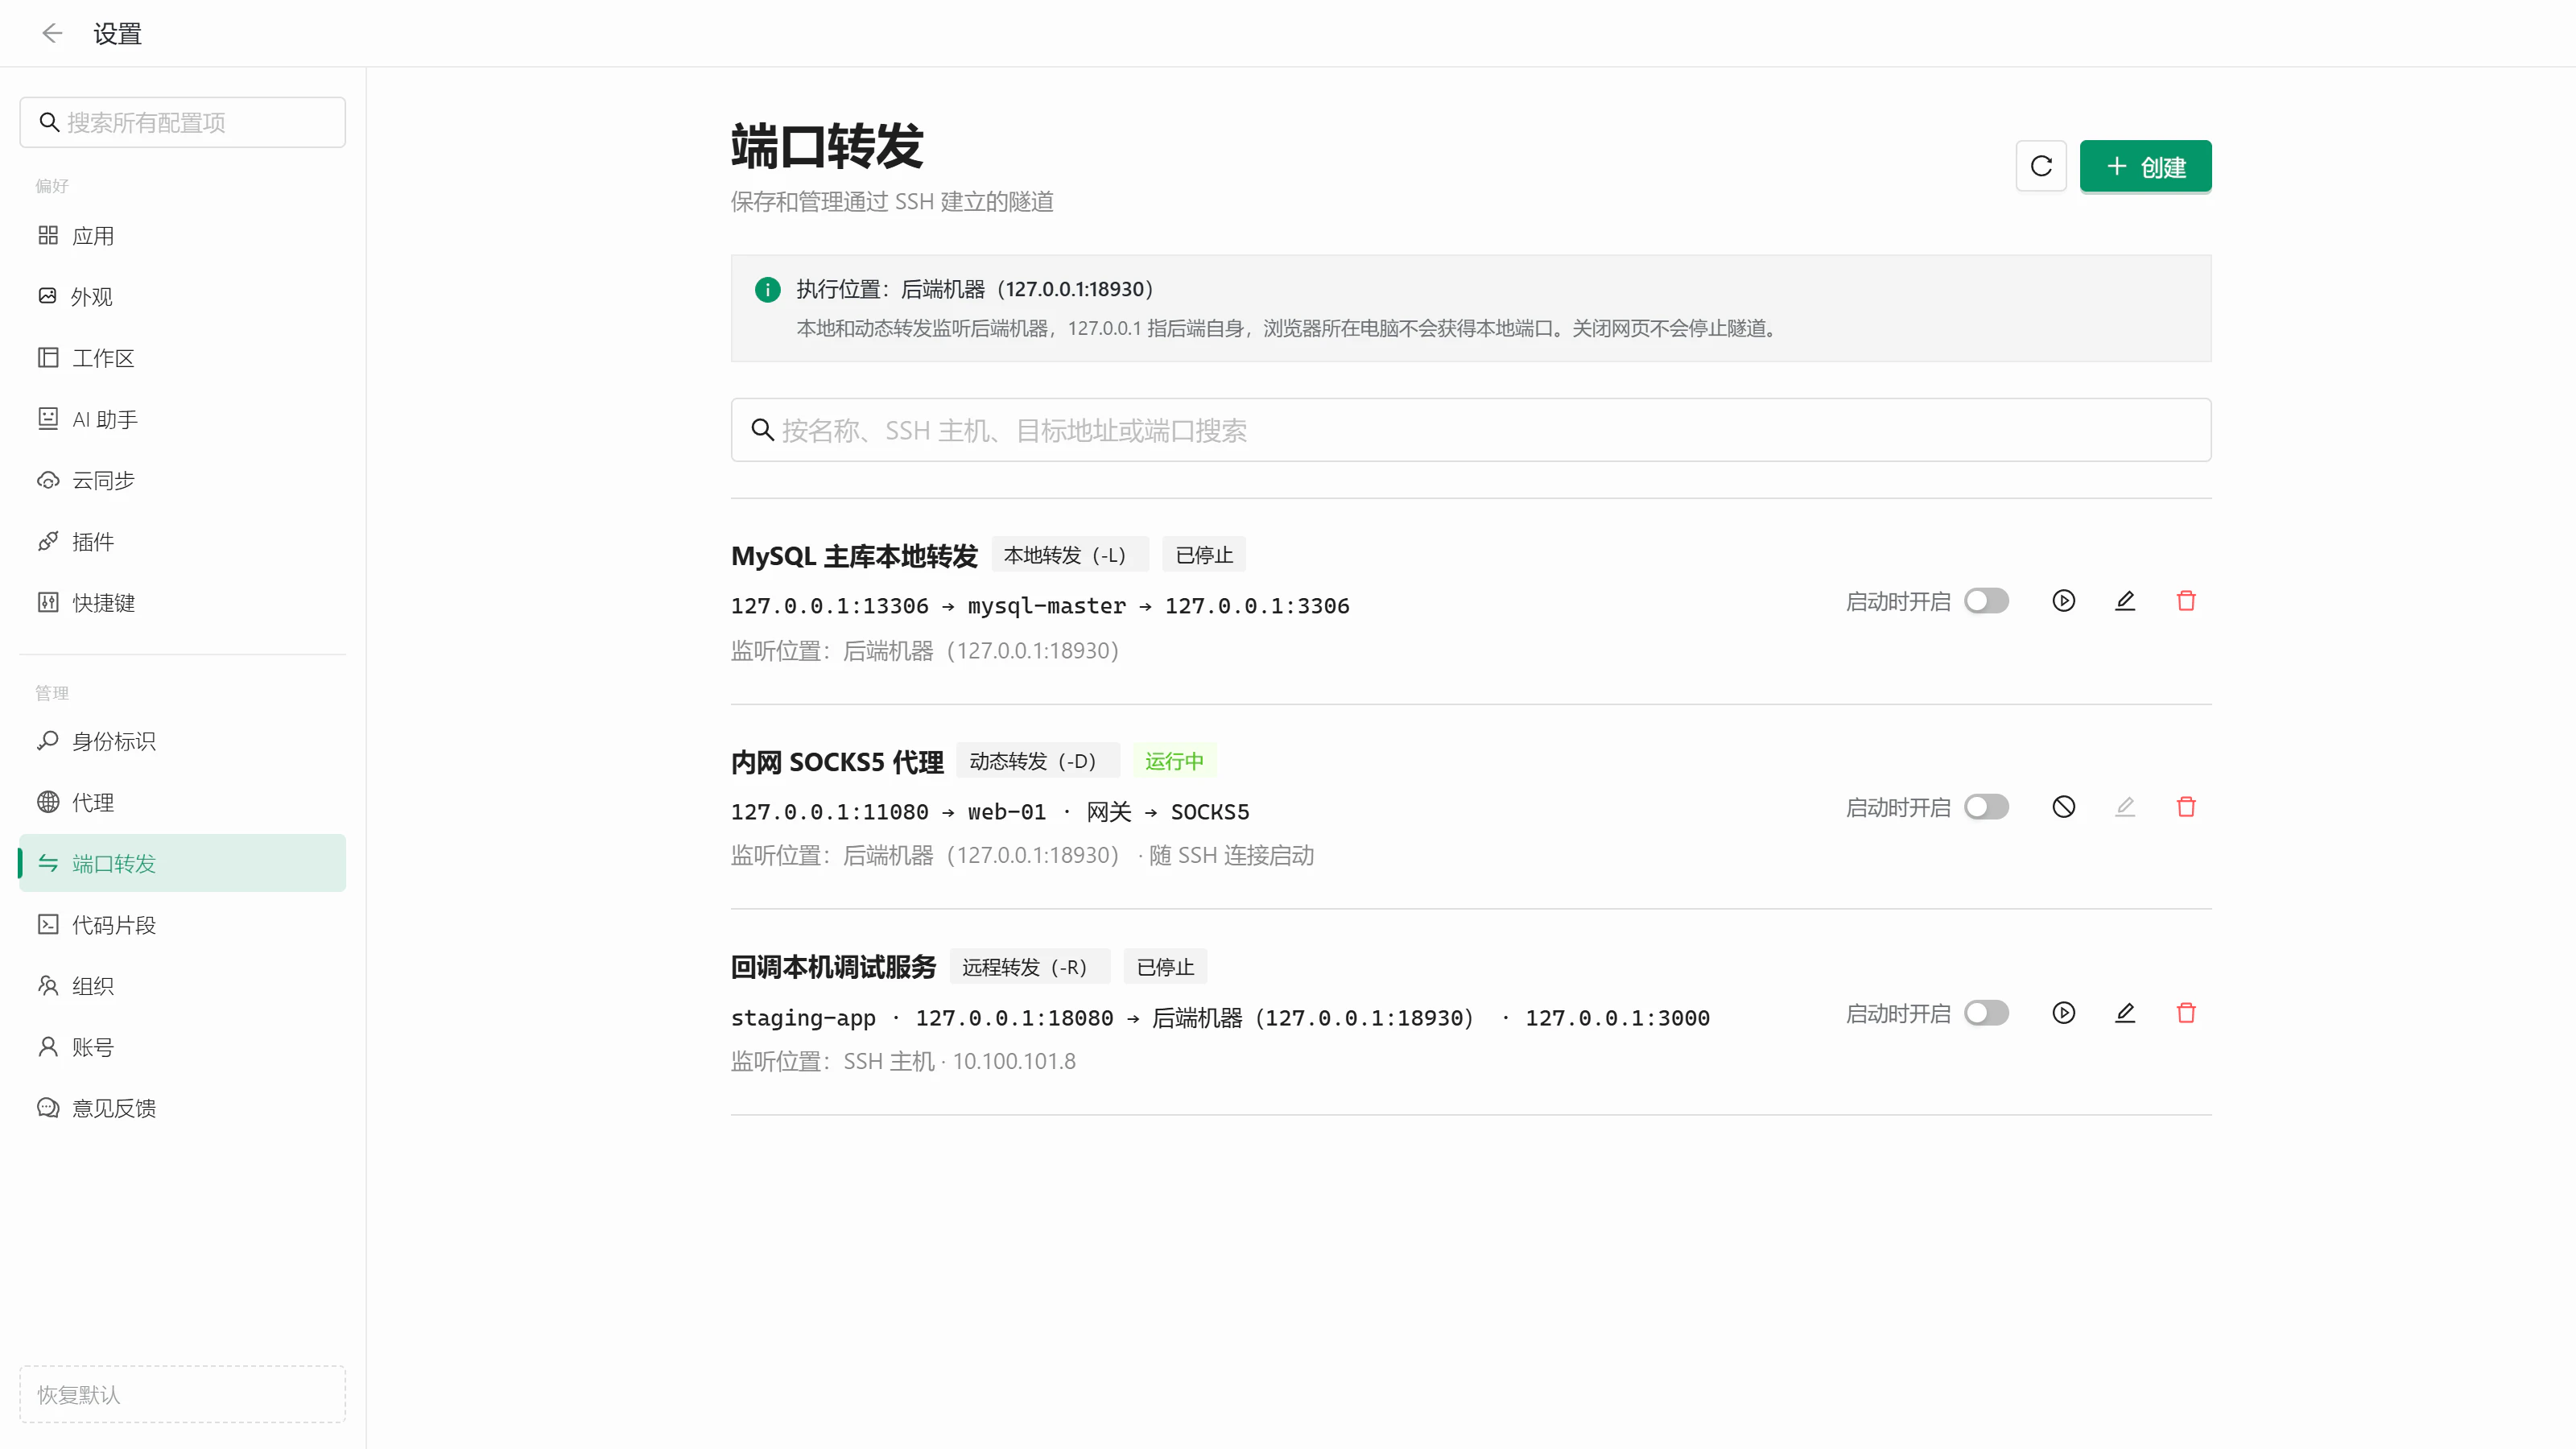
Settings → Port forwarding manages tunnels established over SSH:
| Type | Description |
|---|---|
Local forwarding (-L) | Map an address reachable from the remote side to a local port, such as an internal MySQL server on 127.0.0.1:13306 |
Remote forwarding (-R) | Let a port on the remote host connect back to a local service for debugging |
Dynamic forwarding (-D) | Open a local SOCKS5 proxy that reaches the internal network through the SSH host |
- Search, edit, delete, and start or stop rules in one click. Rules can start with the backend or start when an SSH terminal connects
- Tunnels reuse the saved connection's authentication, jump hosts, and proxies, and verify host fingerprints on first start
- Tunnels run independently of terminal tabs. The interface shows where they run and listen: on your computer in desktop local mode, or on the backend machine in web / desktop cloud mode
Snippets and pinned commands
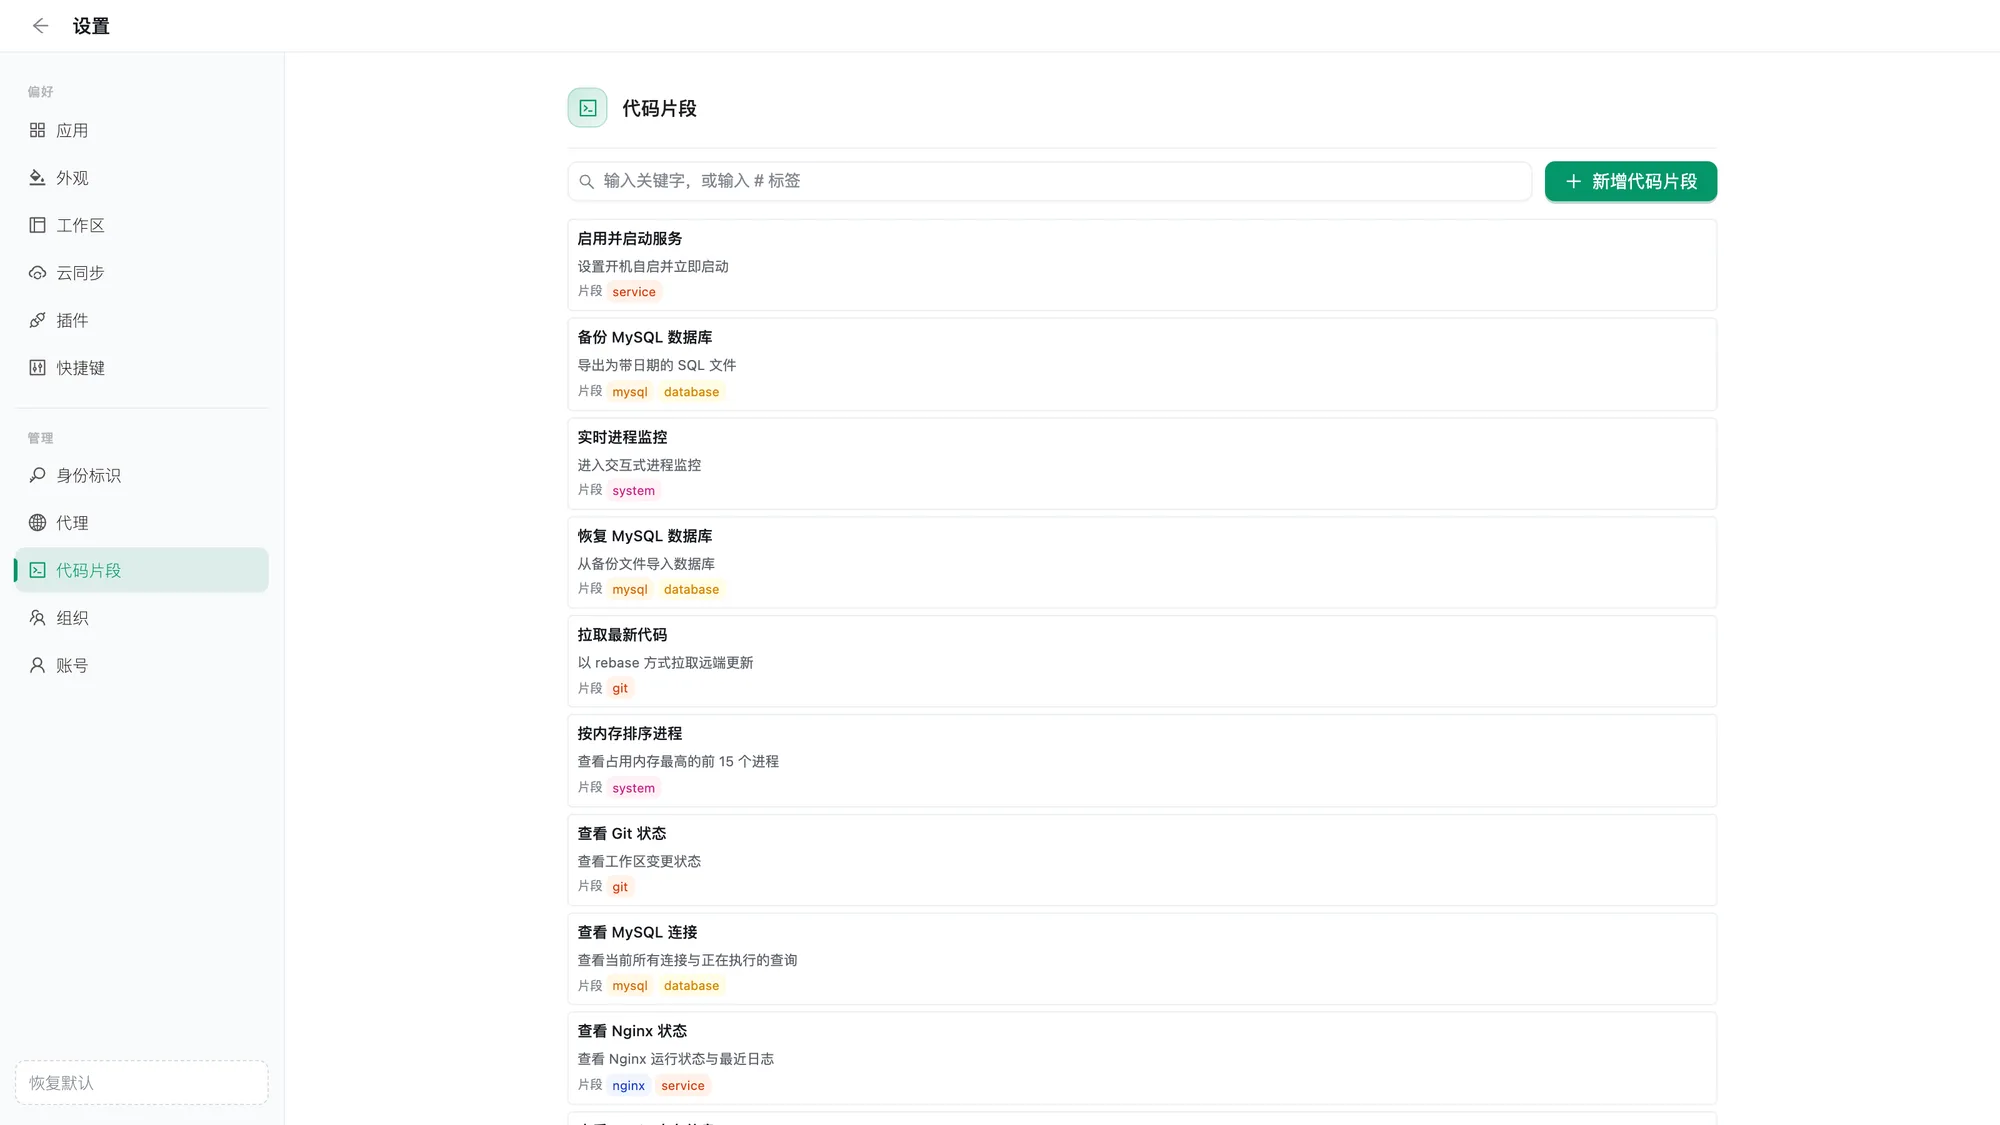
Save frequent commands as snippets to send to the terminal or copy:
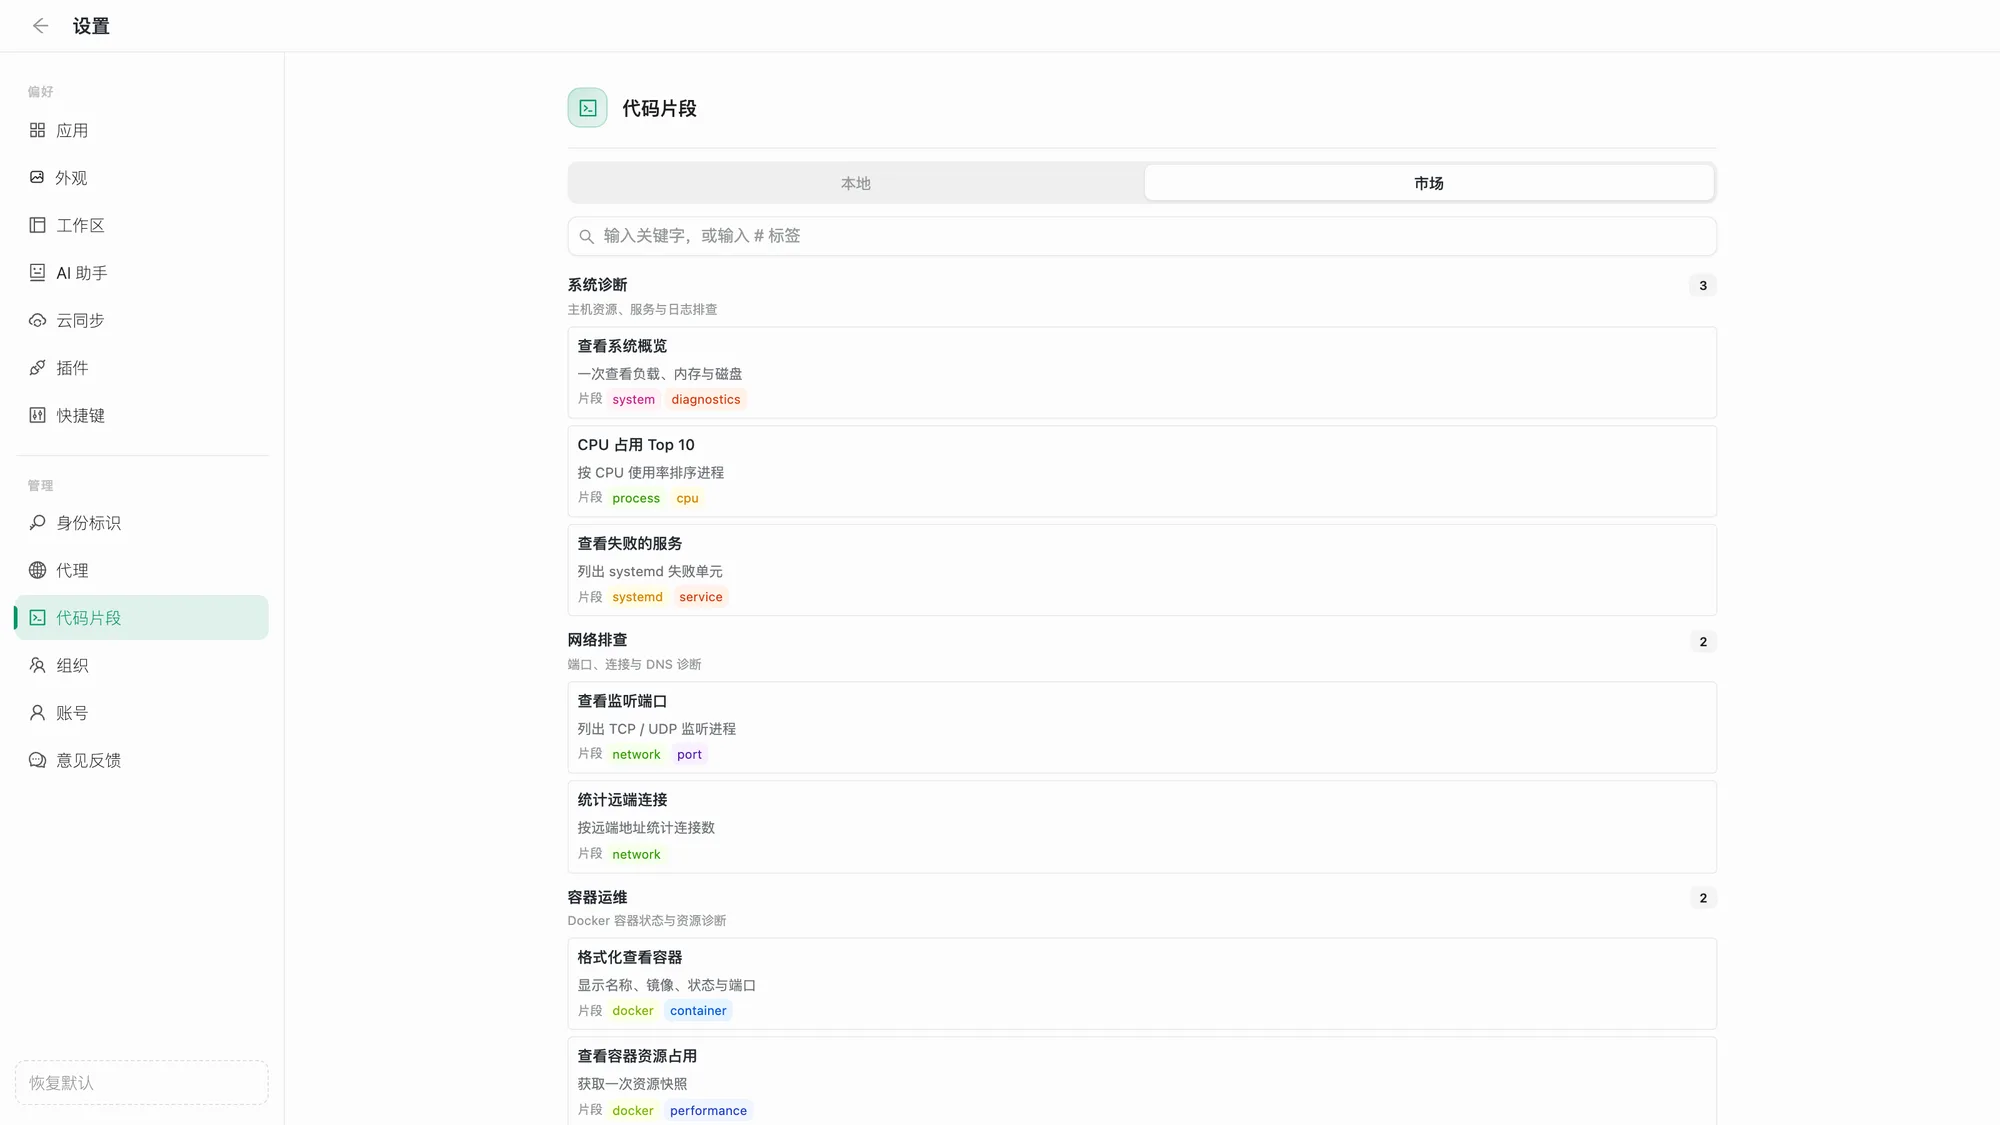
- Snippet marketplace: over a hundred official operations commands organized into categories such as diagnostics, networking, and containers. Search local and marketplace snippets together; add a command locally to edit it
- Fields include name, description, command, and snippet tags for categorization and search
- Server tag bindings: show a snippet only when the current connection has those tags, such as showing “Restart Nginx” only on hosts tagged
web - Connection bindings: prioritize a snippet on selected connections for host-specific commands
- Keep snippets docked beside the terminal and double-click to send; a confirmation dialog helps prevent accidental execution
Pin below the terminal
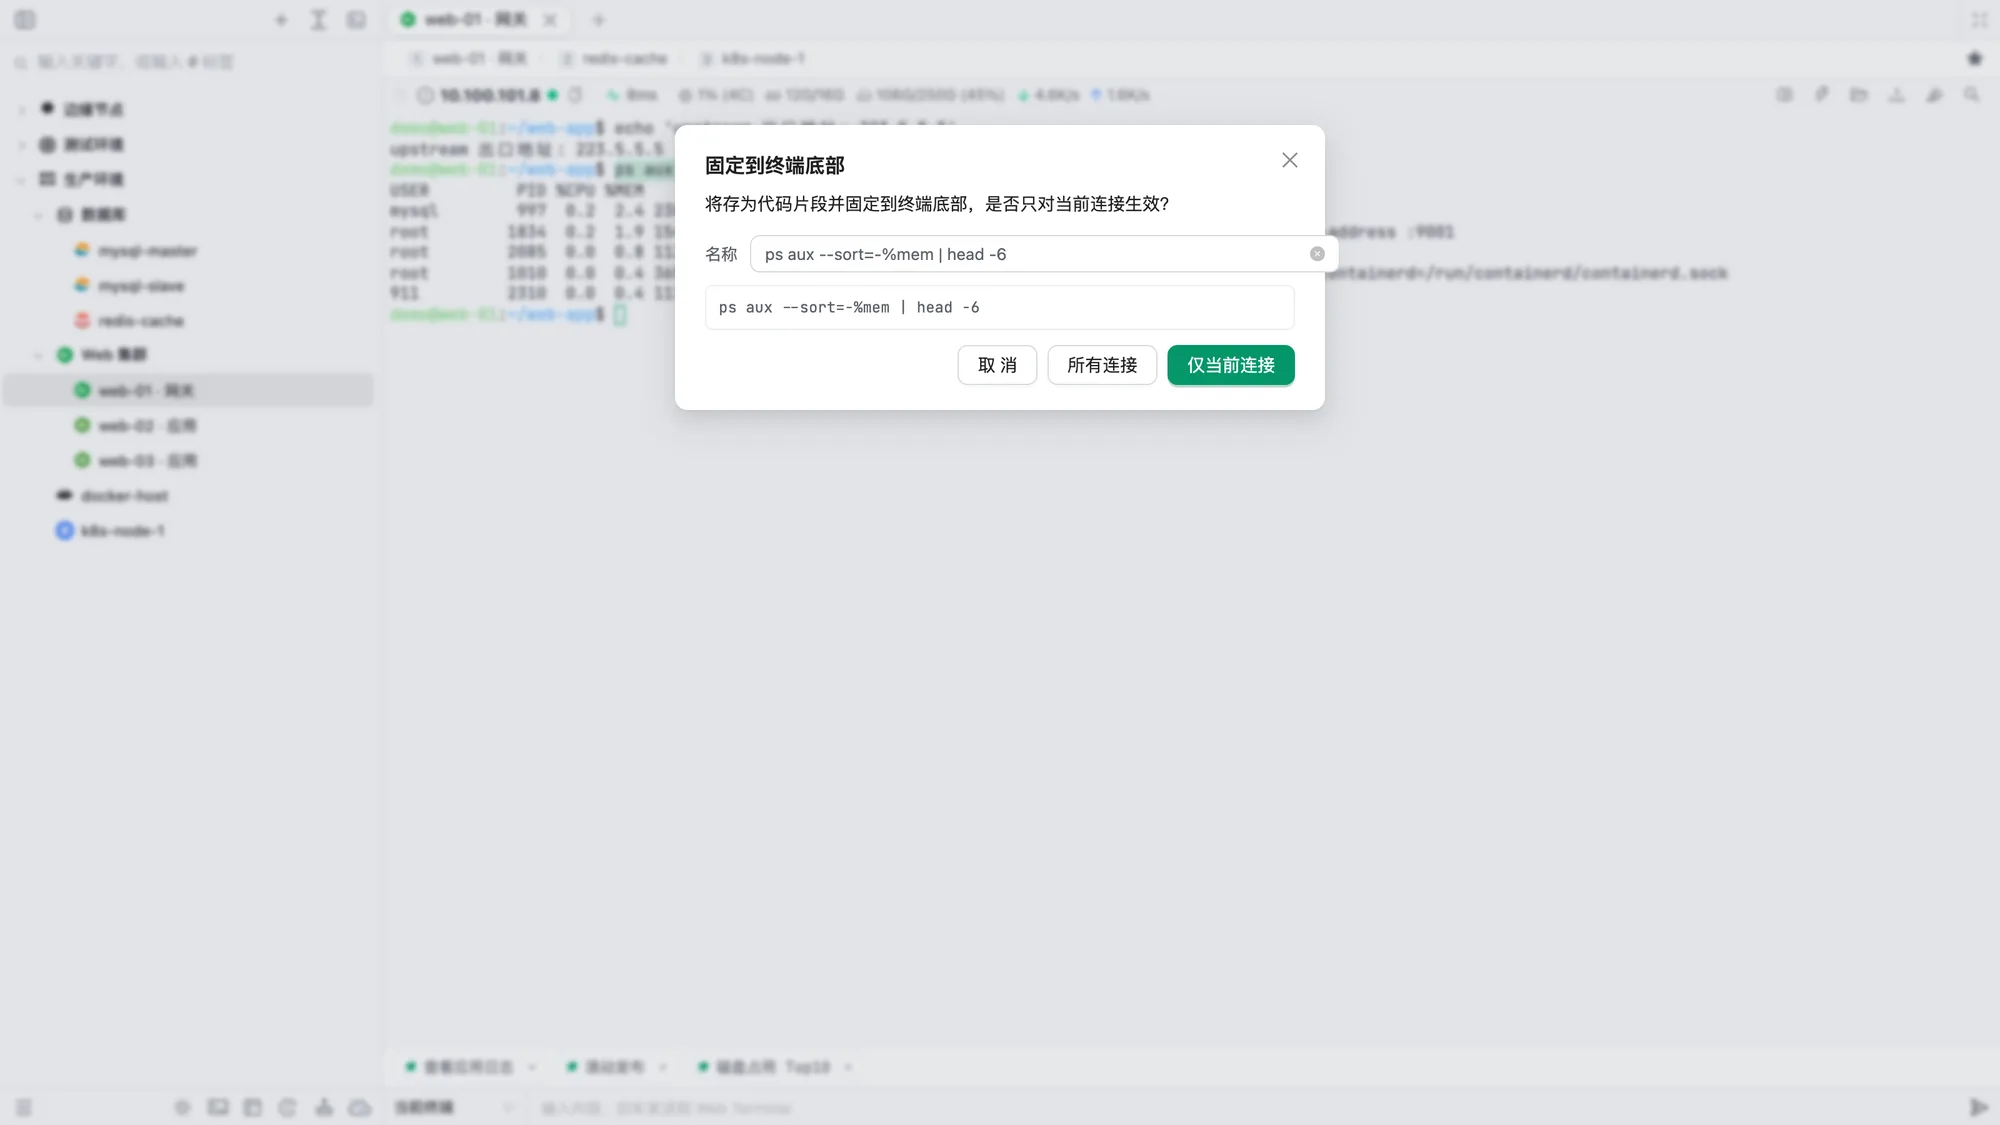
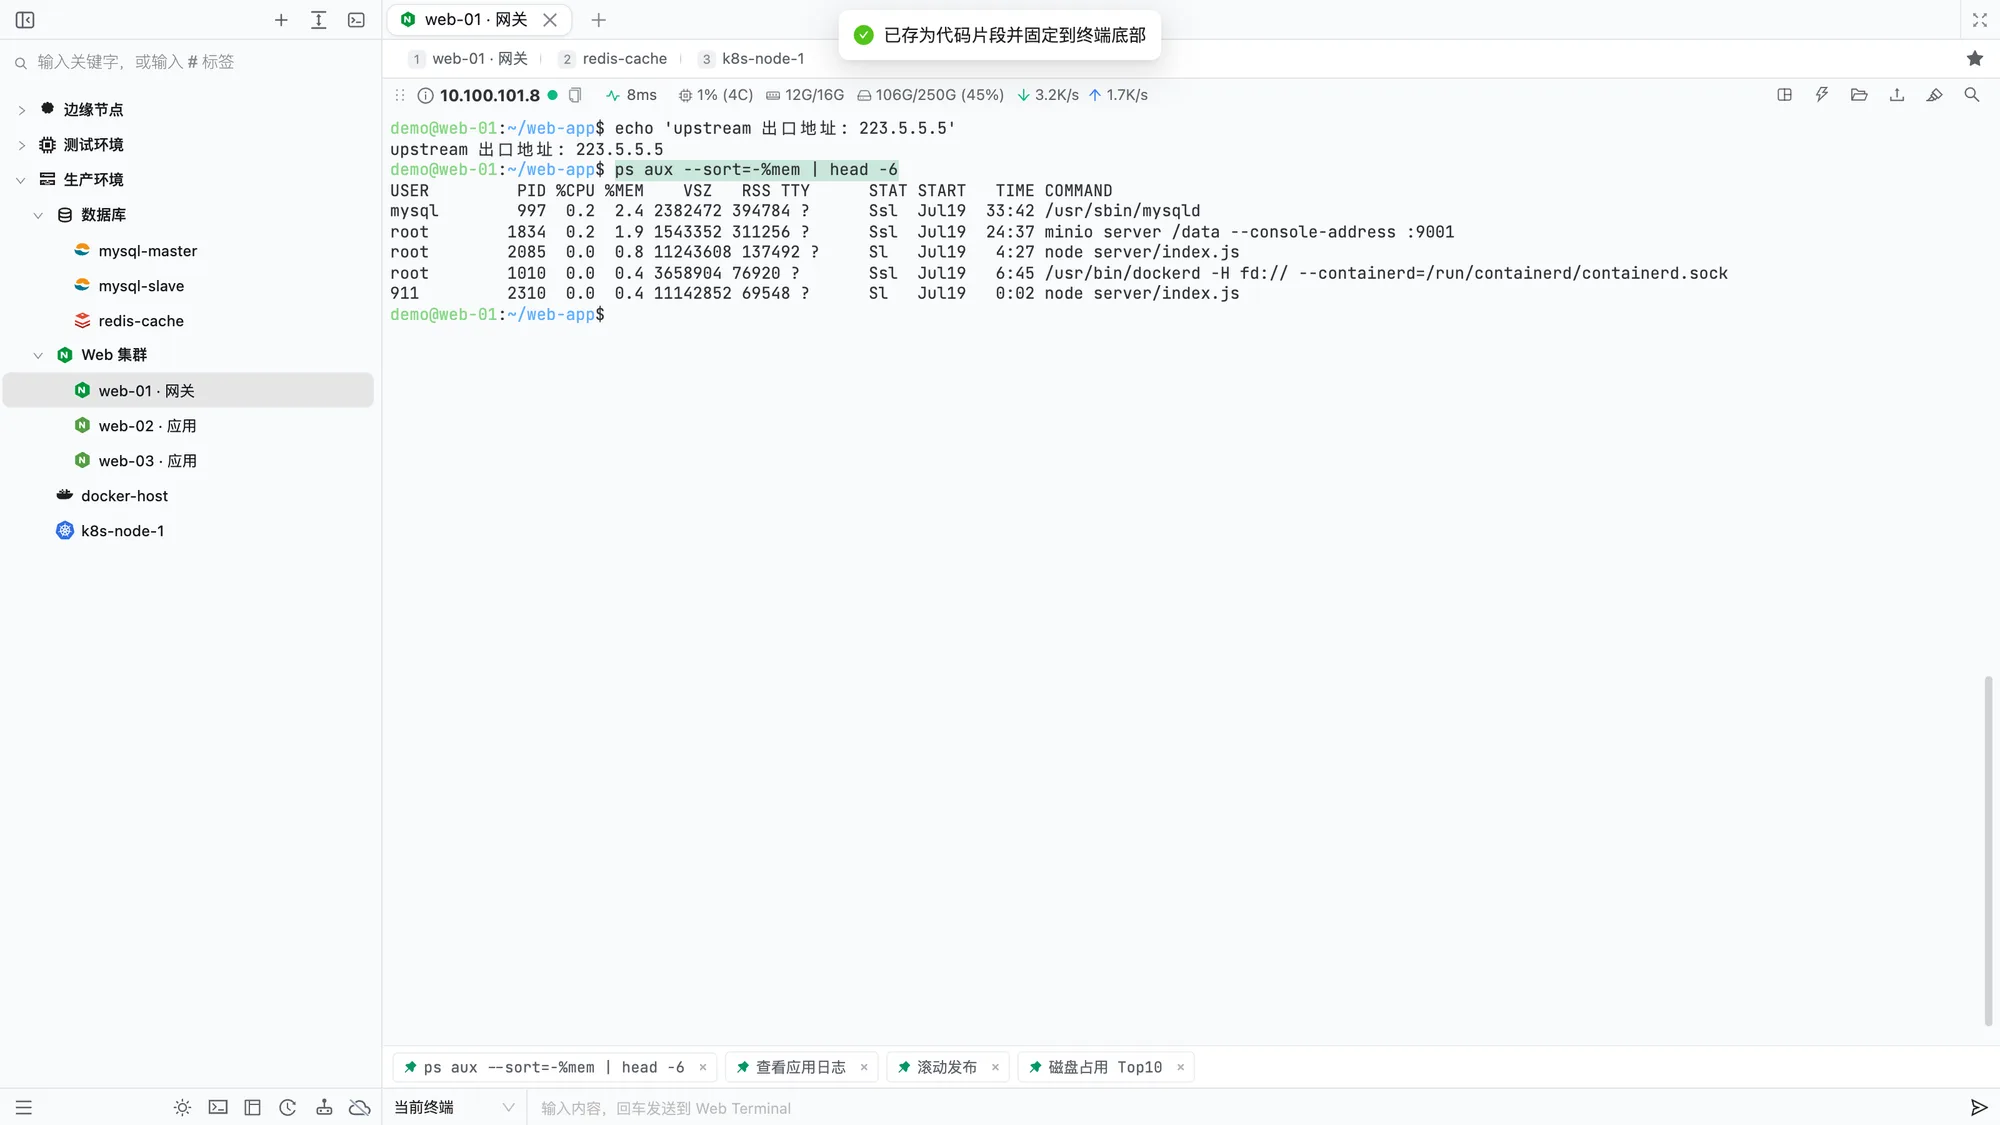
Select a useful command and choose Pin from the selection menu. It is saved as a snippet and pinned to the command bar below the terminal, ready to send with one click:
- Rename the snippet in the dialog and choose this connection only or all connections
- Pinned commands are persistent snippets that sync through the cloud. Clicking
×only unpins a command; the snippet remains in the library - Pin or unpin snippets at any time using the pin button in Settings → Snippets
- Visibility follows the snippet panel rules: connection-bound snippets appear only on those connections; snippets with server tags but no connection binding require the current connection to have all those tags
- When the bar overflows, scroll horizontally with the arrows or mouse wheel. The first nine commands are numbered; with the Cloud Term shortcut preset,
Alt+Shift+1–9on Windows or⌥1–9on macOS fills the command into the current terminal without pressing Enter
| Pin dialog: name and scope | Pinned command bar |
|---|---|
 |  |
Command history
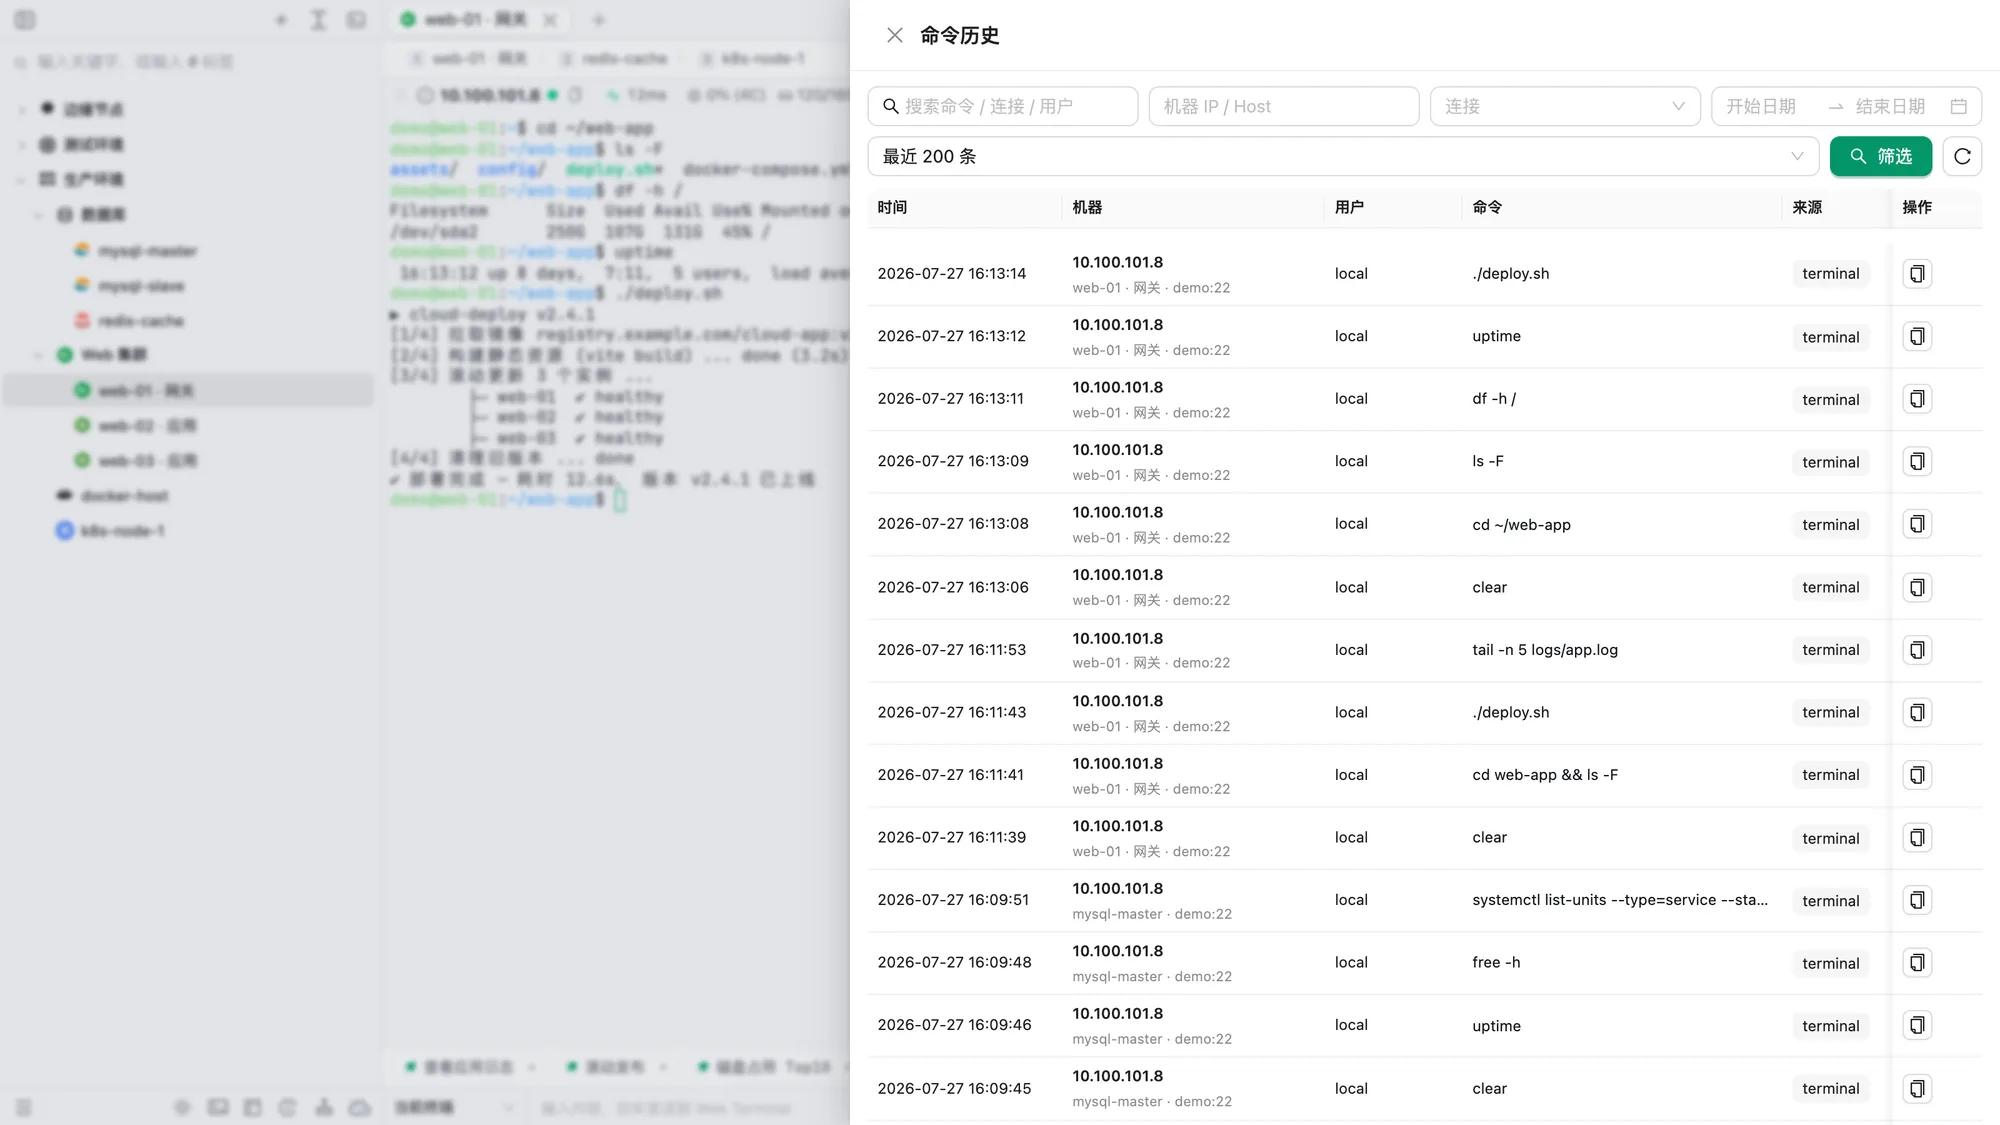
Commands executed in each terminal session are recorded automatically, with SSH and Redis shown separately:
- Search by command, connection, user, or host IP, filter connections by folder tree, and narrow by date range
- View execution time, host, signed-in user, shell, working directory, and source. Multiline commands show the first line and line count, and details keep every line
- Copy a command with one click. Opening history from a terminal filters to the current connection
Shell history on remote hosts
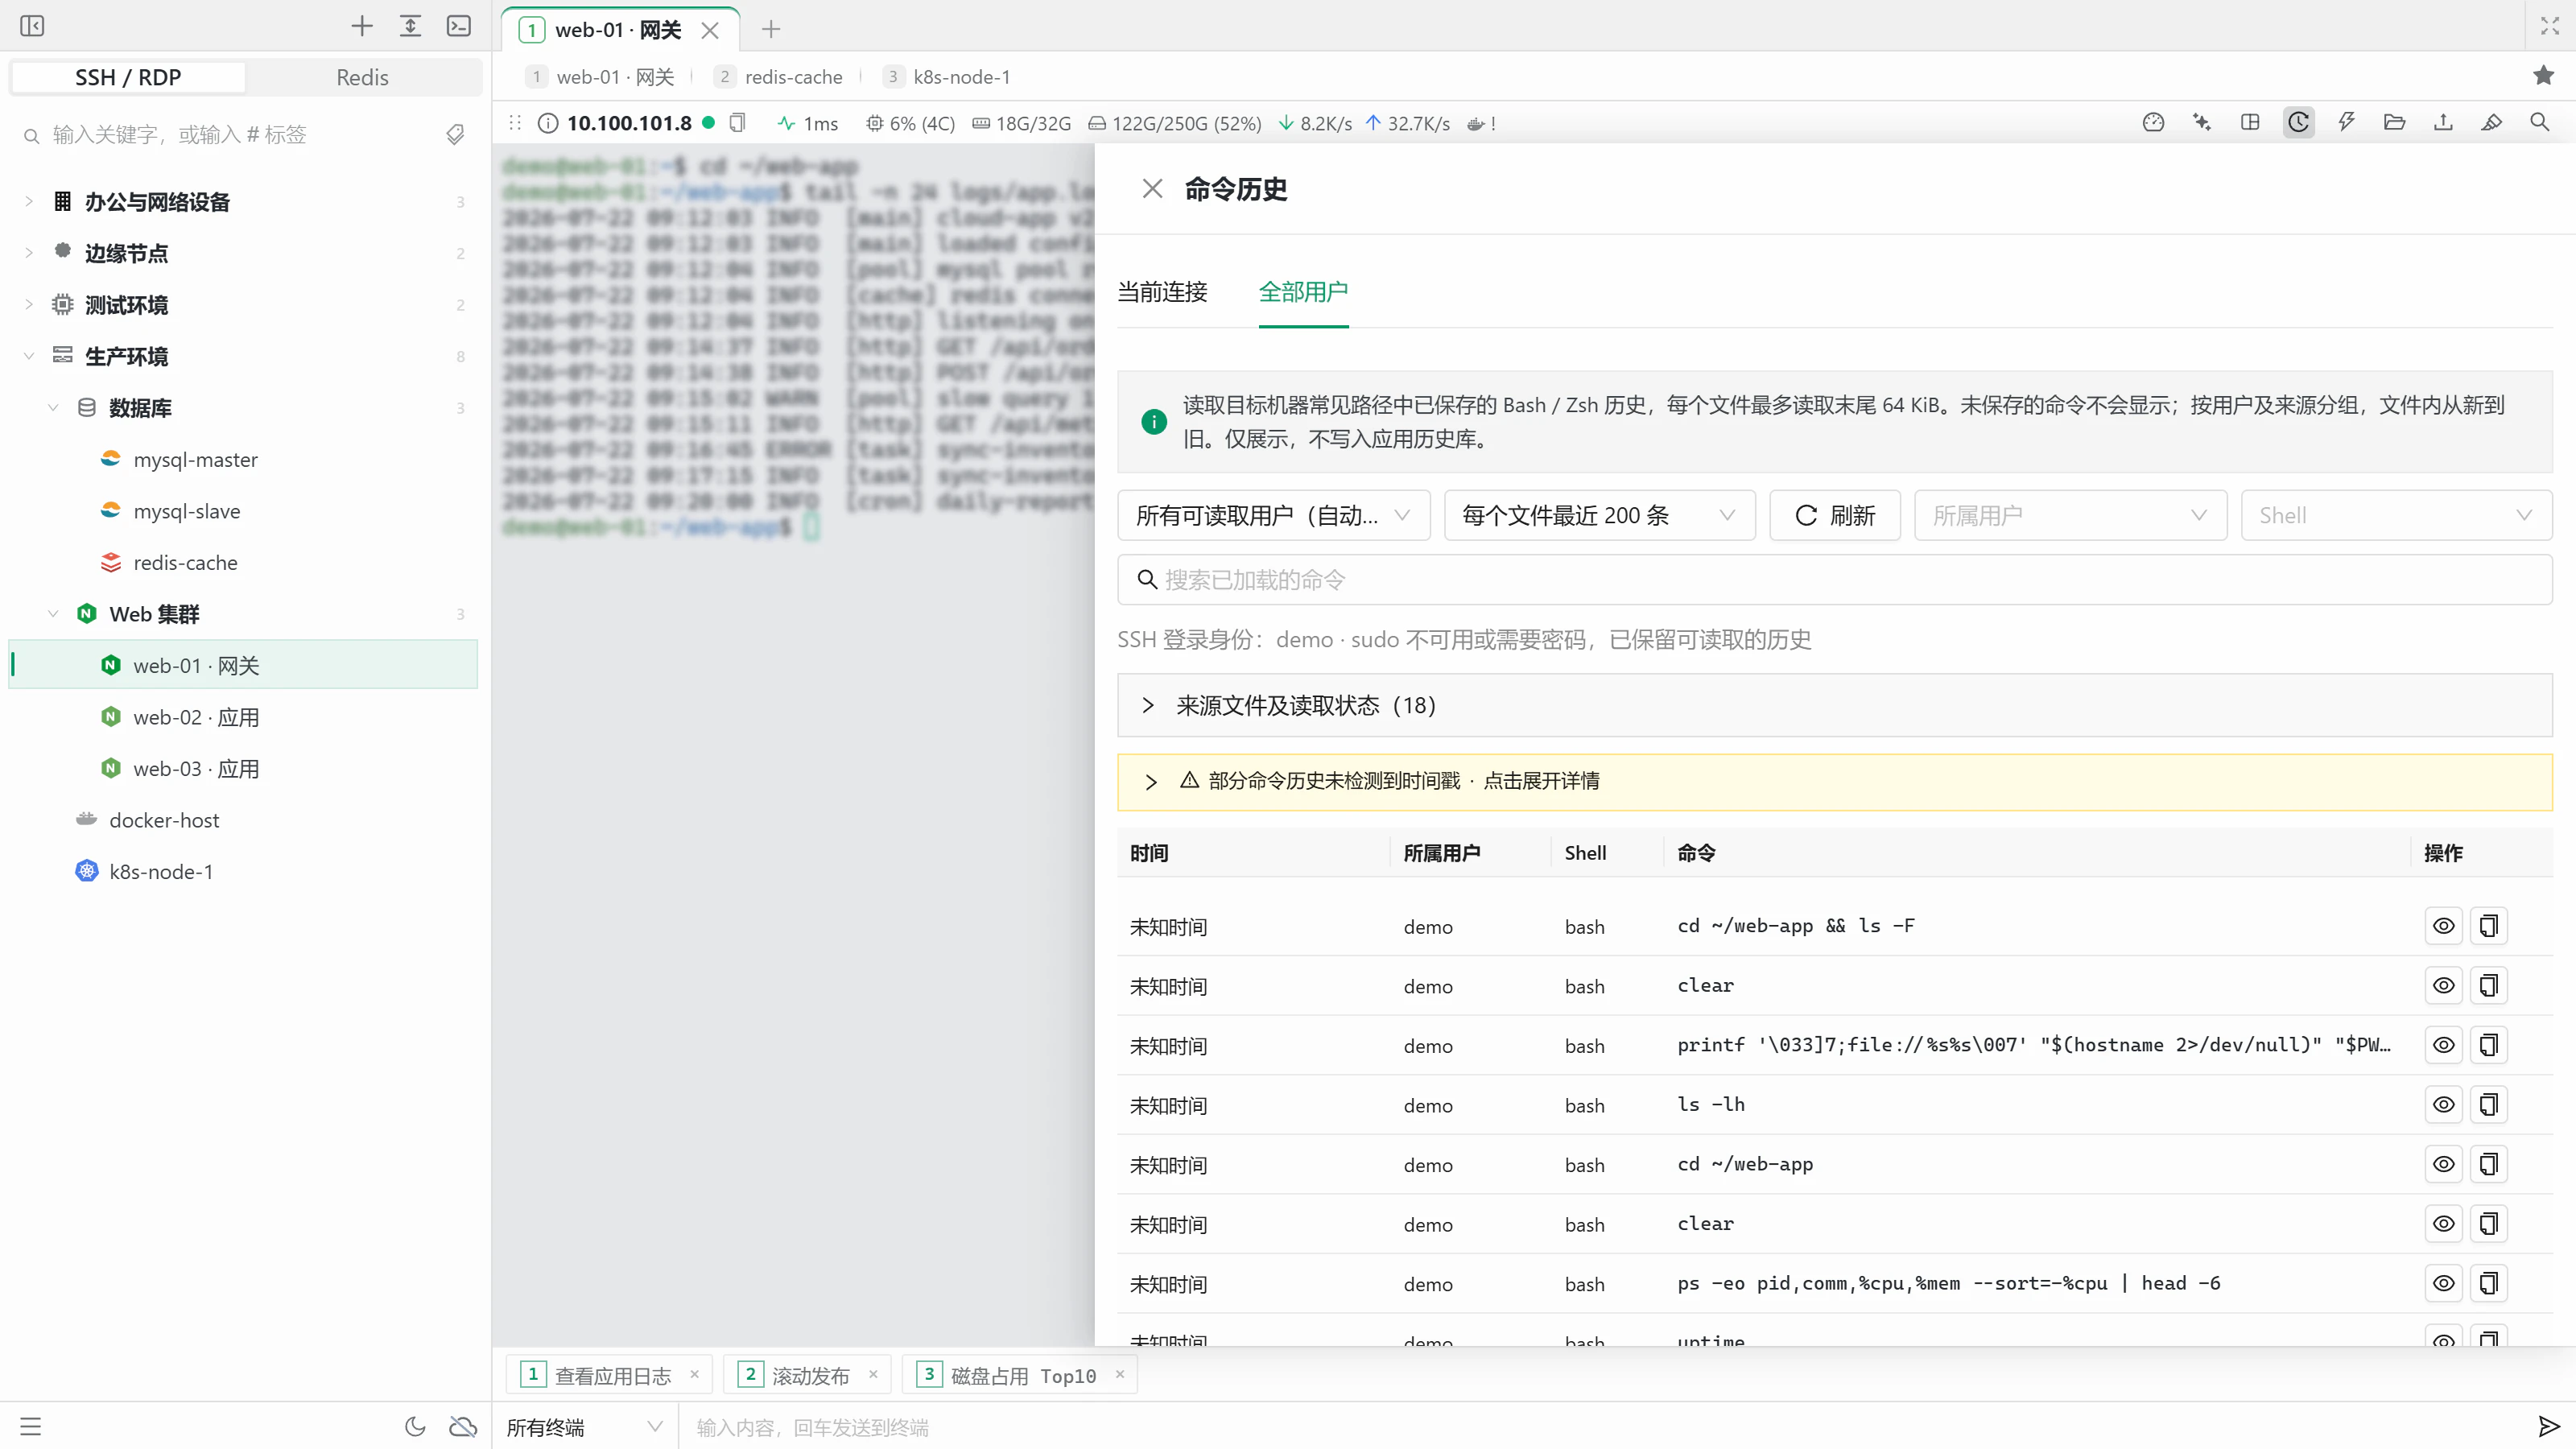
The terminal's history panel also has an All users tab that reads saved Bash and Zsh history from Linux / macOS hosts on demand:
- Read history for the current SSH user or every readable user (passwordless sudo is tried when needed), with the latest 200 / 500 / 1000 entries per source
- Filter by user, shell, or keyword, and see source files, timestamps, and truncation. Remote history files are only read, never changed
- When timestamps are missing, add timestamp settings to the current user's
~/.bashrc(or/etc/profilewhen permitted) in one step
Connection log
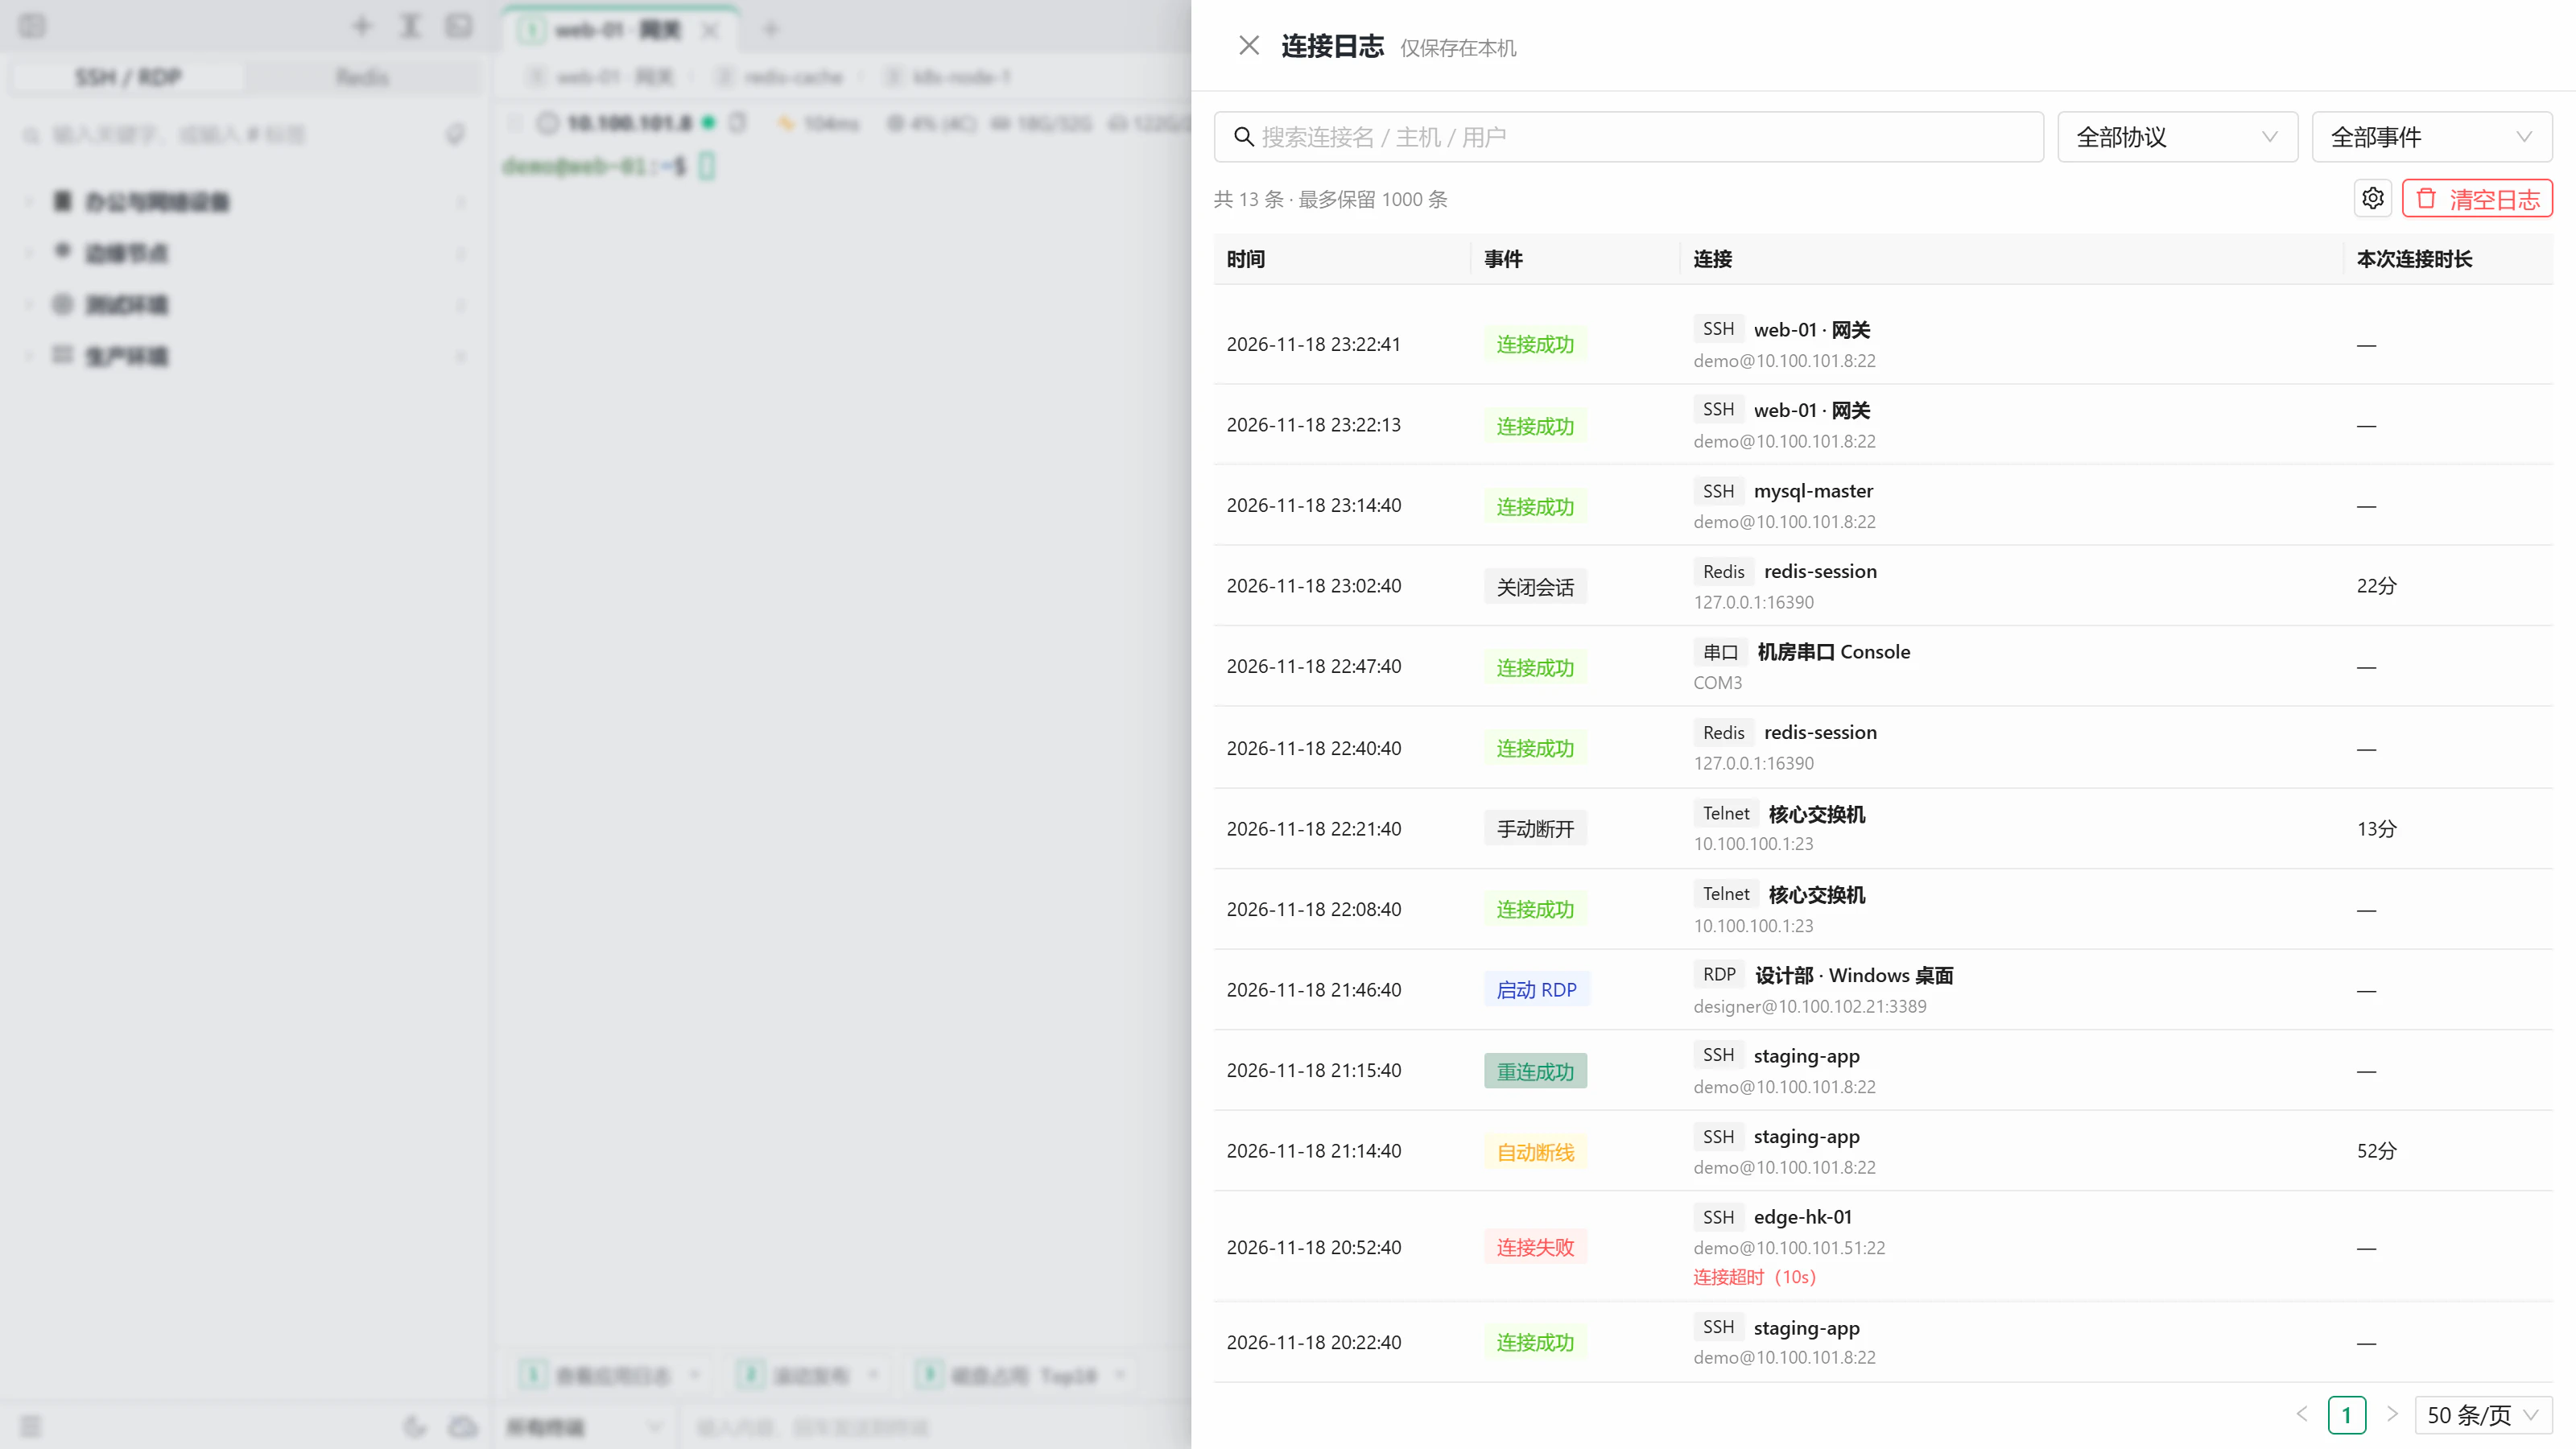
Open Connection log from the settings menu at the top to see SSH, Redis, Telnet, and serial events: successful and failed connections, unexpected drops, manual disconnects, reconnects, and closed sessions, with the time, address, and session length. For RDP, only whether the system client launched is recorded.
- Search by connection name, host, or username, filter by protocol and event type, and page through the newest entries first
- The log is stored only on this device and separated by signed-in user. Entries keep the original details even after a connection is renamed or deleted
- 1000 entries are kept by default; change the limit to 100–10,000 in Settings → Workspace → Connection log
Appearance and themes
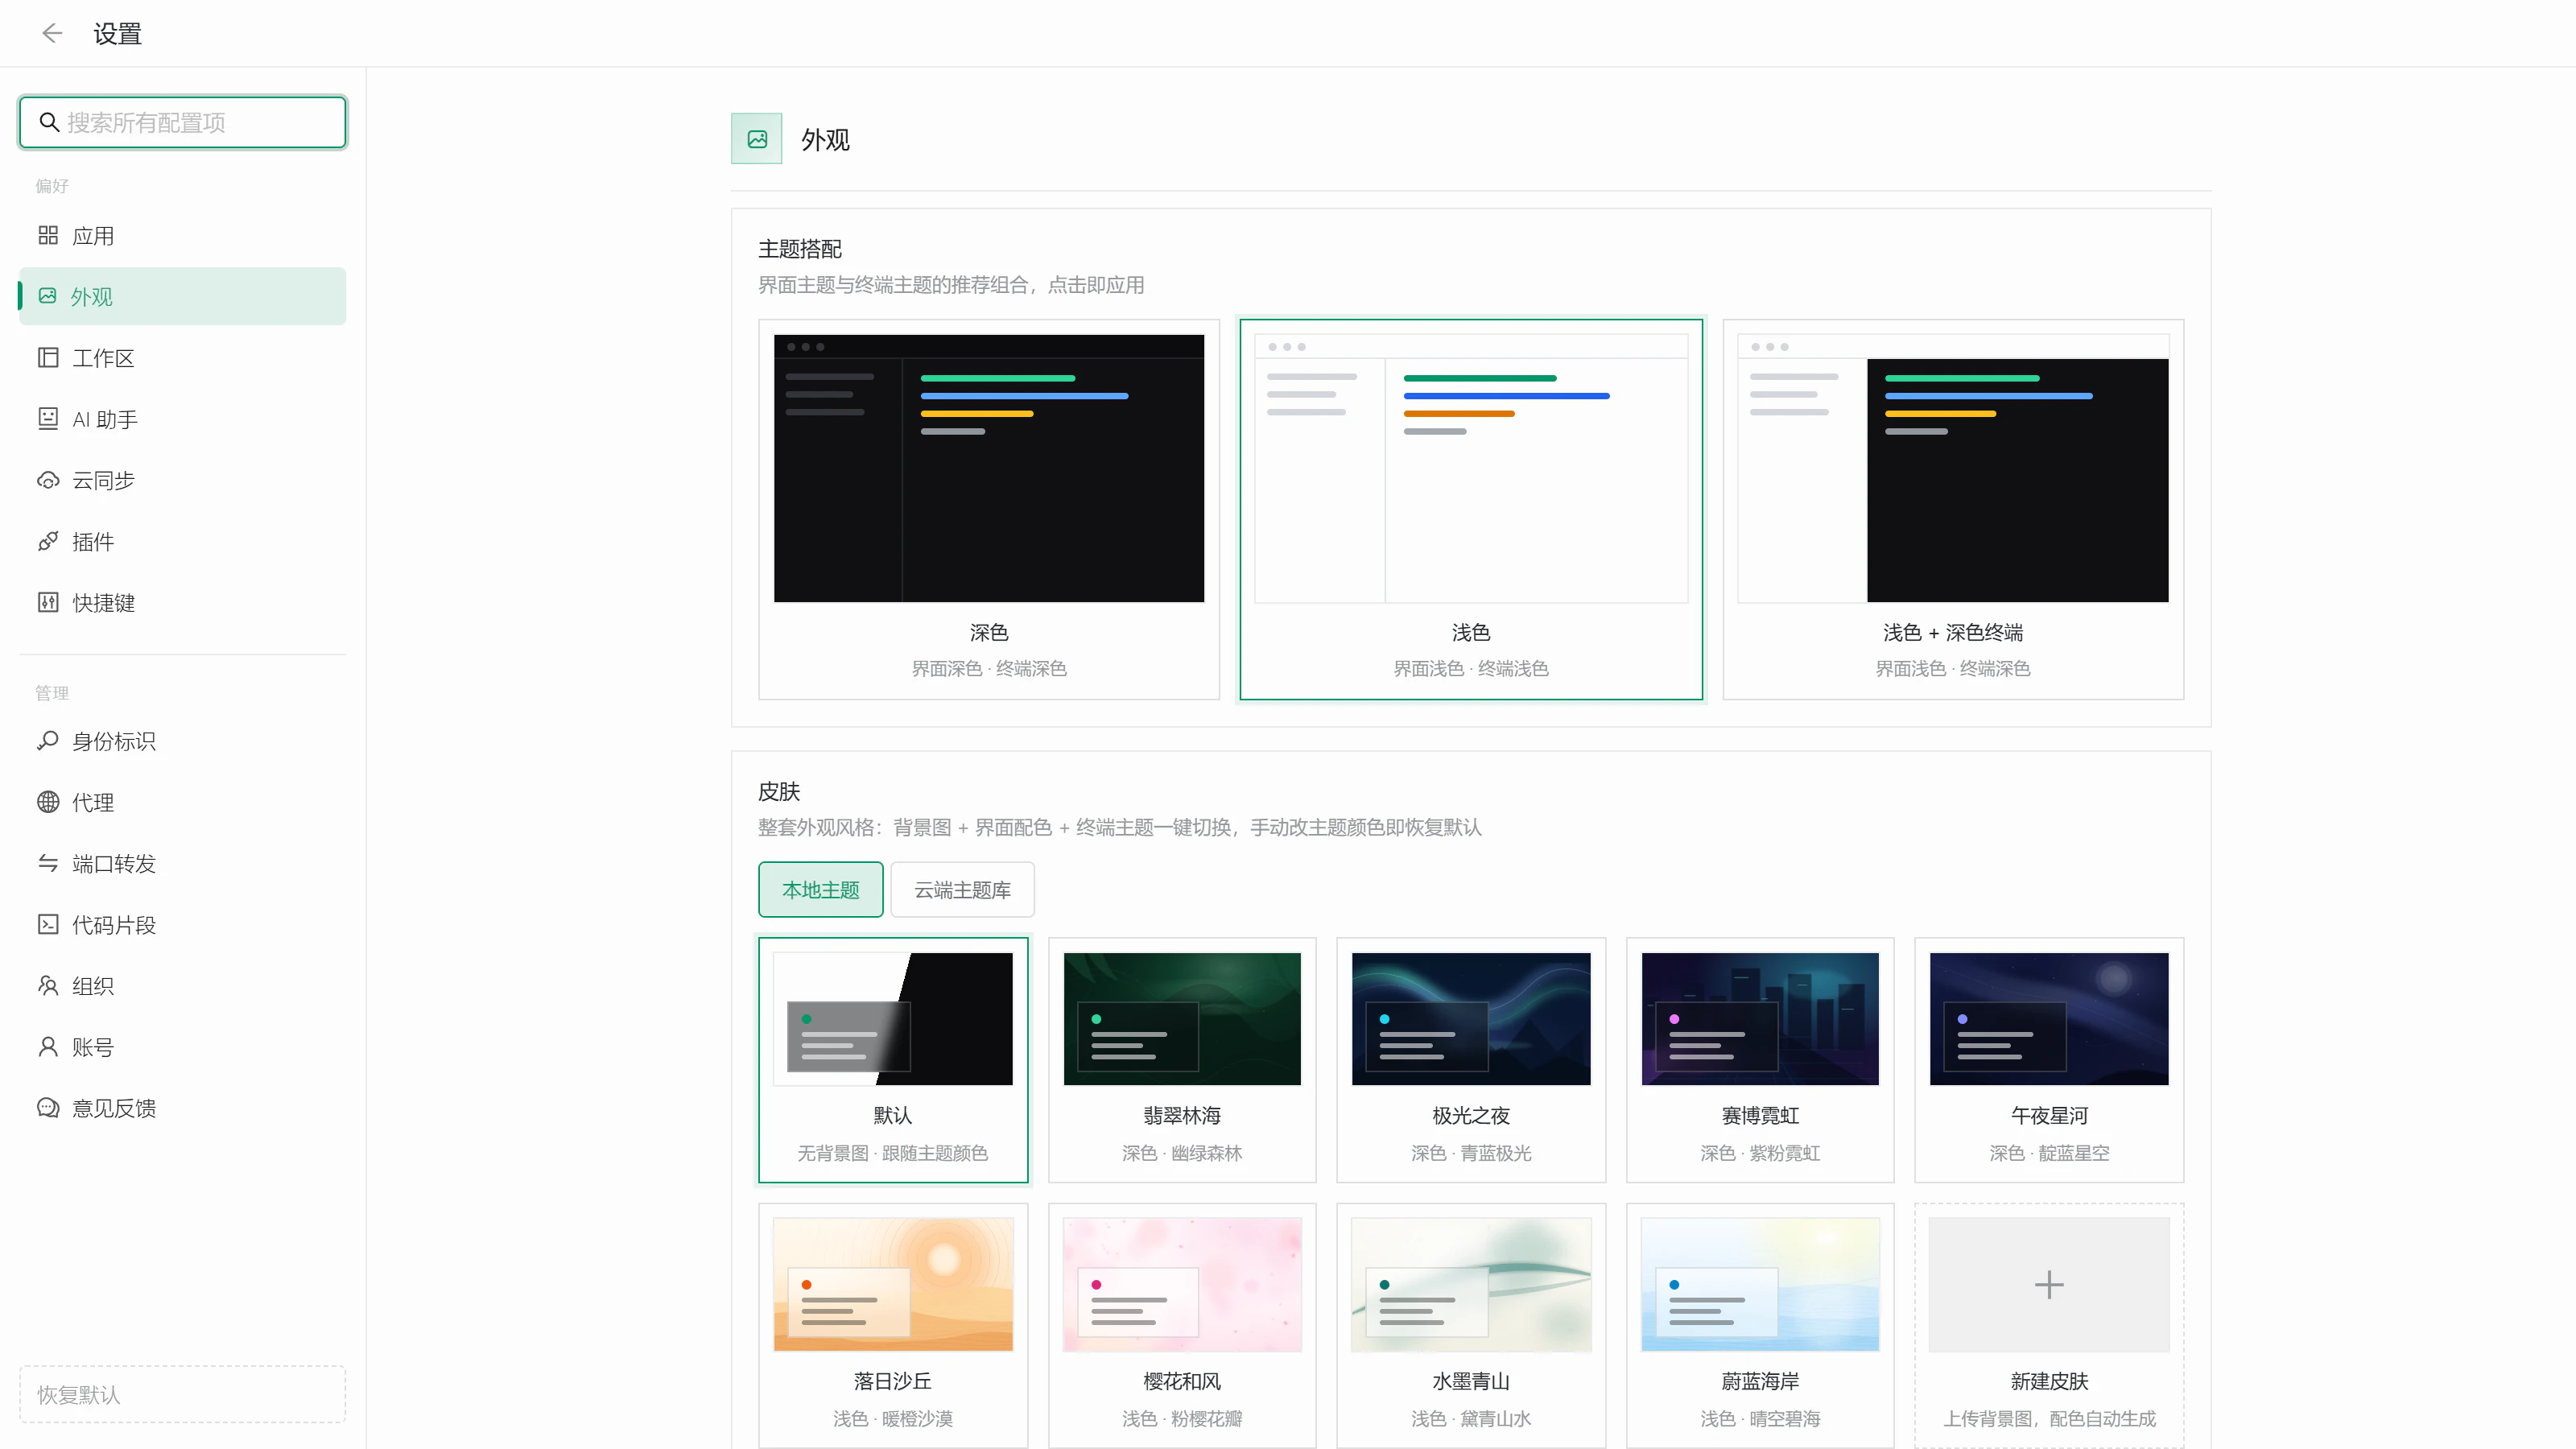
- Interface theme: dark or light
- Terminal themes: a large collection of open-source color schemes, grouped into dark and light themes
- Match interface colors to the terminal: choosing a terminal theme also adjusts backgrounds in the app, settings, and dialogs
- Theme presets: dark, light, or a light interface with a dark terminal
- Custom theme editor: duplicate any theme and edit its background, foreground, cursor, selection, and 16-color palette
- Fonts: set interface and terminal fonts separately, with an independent Chinese / CJK font. Local font availability is checked and missing fonts fall back automatically
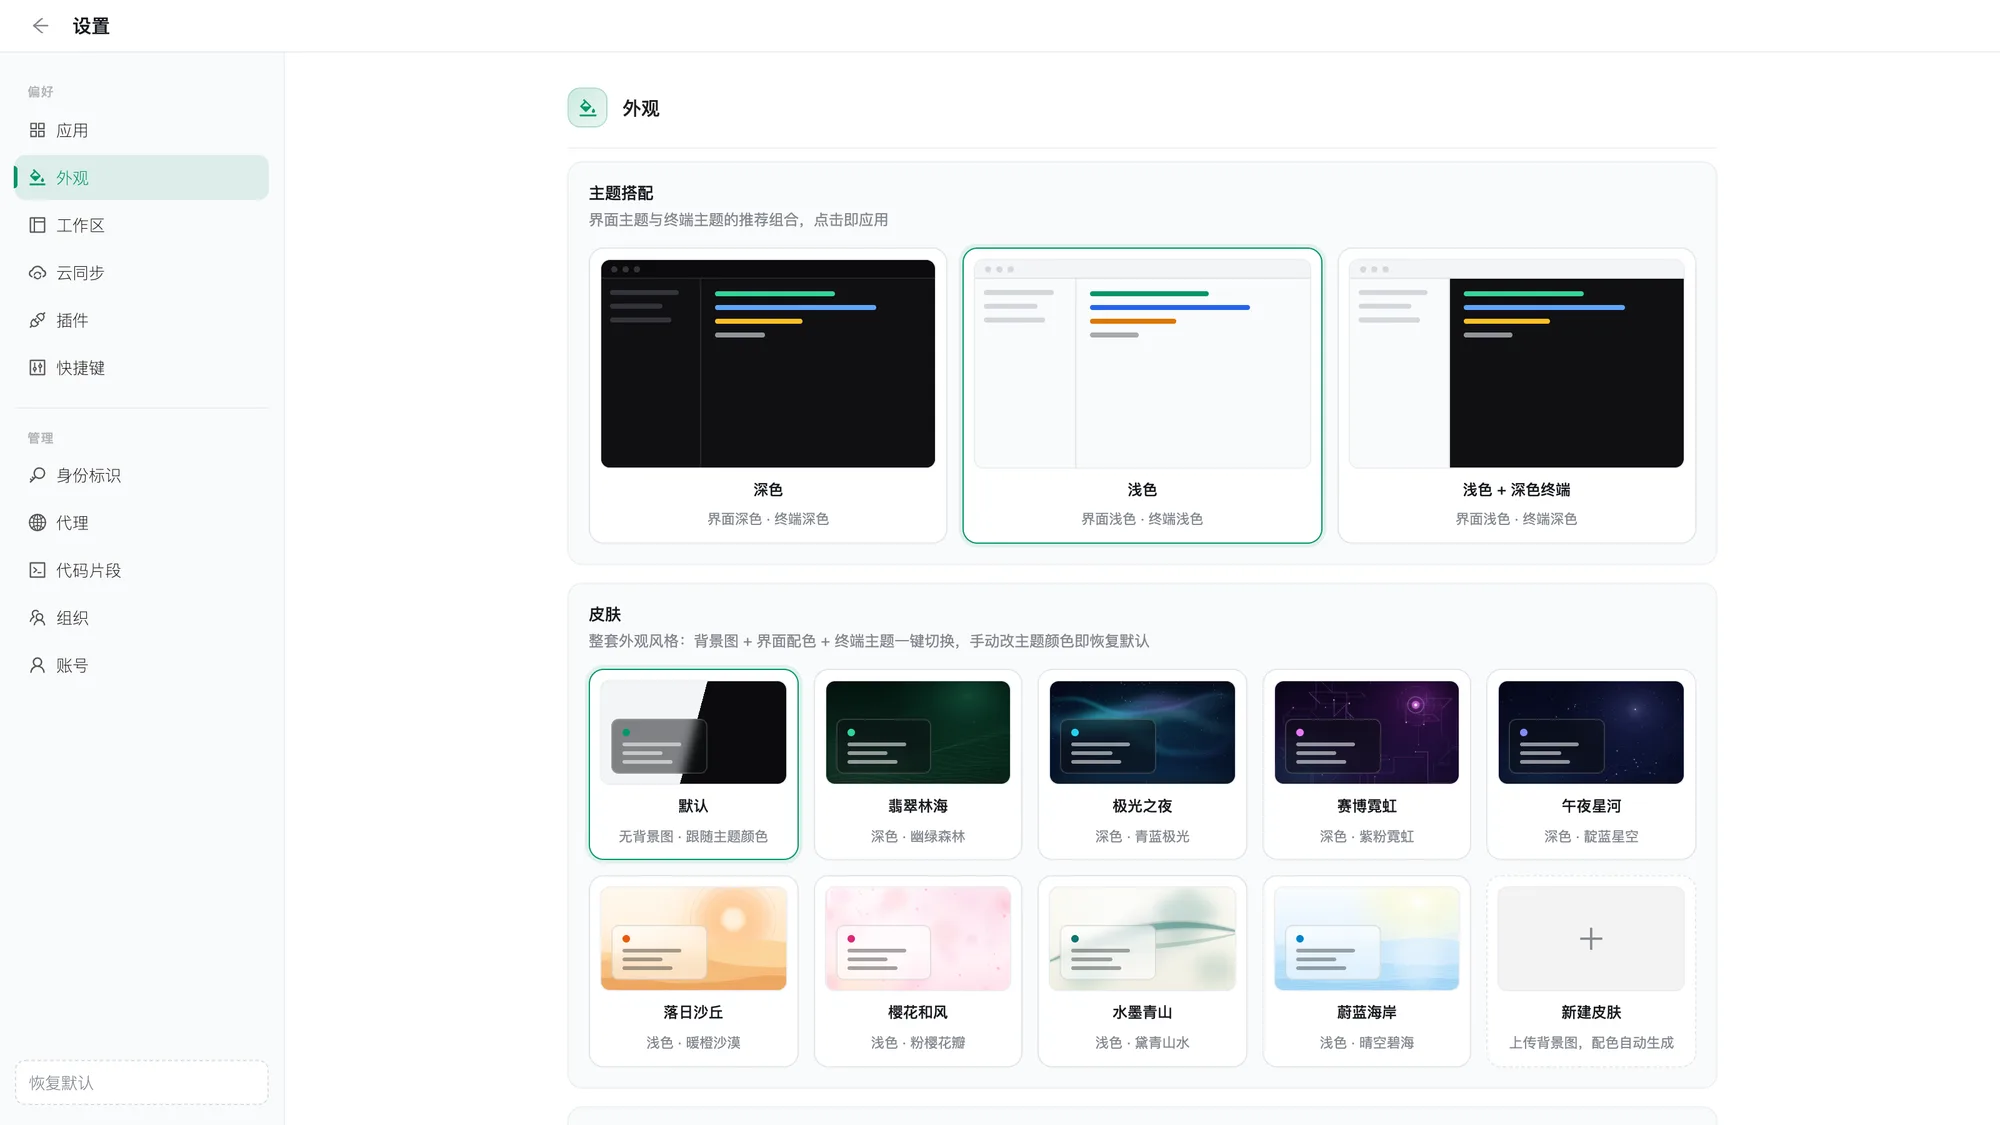
The three theme presets:
| Dark | Light | Light + dark terminal |
|---|---|---|
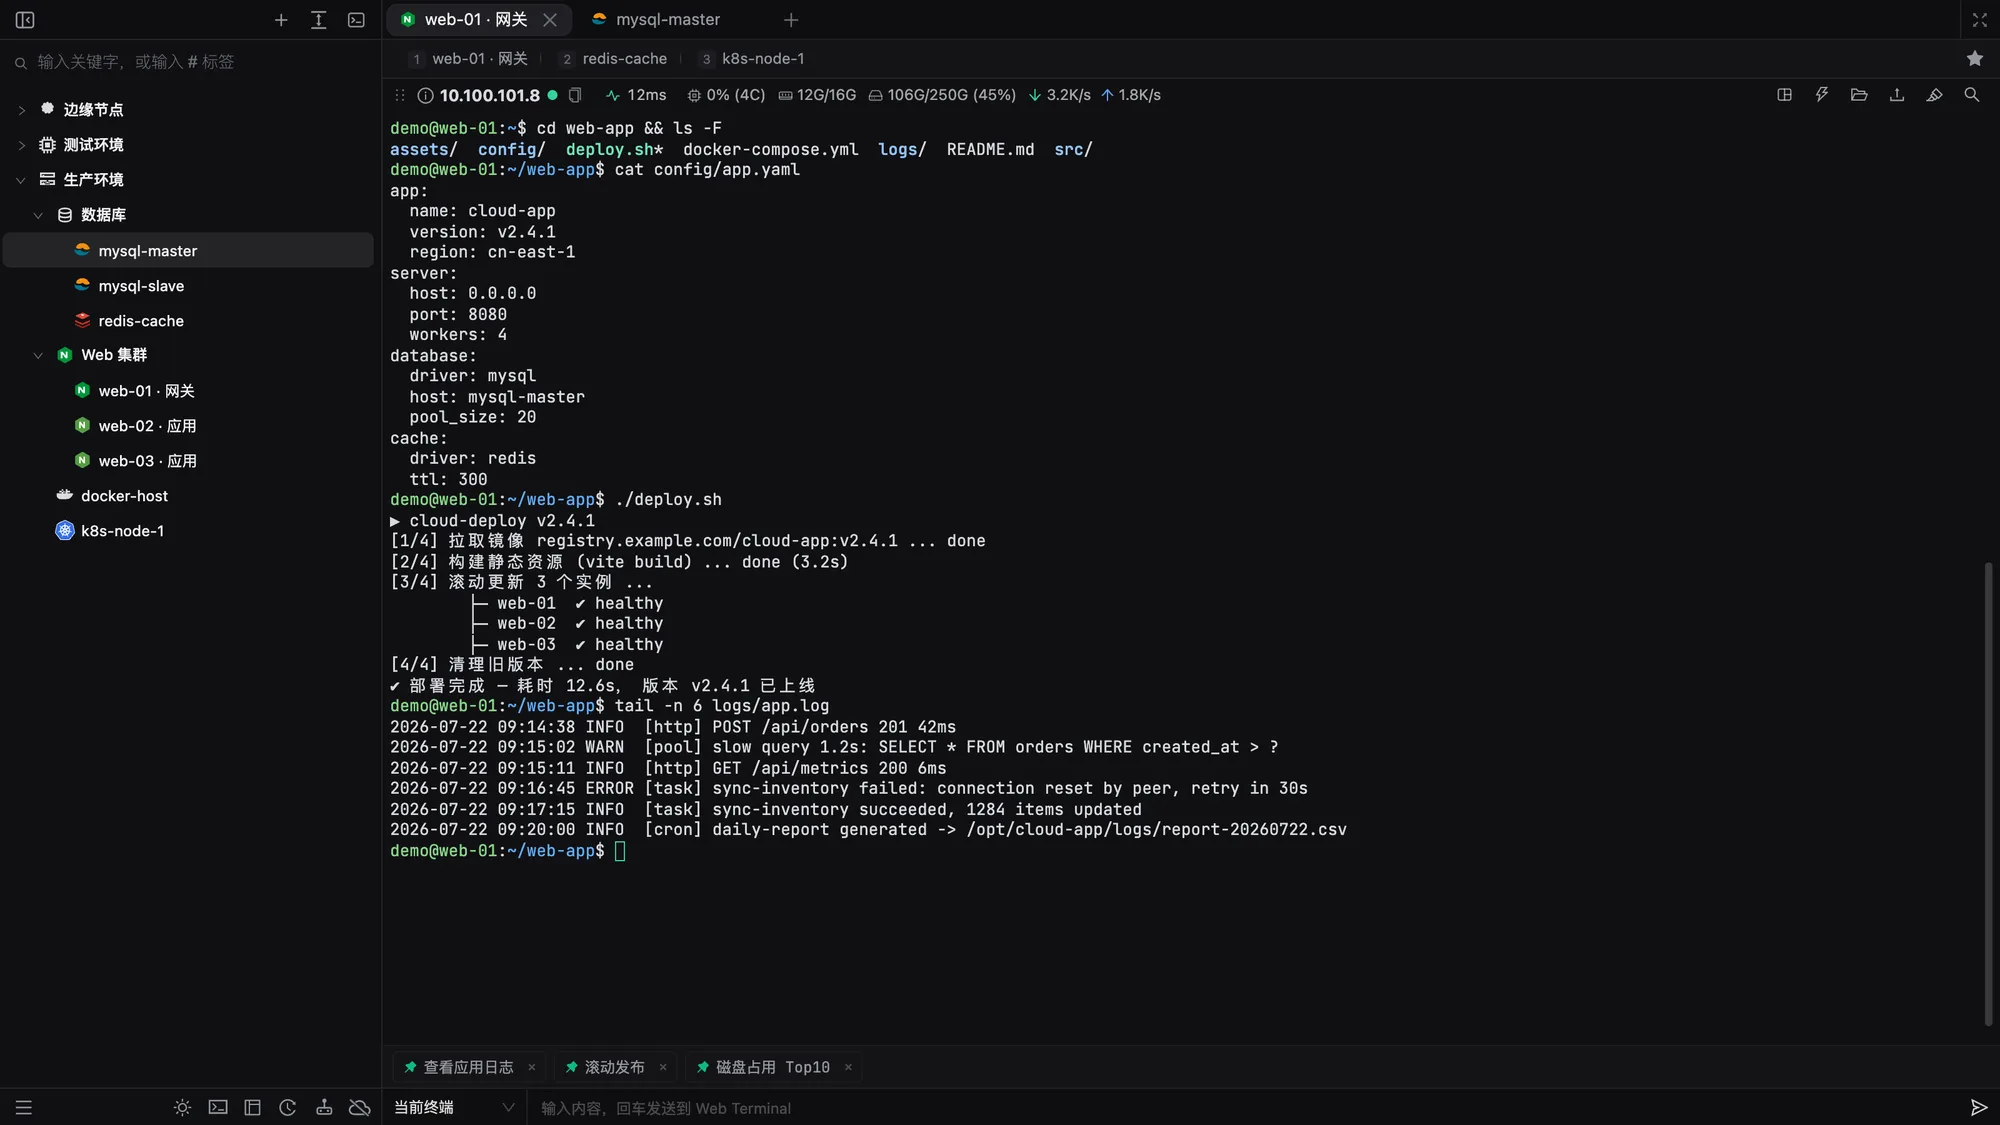 | | 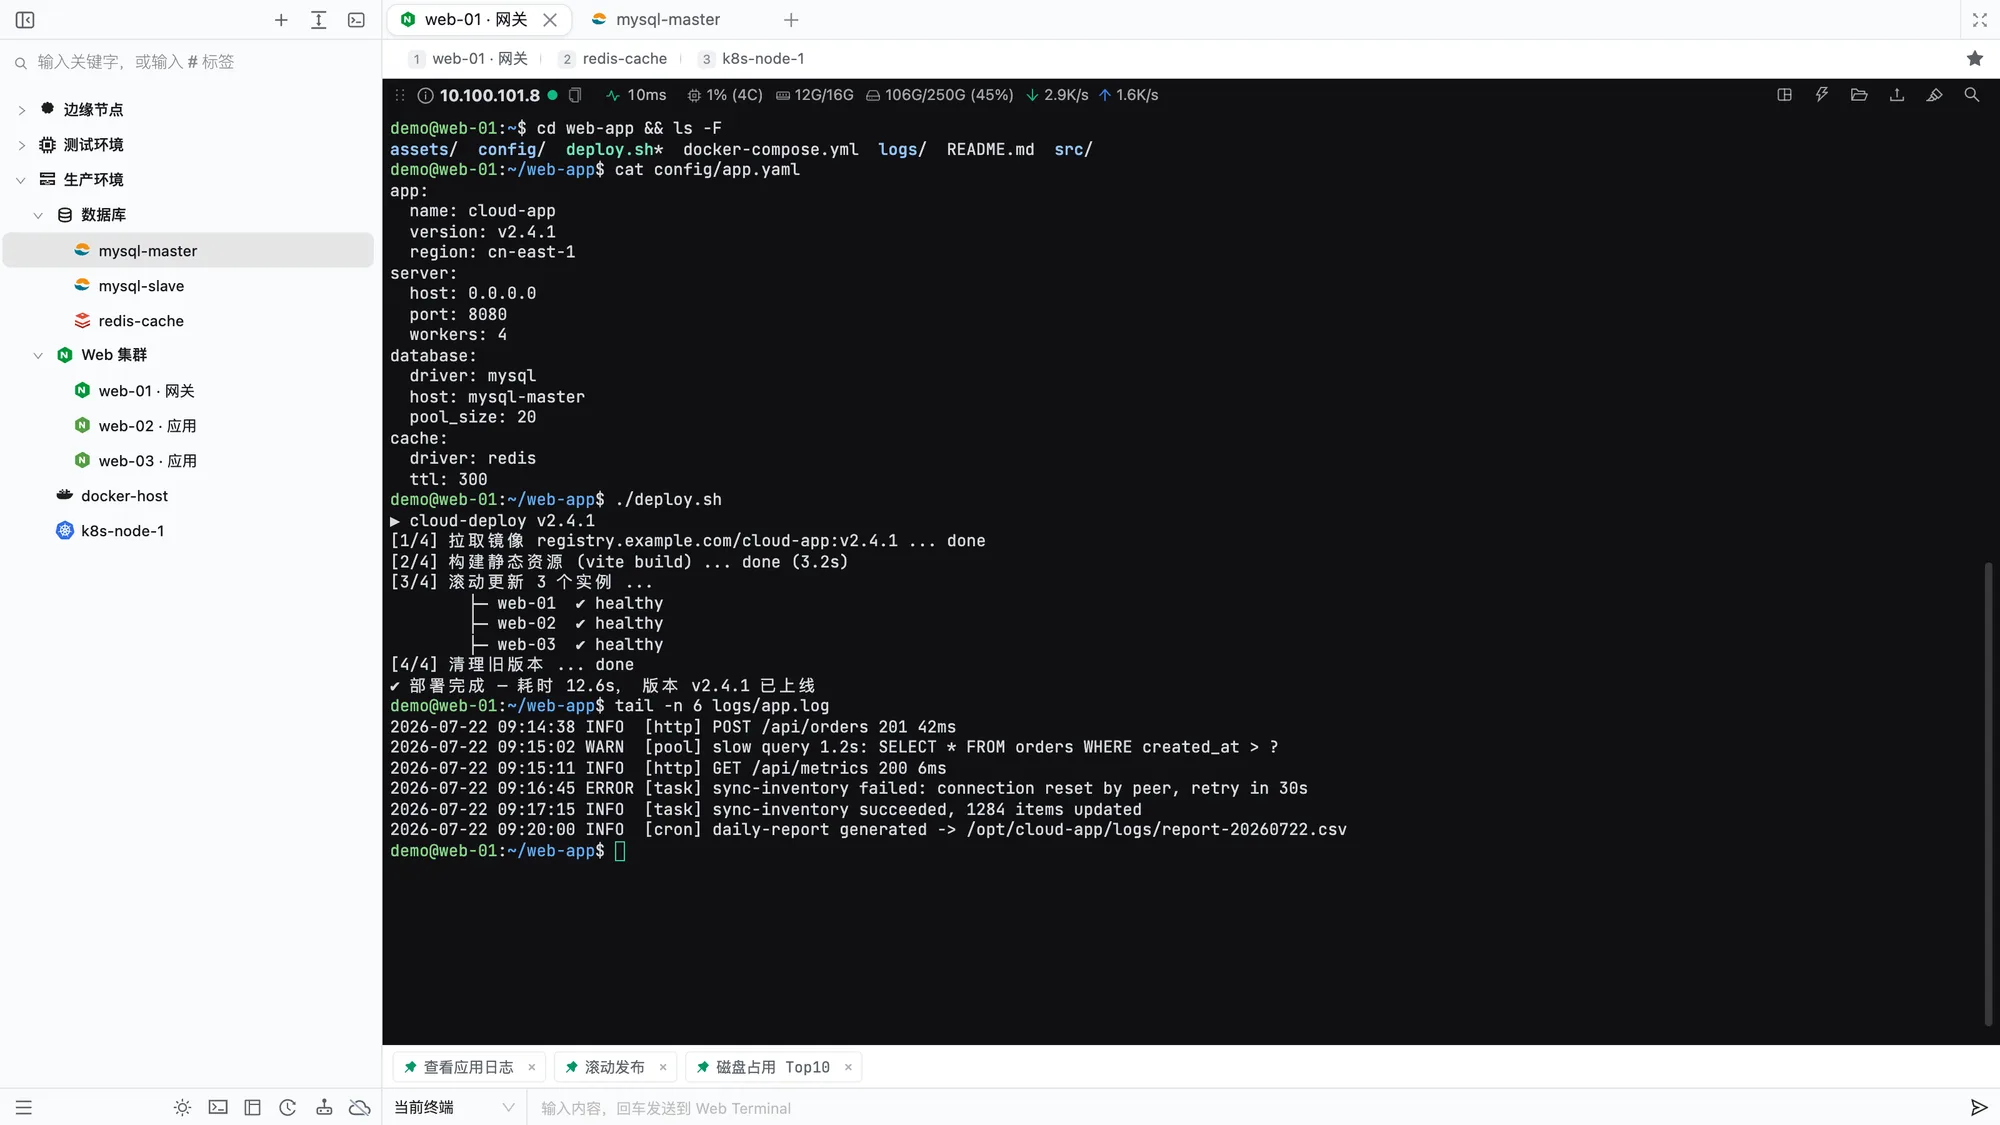 |
Skins
A skin is a complete appearance package combining wallpaper, interface colors, and a matching translucent terminal theme. Sidebars, tabs, and panels become translucent so the wallpaper shows through with a frosted-glass effect.
Open Settings → Appearance → Skins, or choose a skin in the first onboarding step.
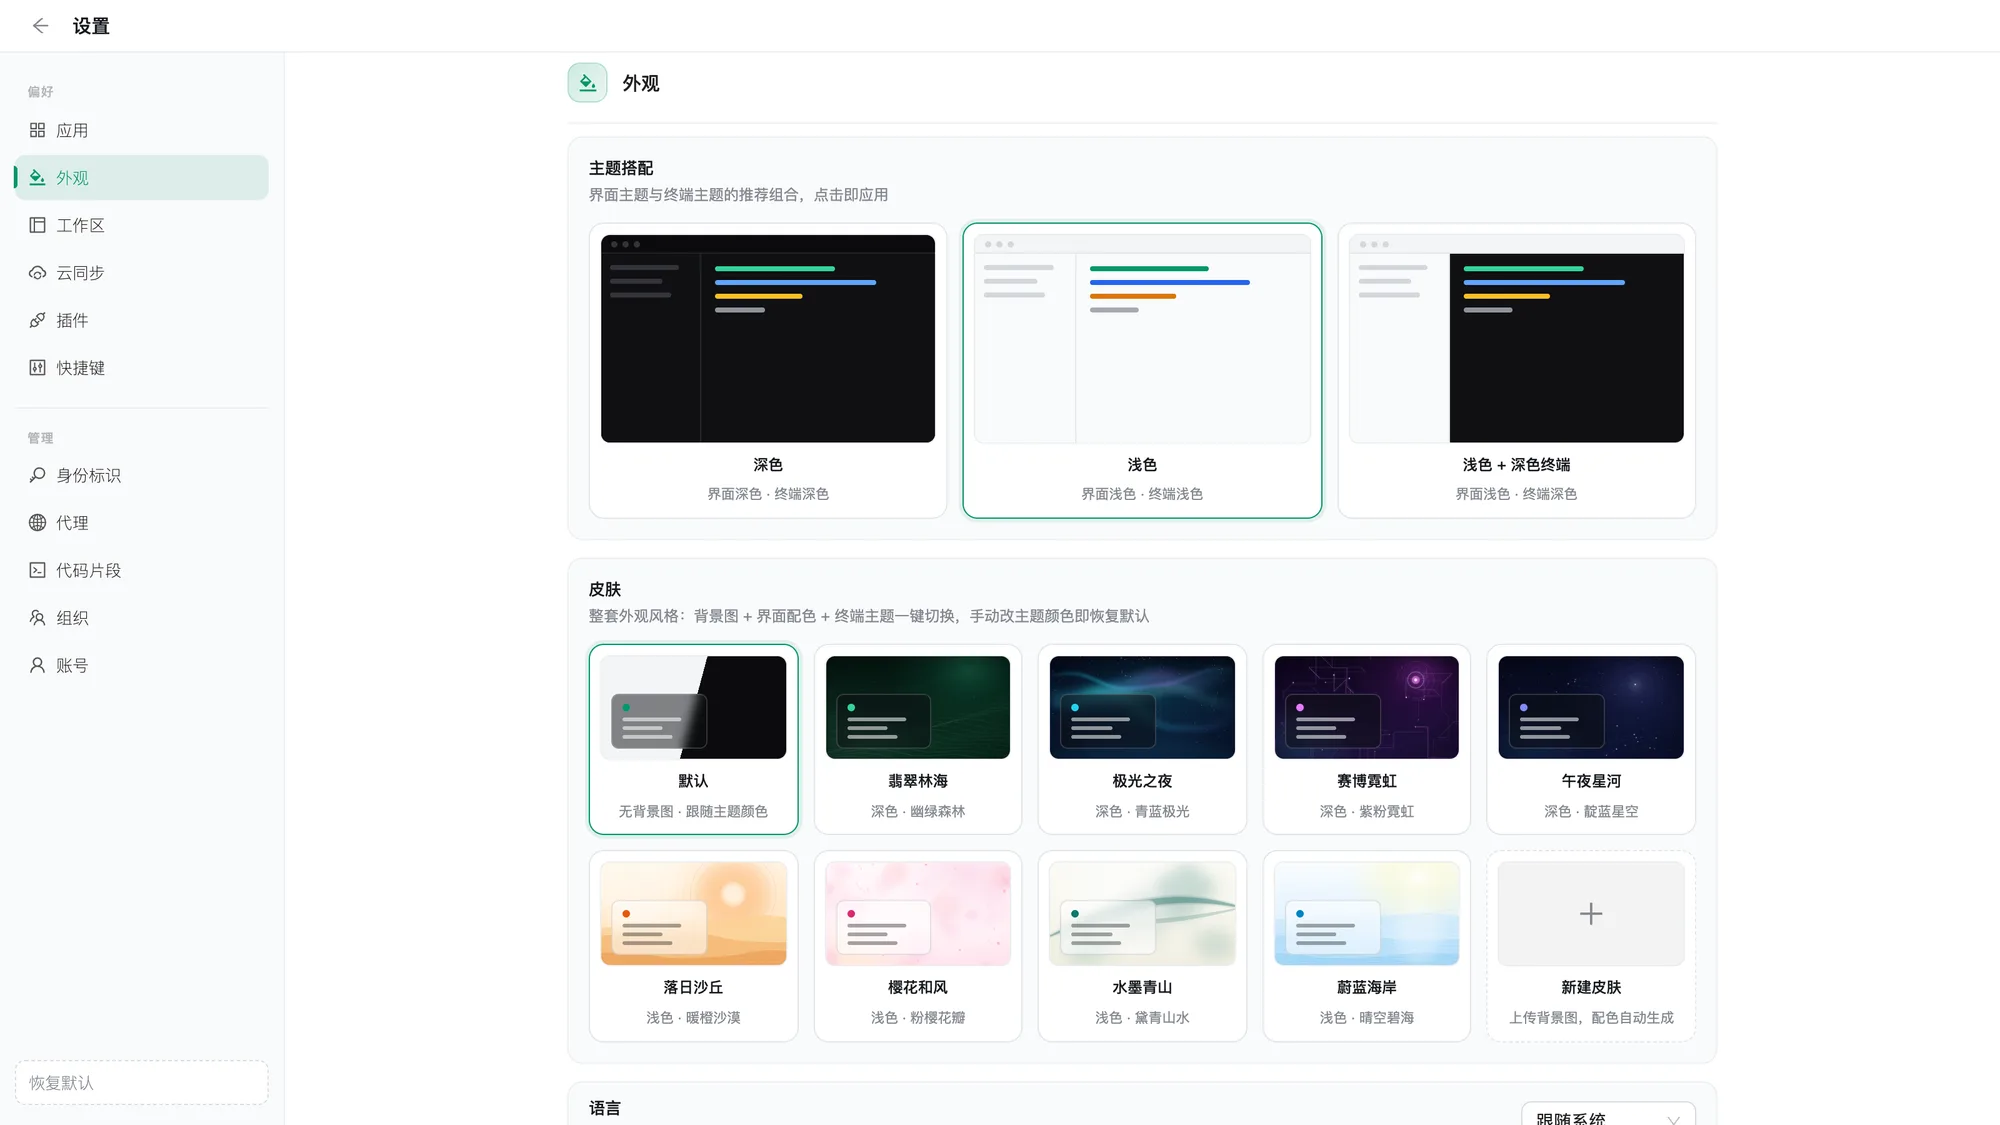
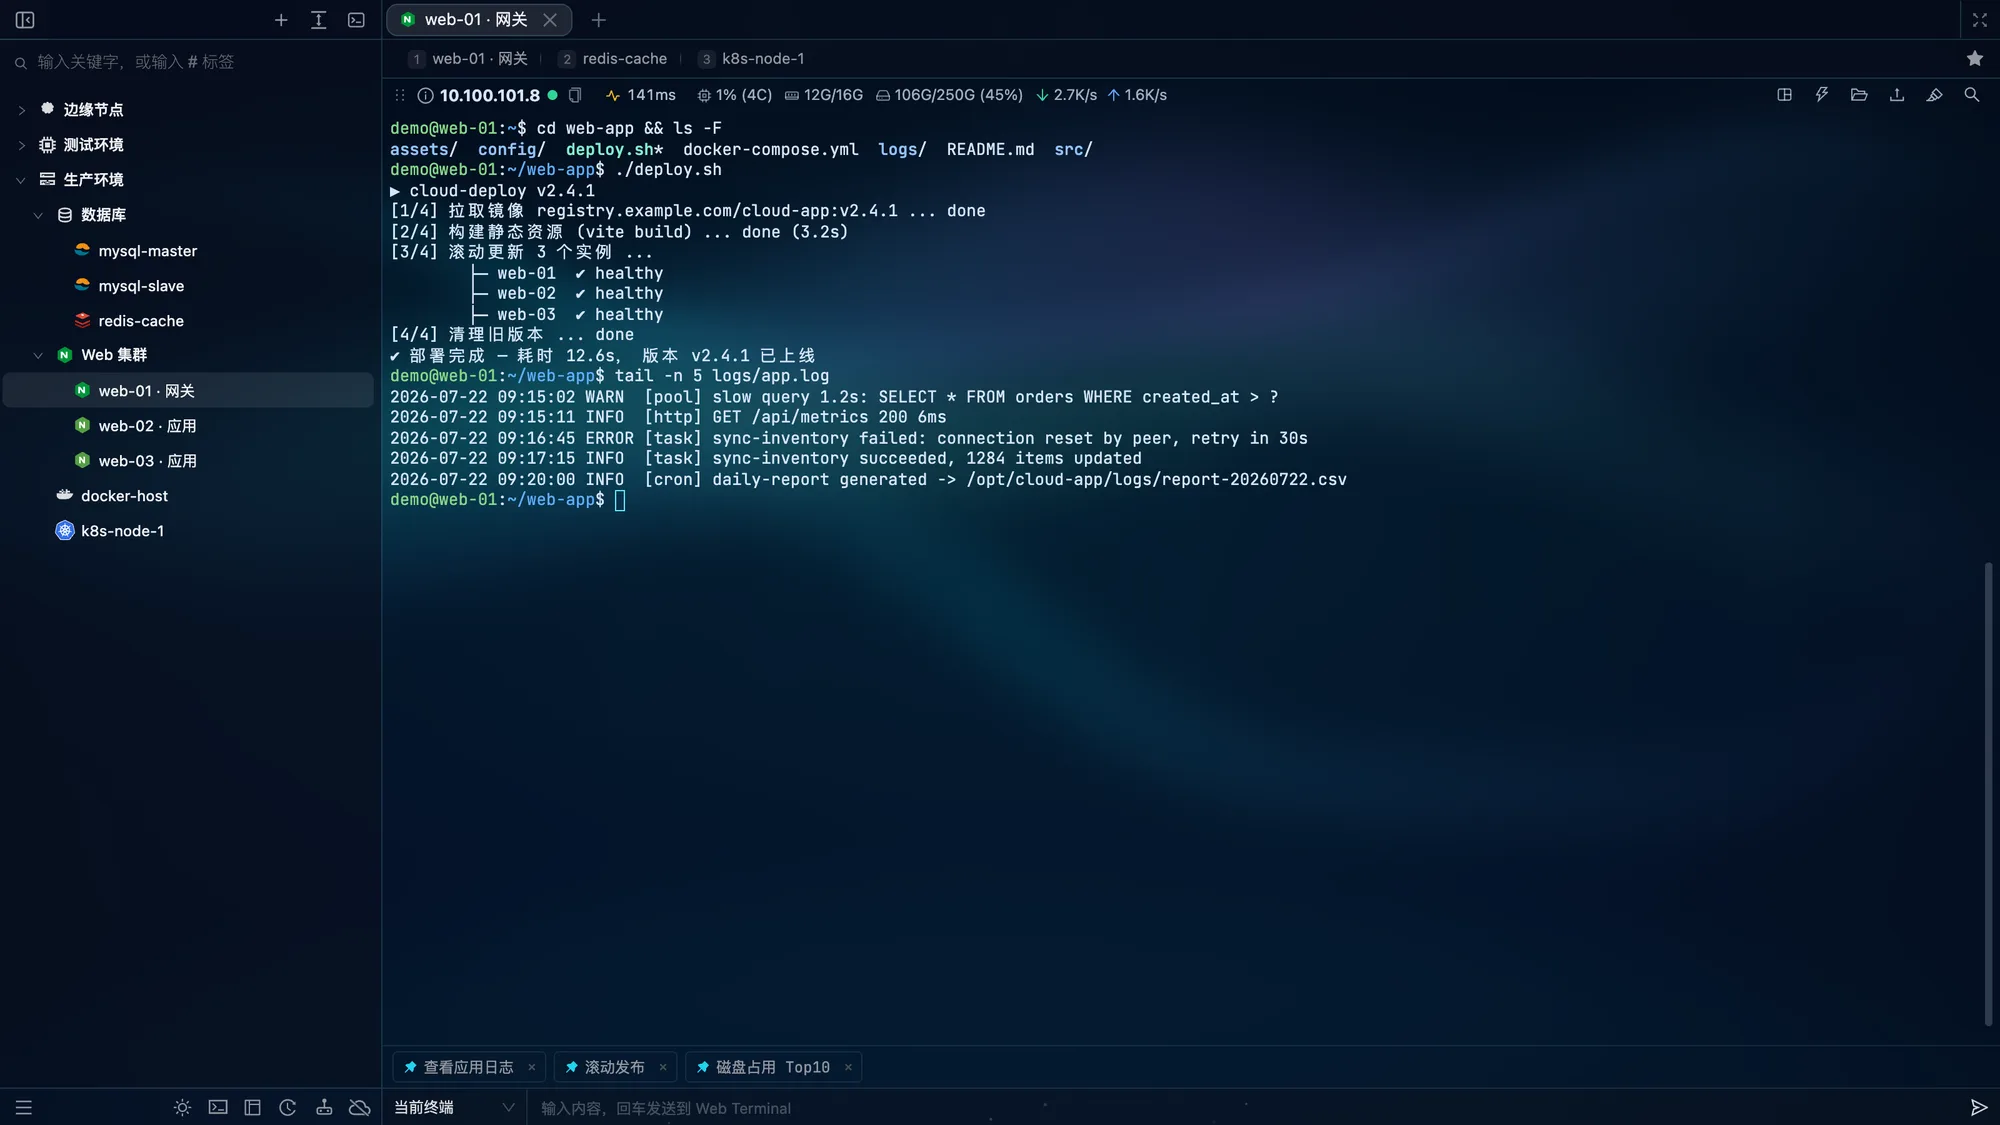
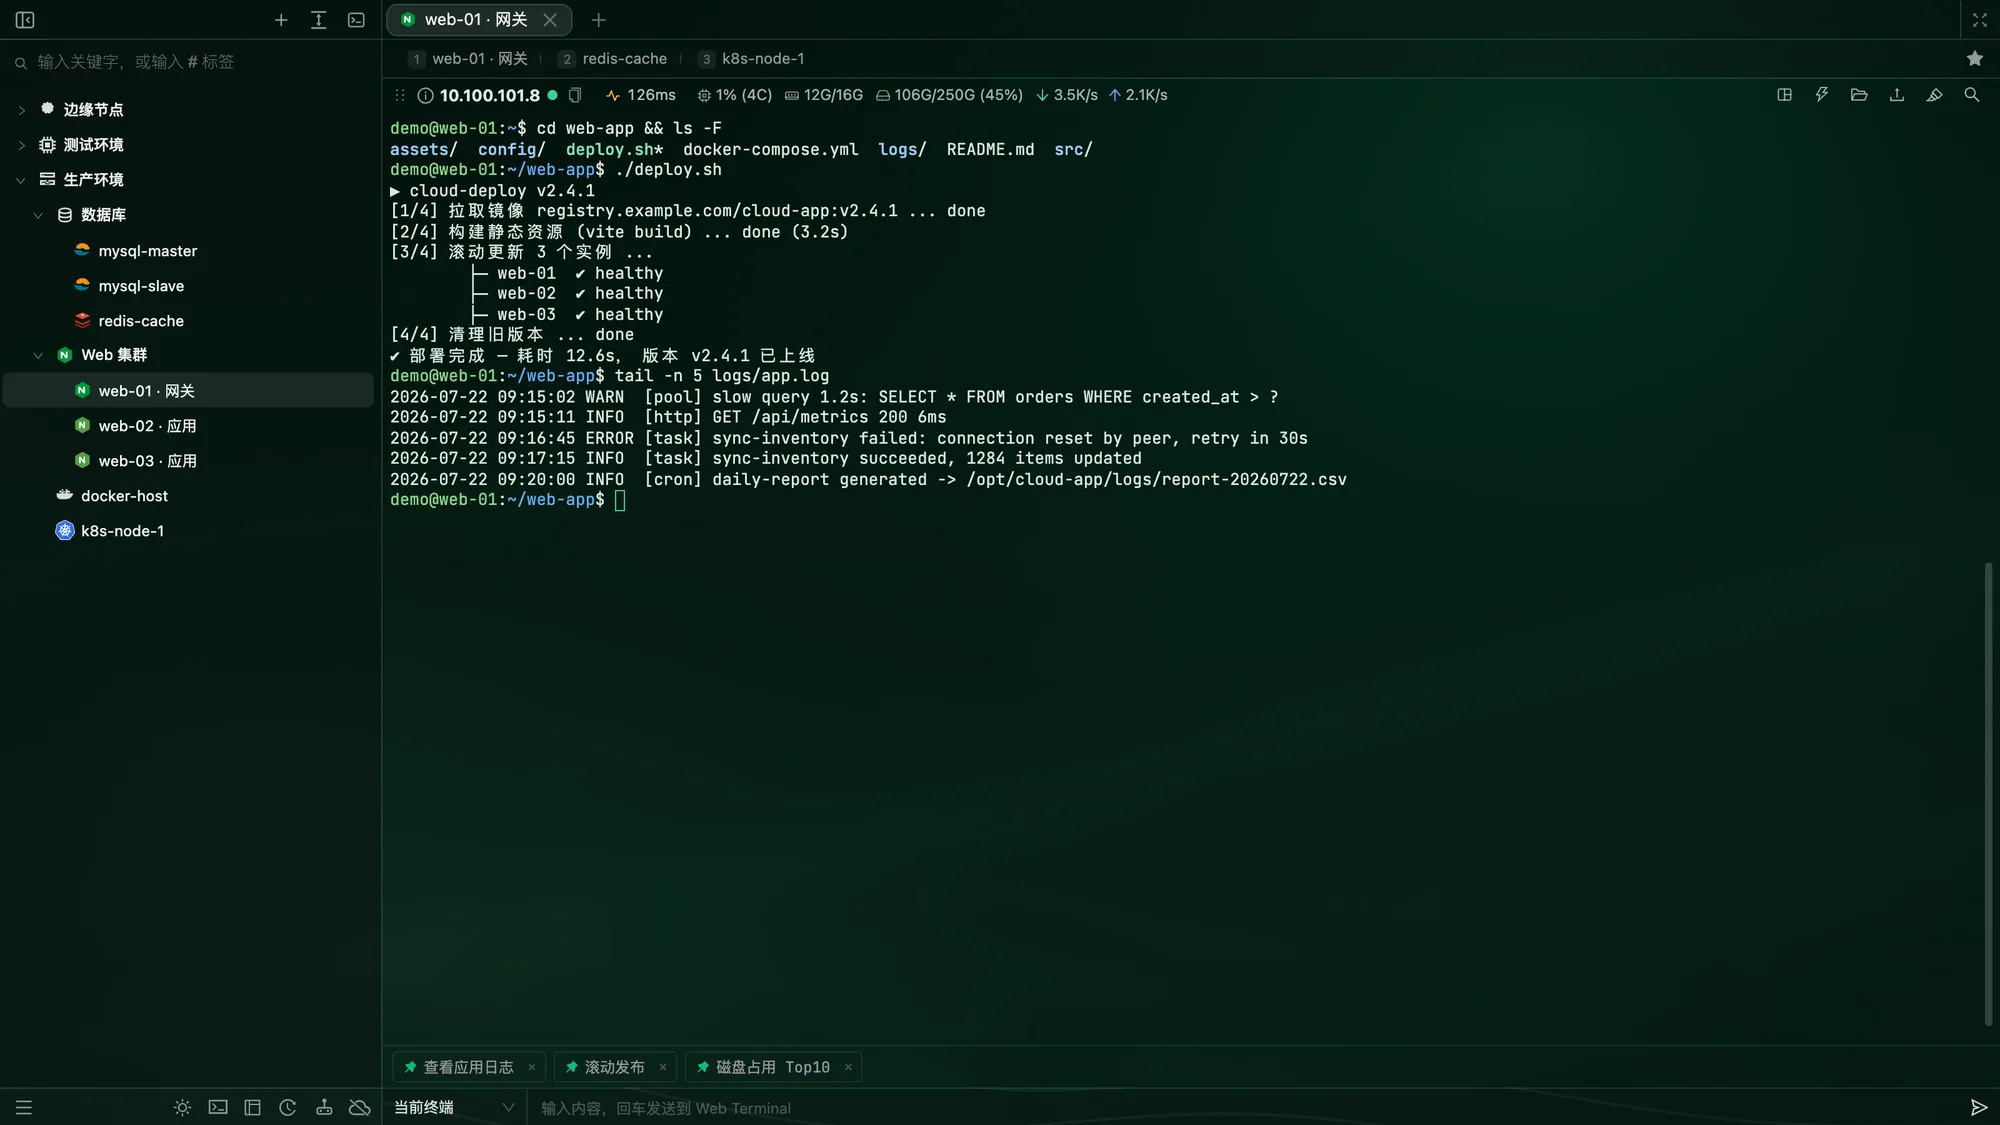
Eight skins are built in, four dark and four light. Their vector backgrounds stay sharp at any resolution without additional image files:
| Skin | Style | Skin | Style |
|---|---|---|---|
| Emerald Forest | Dark · Deep green forest | Sunset Dunes | Light · Warm orange desert |
| Aurora Night | Dark · Blue-green aurora | Sakura Breeze | Light · Pink petals |
| Cyber Neon | Dark · Purple and pink neon | Ink Mountains | Light · Ink-wash landscape |
| Midnight Galaxy | Dark · Indigo stars | Azure Coast | Light · Blue sky and sea |
| Aurora Night | Emerald Forest |
|---|---|
 |  |
Built-in skins include animated backgrounds; turn them off with the Skin animation switch (you are reminded of the performance cost the first time you turn it on).
Cloud theme library
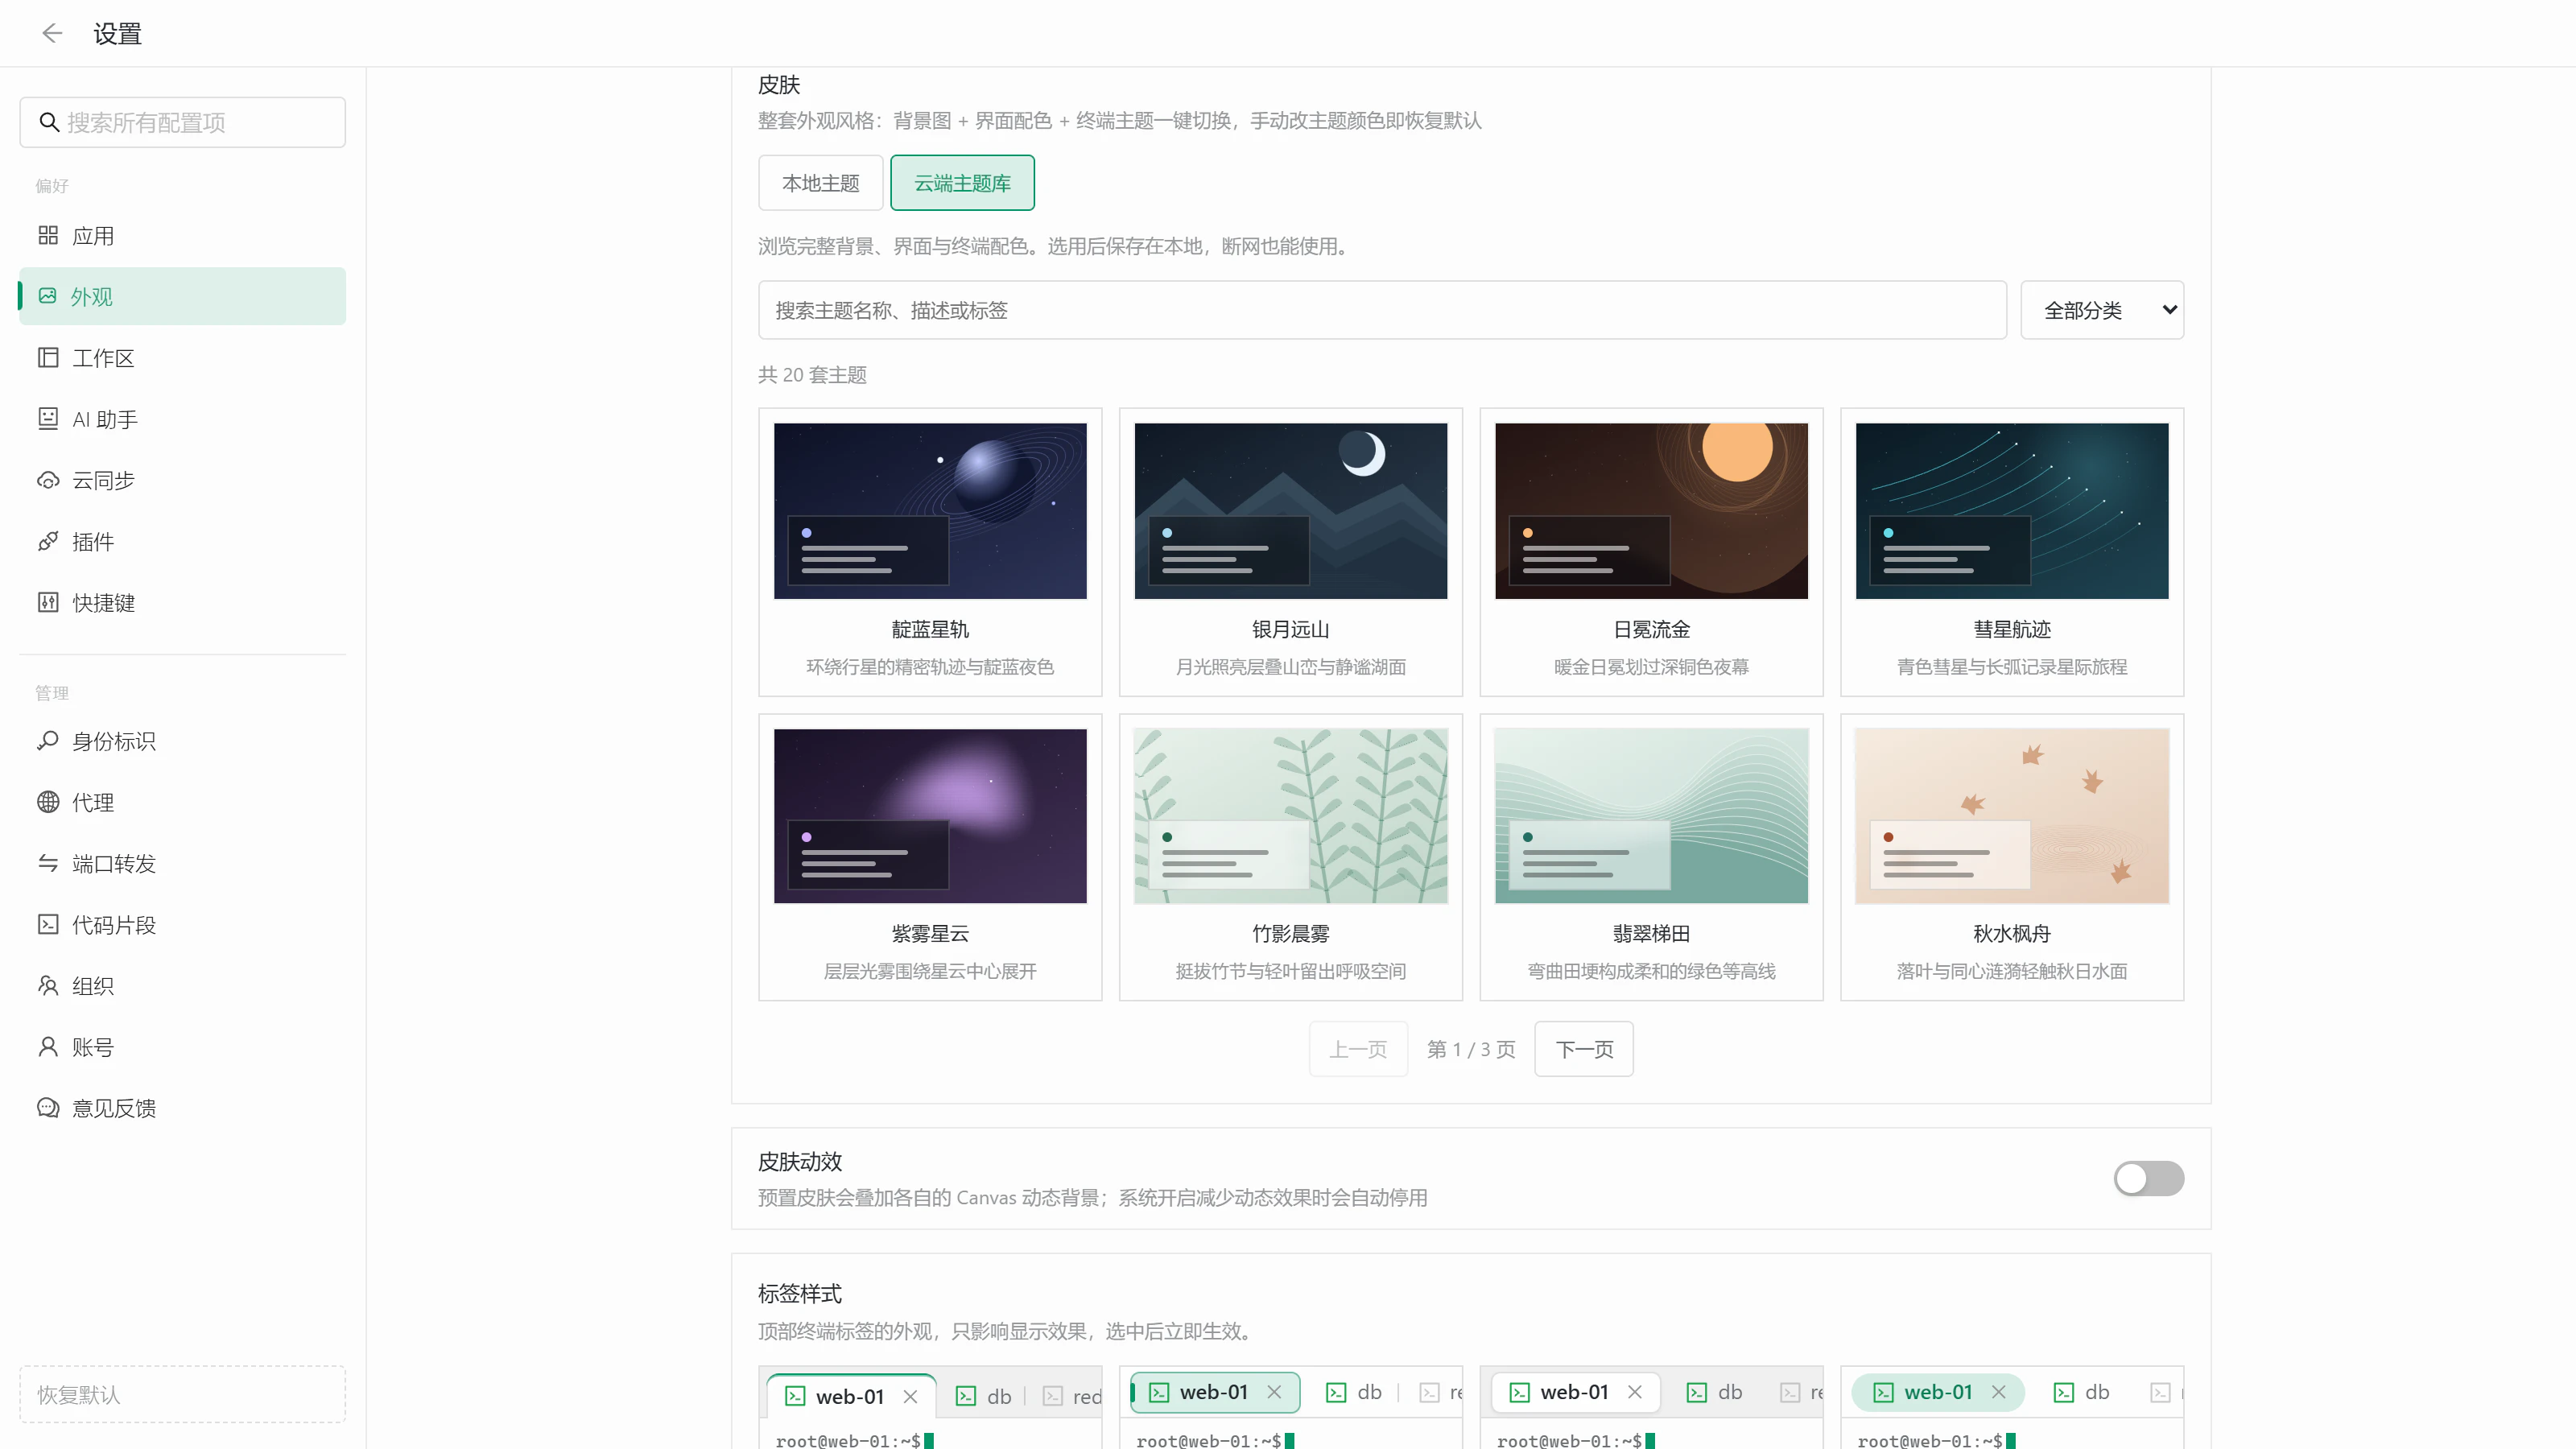
Switch the skins section to Cloud theme library to browse more official themes, with search by name, description, or tag and category filters. Choosing a theme downloads and verifies its .cttheme package, saving the background, interface colors, and terminal palette together. Installed themes stay in your local themes and keep working after restarts or offline; if a download or check fails, your current theme stays in place. You can also preview and download theme packages in the theme library on this site.
Custom skins
Choose New skin, the last card in the skin grid, to create your own:
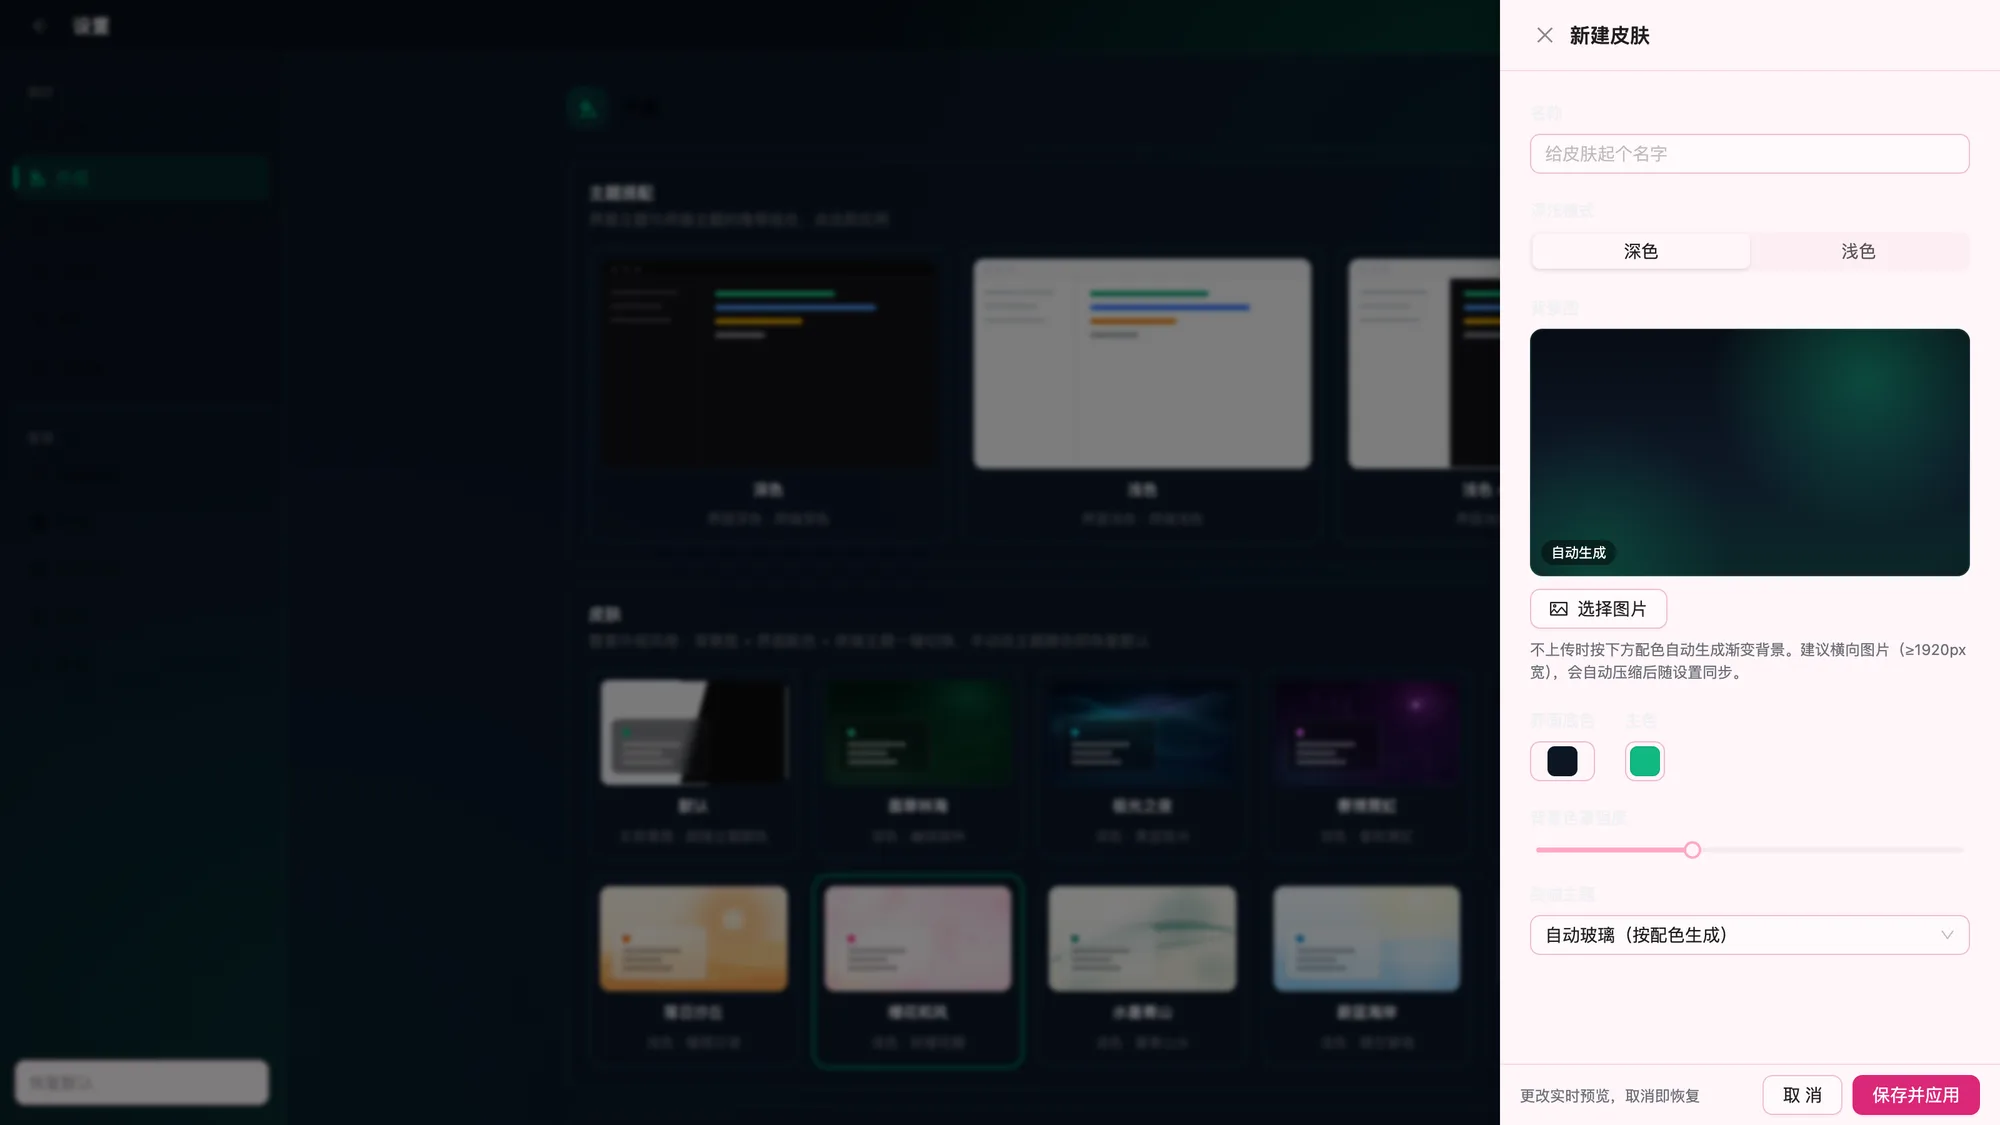
- Wallpaper: upload a local image, preferably landscape and at least 1920px wide. It is compressed before syncing with settings. Without an image, a gradient is generated from your chosen colors
- Interface base / accent color: set the overall tone and highlight color
- Background overlay strength: 0%–60%; higher values improve foreground clarity and dim the wallpaper
- Terminal theme: choose automatic glass colors generated from the palette, or any built-in or custom terminal theme
- Changes preview instantly; Cancel restores the previous appearance and Save applies the skin. Hover an existing custom skin to edit or delete it
Skins change both the interface and terminal theme. Manually switching light / dark mode or applying a theme preset exits the skin and removes its background by design. Skins, including custom wallpaper, sync with settings.
Cursor styles
Settings → Appearance → Cursor style changes the mouse pointer inside the app (other programs are not affected):
- Sixteen built-in presets: basic styles such as Outline, Pencil sketch, Obsidian, Mint, Glacier, Retro pixel, Neon, and Aurora gradient, plus character styles such as Liquid glass, Gilded, Origami, Ink, and Orange cat under “More styles”
- Hover a card to preview it and try the click, text, and drag pointers in the test area. Your choice applies and saves immediately
- Cloud cursor library: switch to the cloud library to browse official styles by category and keyword. Choosing one downloads and verifies all seven pointer states so it keeps working offline. Preview every style in the cursor library on this site
| Built-in presets | Cloud cursor library |
|---|---|
 |  |
Plugins
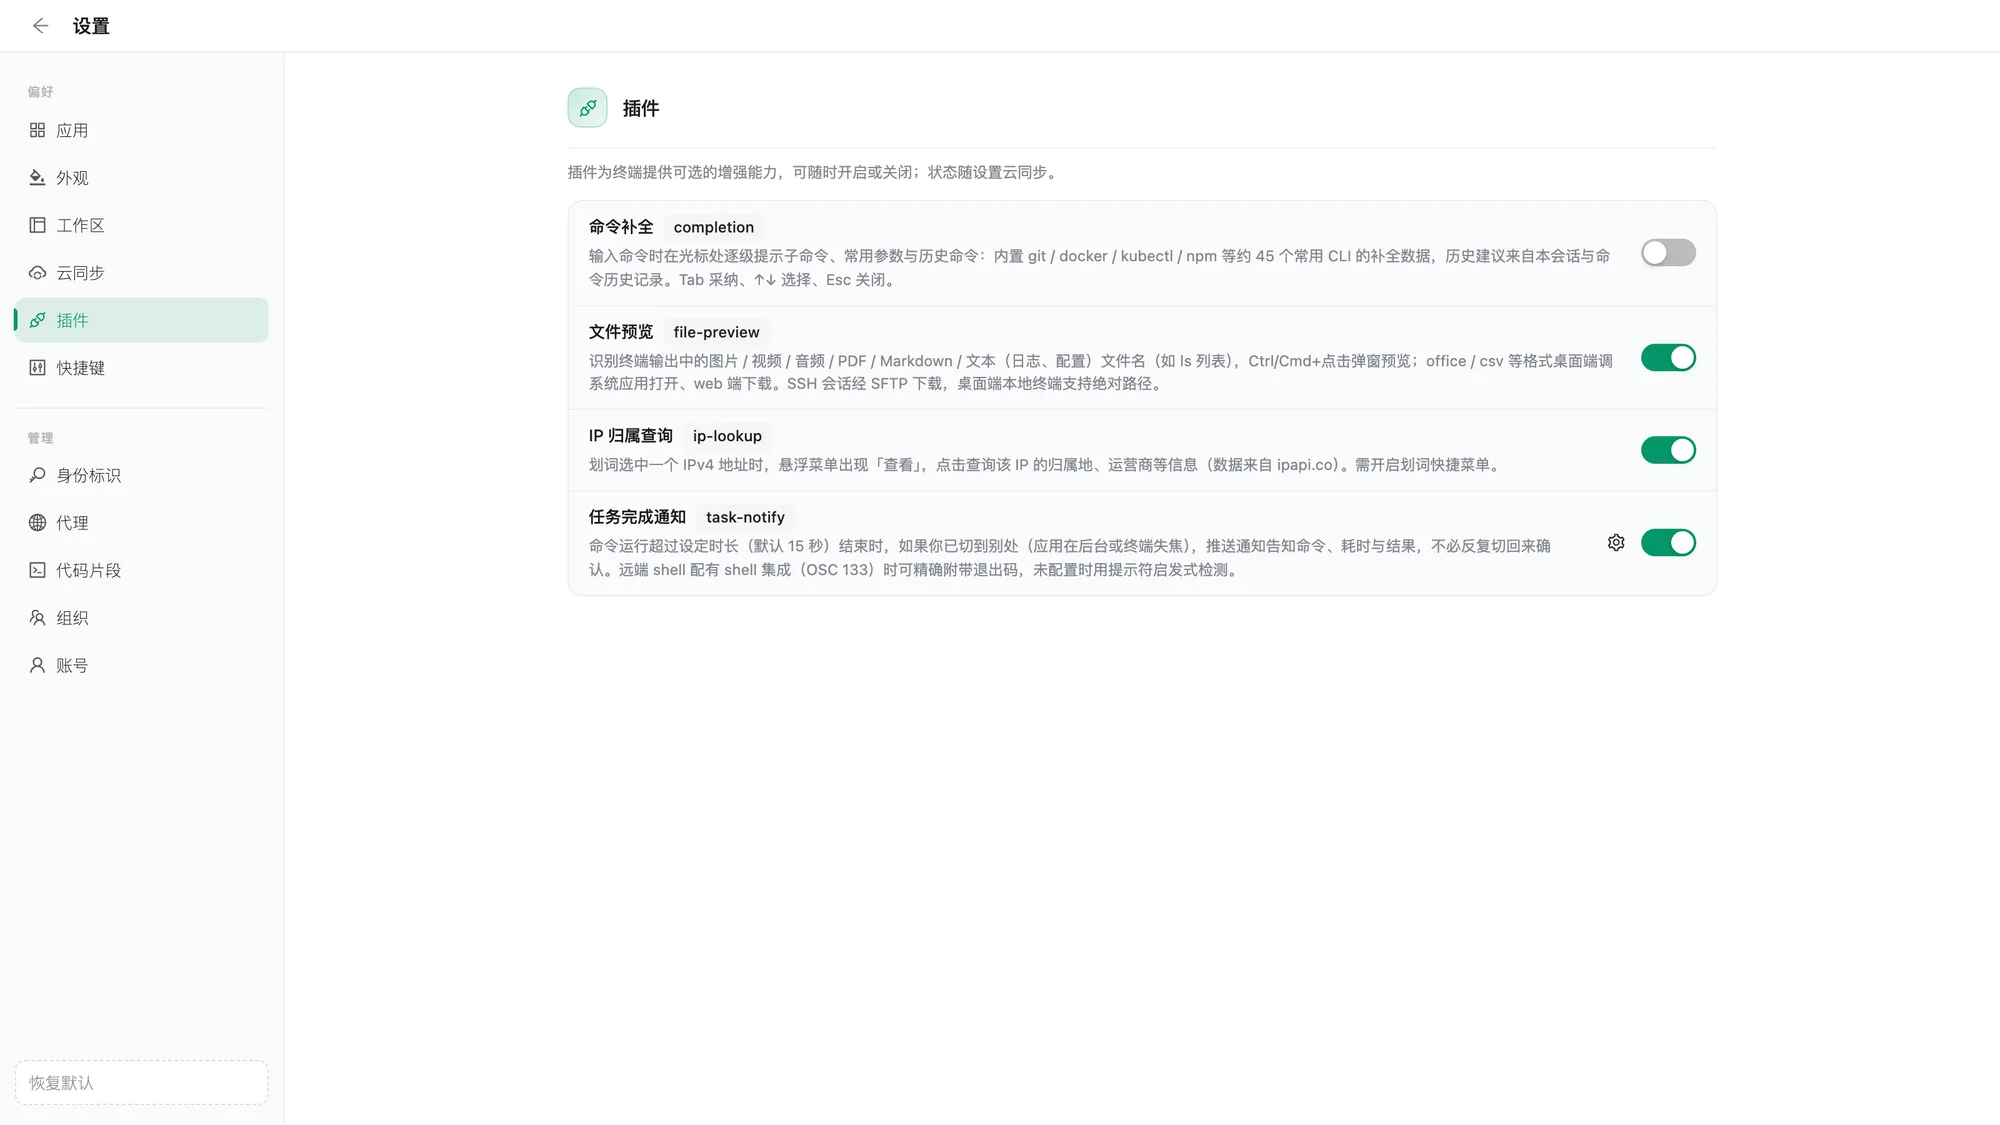
Plugins add optional terminal capabilities. Toggle them at any time in Settings → Plugins; their enabled state syncs with settings.
| Plugin | Default | Purpose |
|---|---|---|
Command completion completion | Off | Suggest subcommands, arguments, and history at the cursor |
File preview file-preview | On | Preview files with Ctrl/Cmd+click on terminal filenames |
IP lookup ip-lookup | On | Look up a selected IPv4 address's location and provider |
JSON formatter json-formatter | On | Format, view, and copy selected JSON |
Task notification task-notify | On | Notify you when a long-running command finishes |
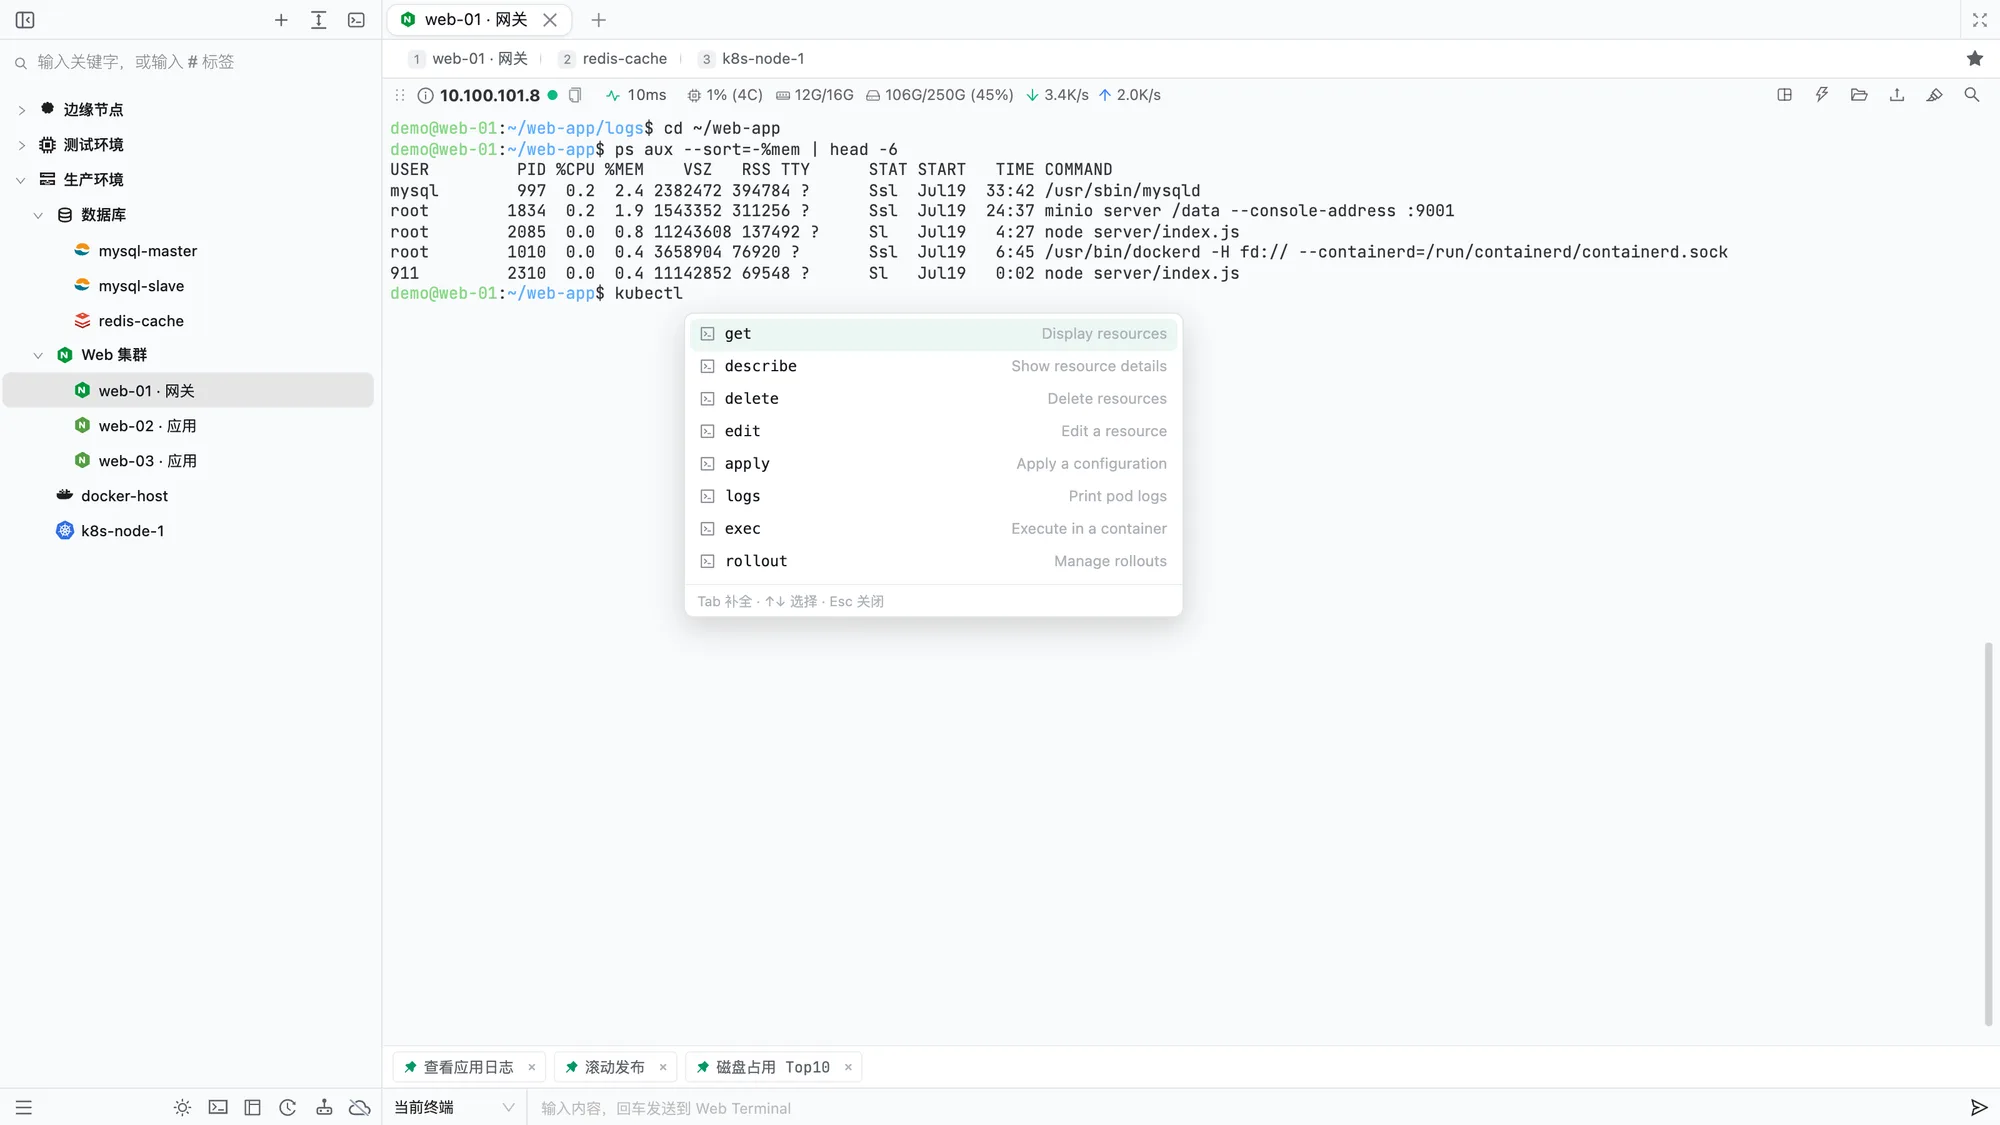
Command completion
- Built-in subcommands and common arguments for about 45 CLIs, including git, docker, docker-compose, kubectl, helm, npm, systemctl, tar, curl, ssh, rsync, grep, find, ps, apt, brew, cargo, go, mysql, redis-cli, nginx, and tmux
- History suggestions come from the current session and saved command history, matching the full line's prefix; up to three appear first
Tabaccepts,↑/↓select, andEscdismisses; accepting a suggestion advances to the next level- The current line is rebuilt from what the terminal actually shows, so suggestions continue after shell completion or history selection.
Tabin path and free-form argument positions goes to the shell - When no suggestion is selected, the popup is 60% opaque by default; change it to 20%–100% in the plugin settings to keep output visible
- Limitations: no suggestions away from the end of the line, during reverse history search, or in full-screen programs such as vim and less; hidden input such as passwords never shows suggestions; dynamic arguments such as branch and container names are not completed yet
File preview
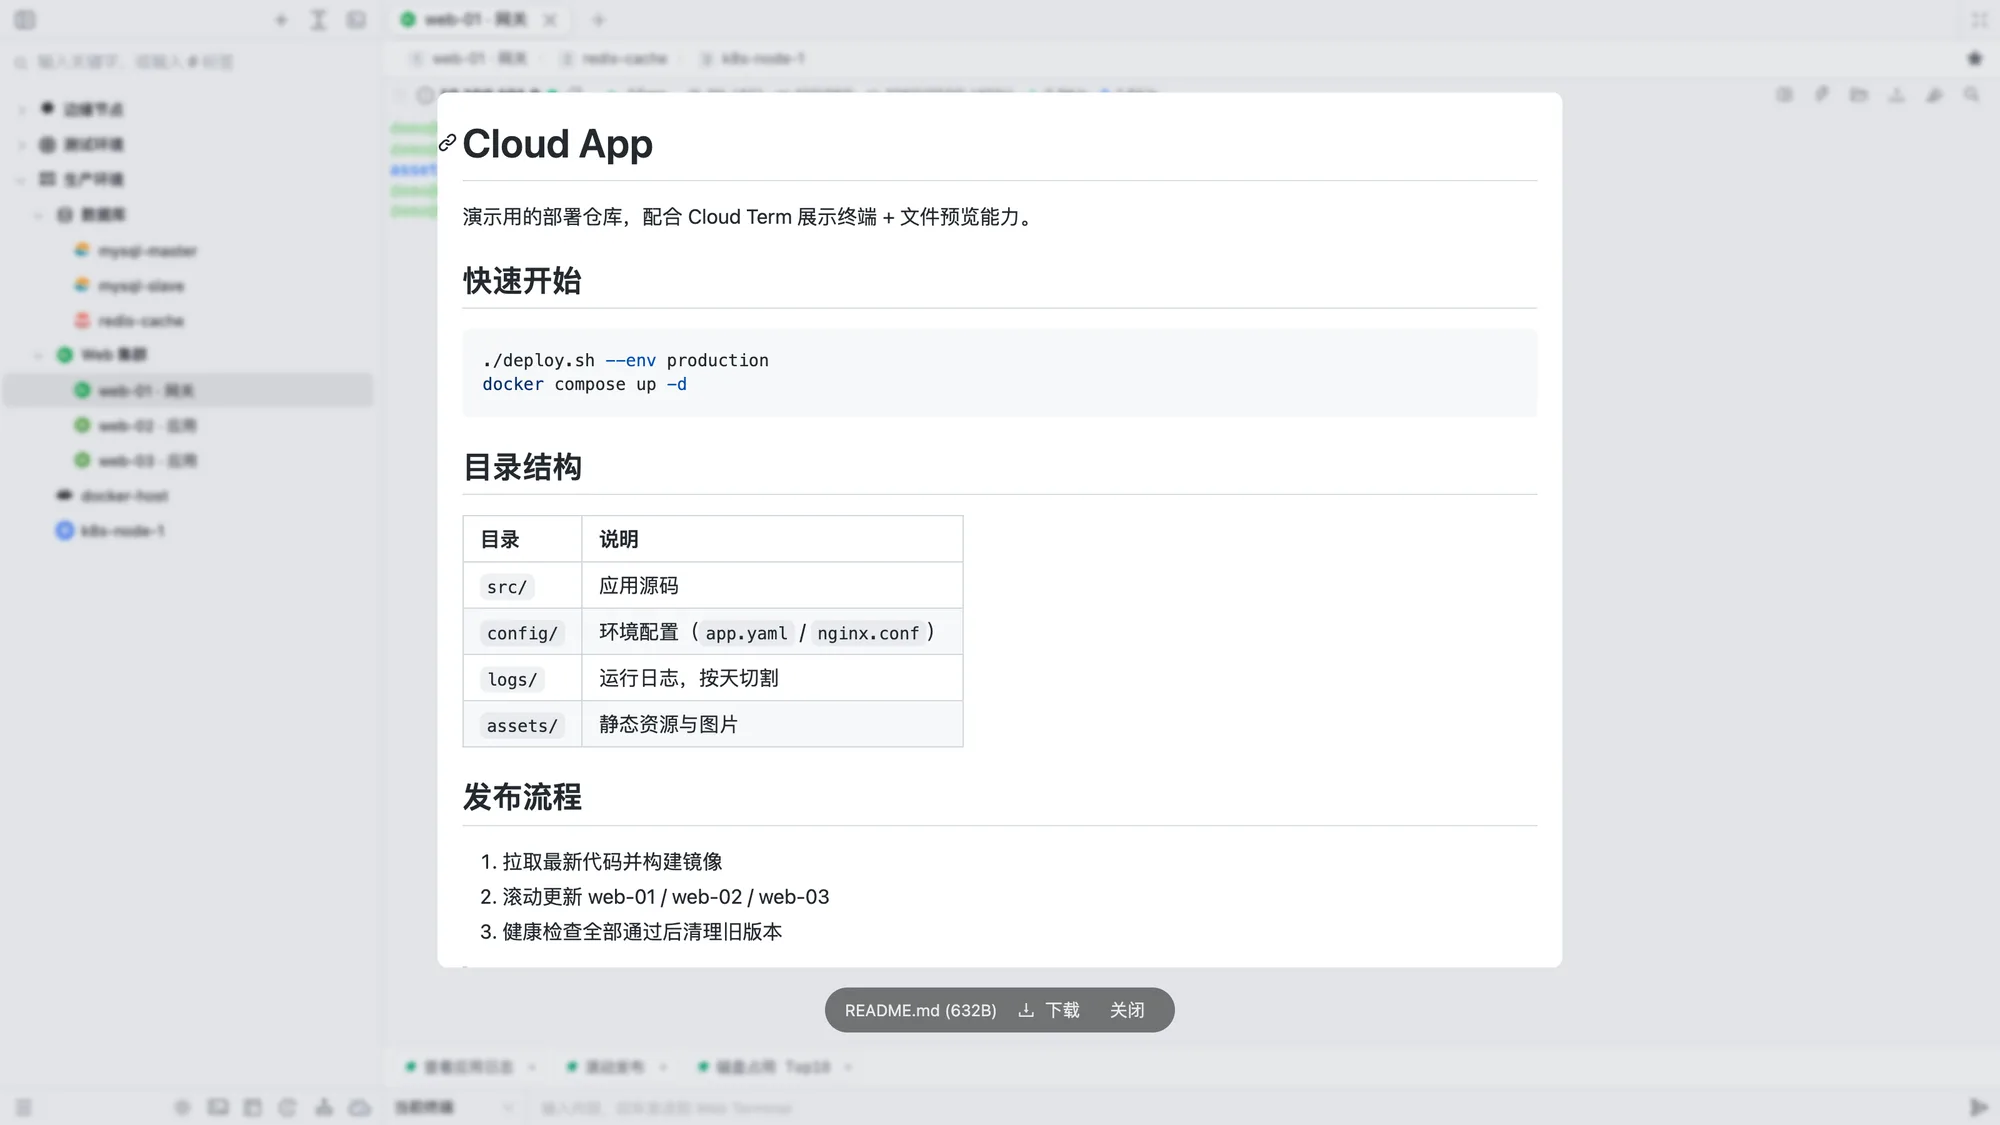
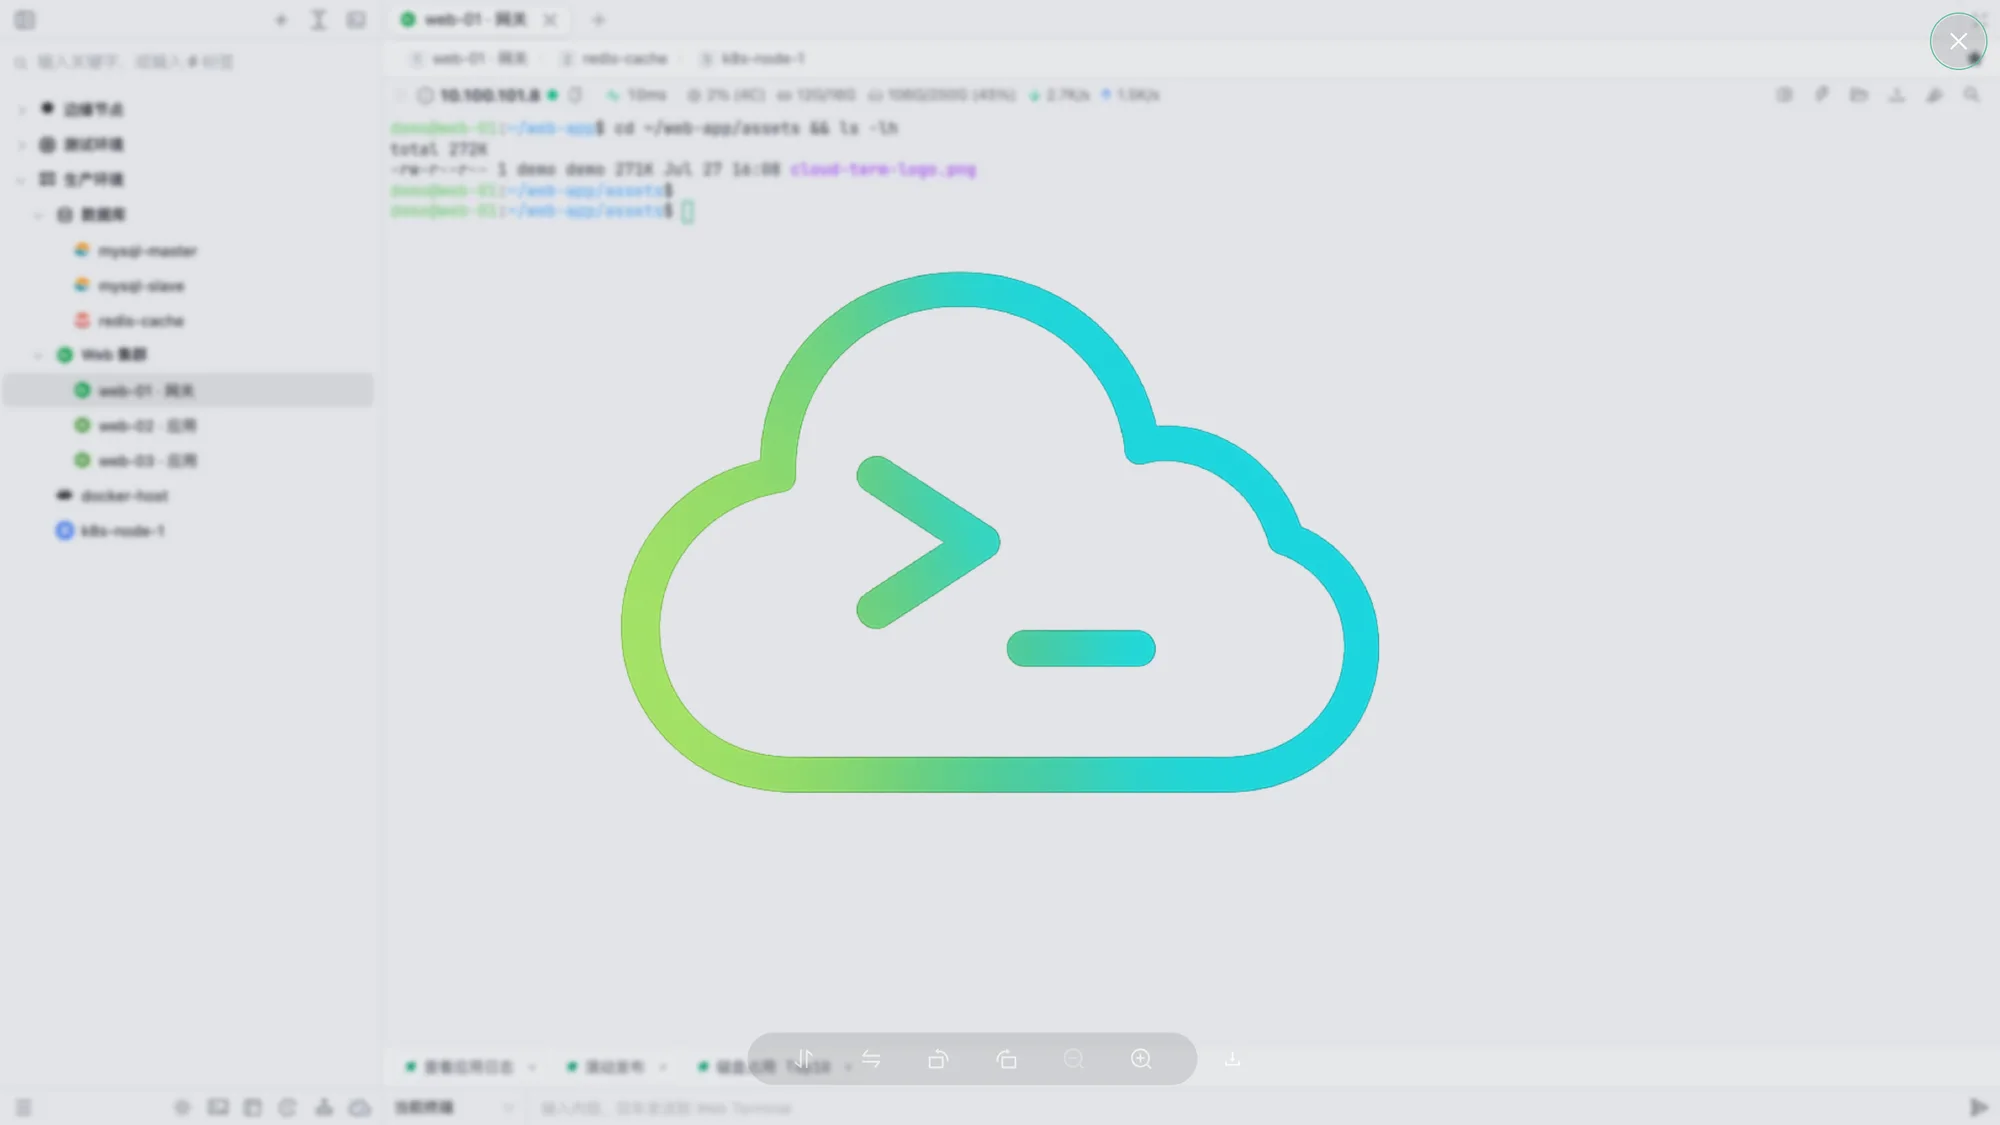
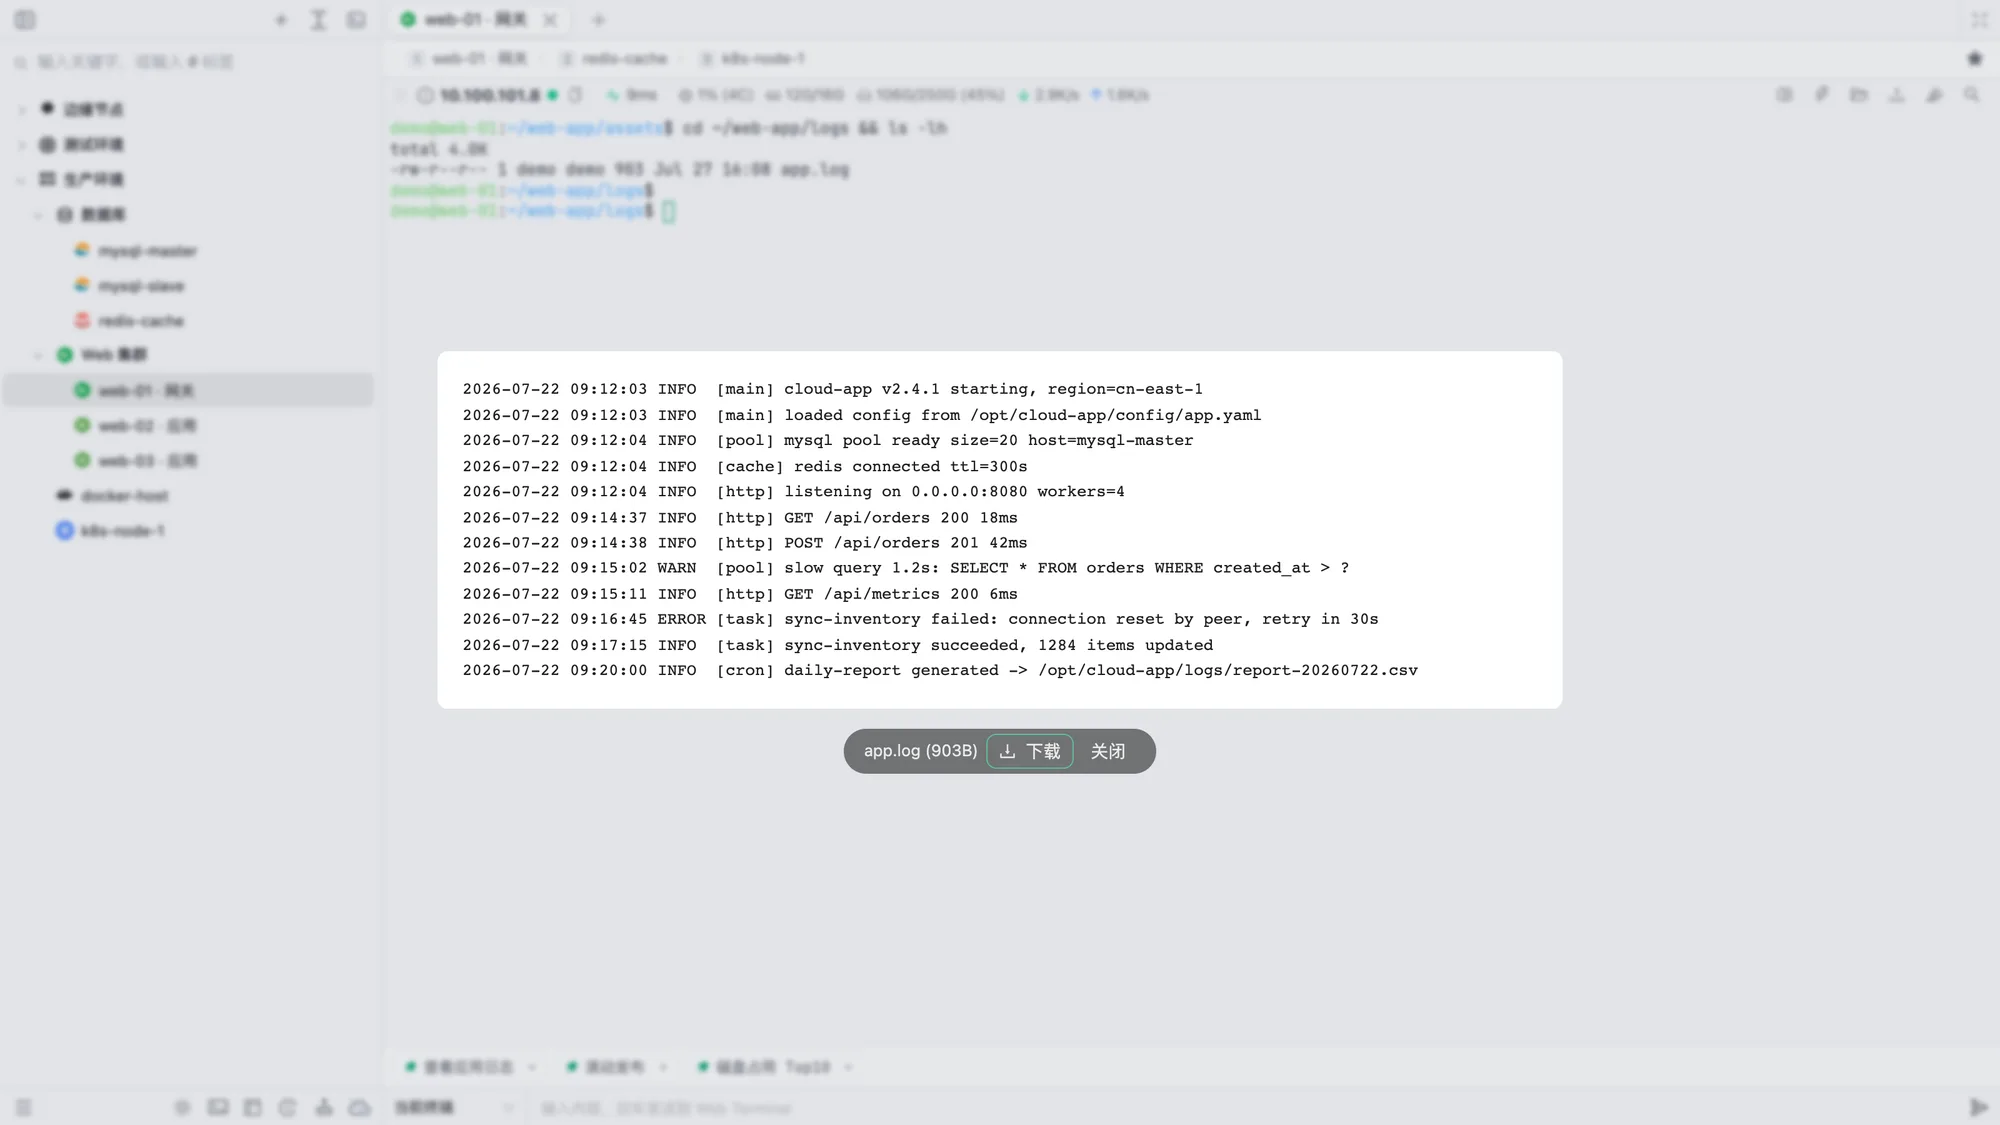
Recognizes filenames in terminal output from ls, find, git status, and logs. Hover to underline a file and Ctrl/Cmd+click to preview it:
- Images: png / jpg / gif / webp / svg / avif and more, with zoom, rotation, and download
- Video / audio: mp4 / webm / mov and mp3 / wav / flac. Browser-unsupported formats such as mkv and avi prompt you to download and play them locally
- PDF / Markdown / text: embedded PDFs, rendered Markdown, and direct viewing of txt / log / json / yaml / conf / env / xml files
- Office / CSV: desktop apps download to a temporary folder and open the system's default application; the web app offers a download
- SSH sessions check file existence through SFTP before downloading. Files over 5 MB require confirmation (50 MB for Office / CSV)
- Relative paths depend on detecting the current directory. Paths starting with
~/and unquoted filenames containing spaces are not recognized
| Markdown preview | Image preview | Log / text preview |
|---|---|---|
 |  |  |
IP lookup
Select an IPv4 address in the terminal and choose “View” from the selection menu to see its country / region, province / city, and provider. Both the web and desktop apps query an offline IP database through the Cloud Term cloud service instead of calling third-party online services, and clearly distinguish reserved addresses, addresses not in the database, and service outages.
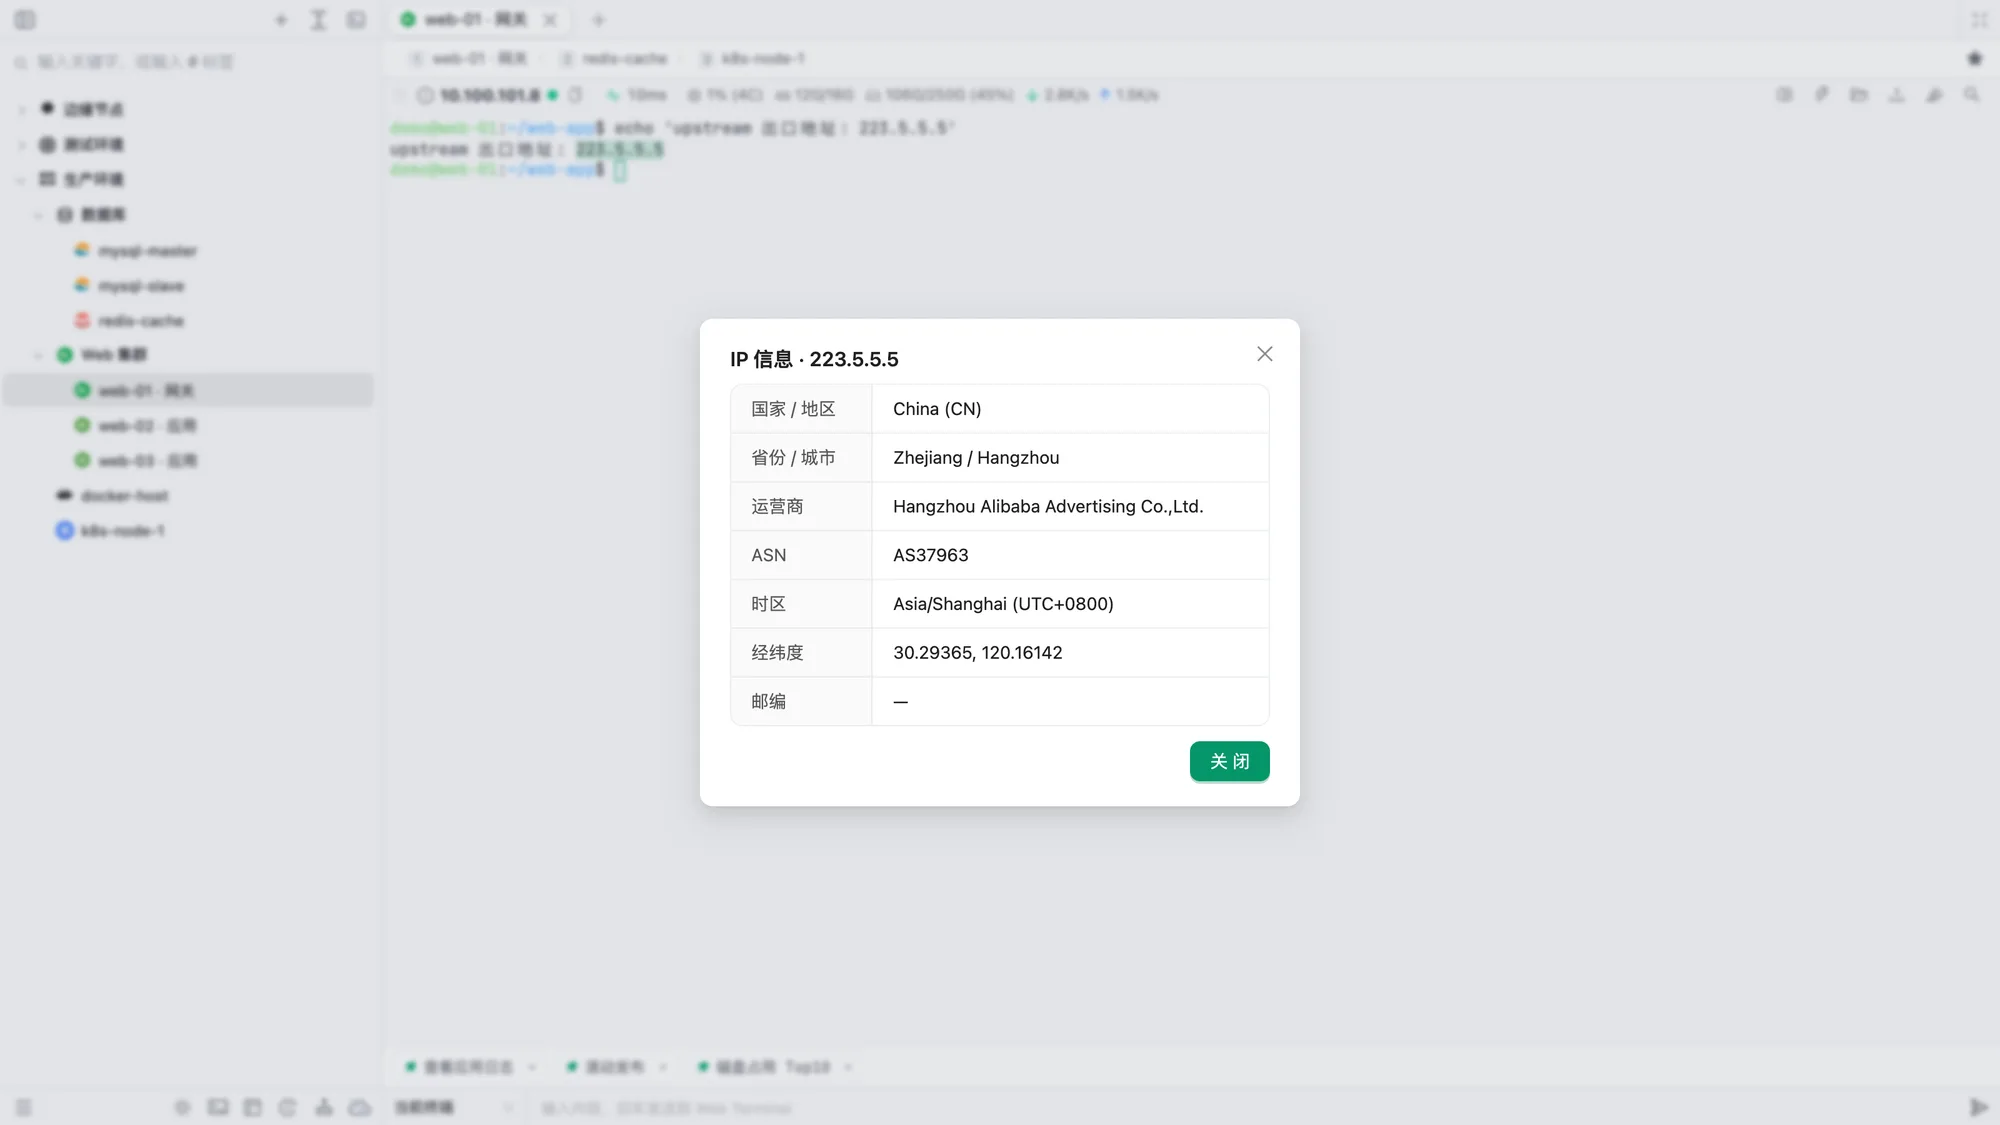
This plugin depends on the selection quick menu. Disabling the floating menu in Settings → Workspace also disables its entry point.
JSON formatting
Select a JSON object or array, such as a curl response or a log line, and choose “Format” to open an indented, syntax-highlighted view:
- The button appears only if the entire selection is a valid JSON object or array, avoiding false matches on ordinary text
- Copy either the formatted text or a minified single-line version
Like IP Lookup, this plugin requires the selection quick menu to be enabled.
Task notifications
Switch to other work while a command runs and receive a notification when it finishes:
- Trigger: a command exceeds the threshold (15 seconds by default), and you are not viewing its terminal when it finishes because the app is in the background or another tab / split pane is active
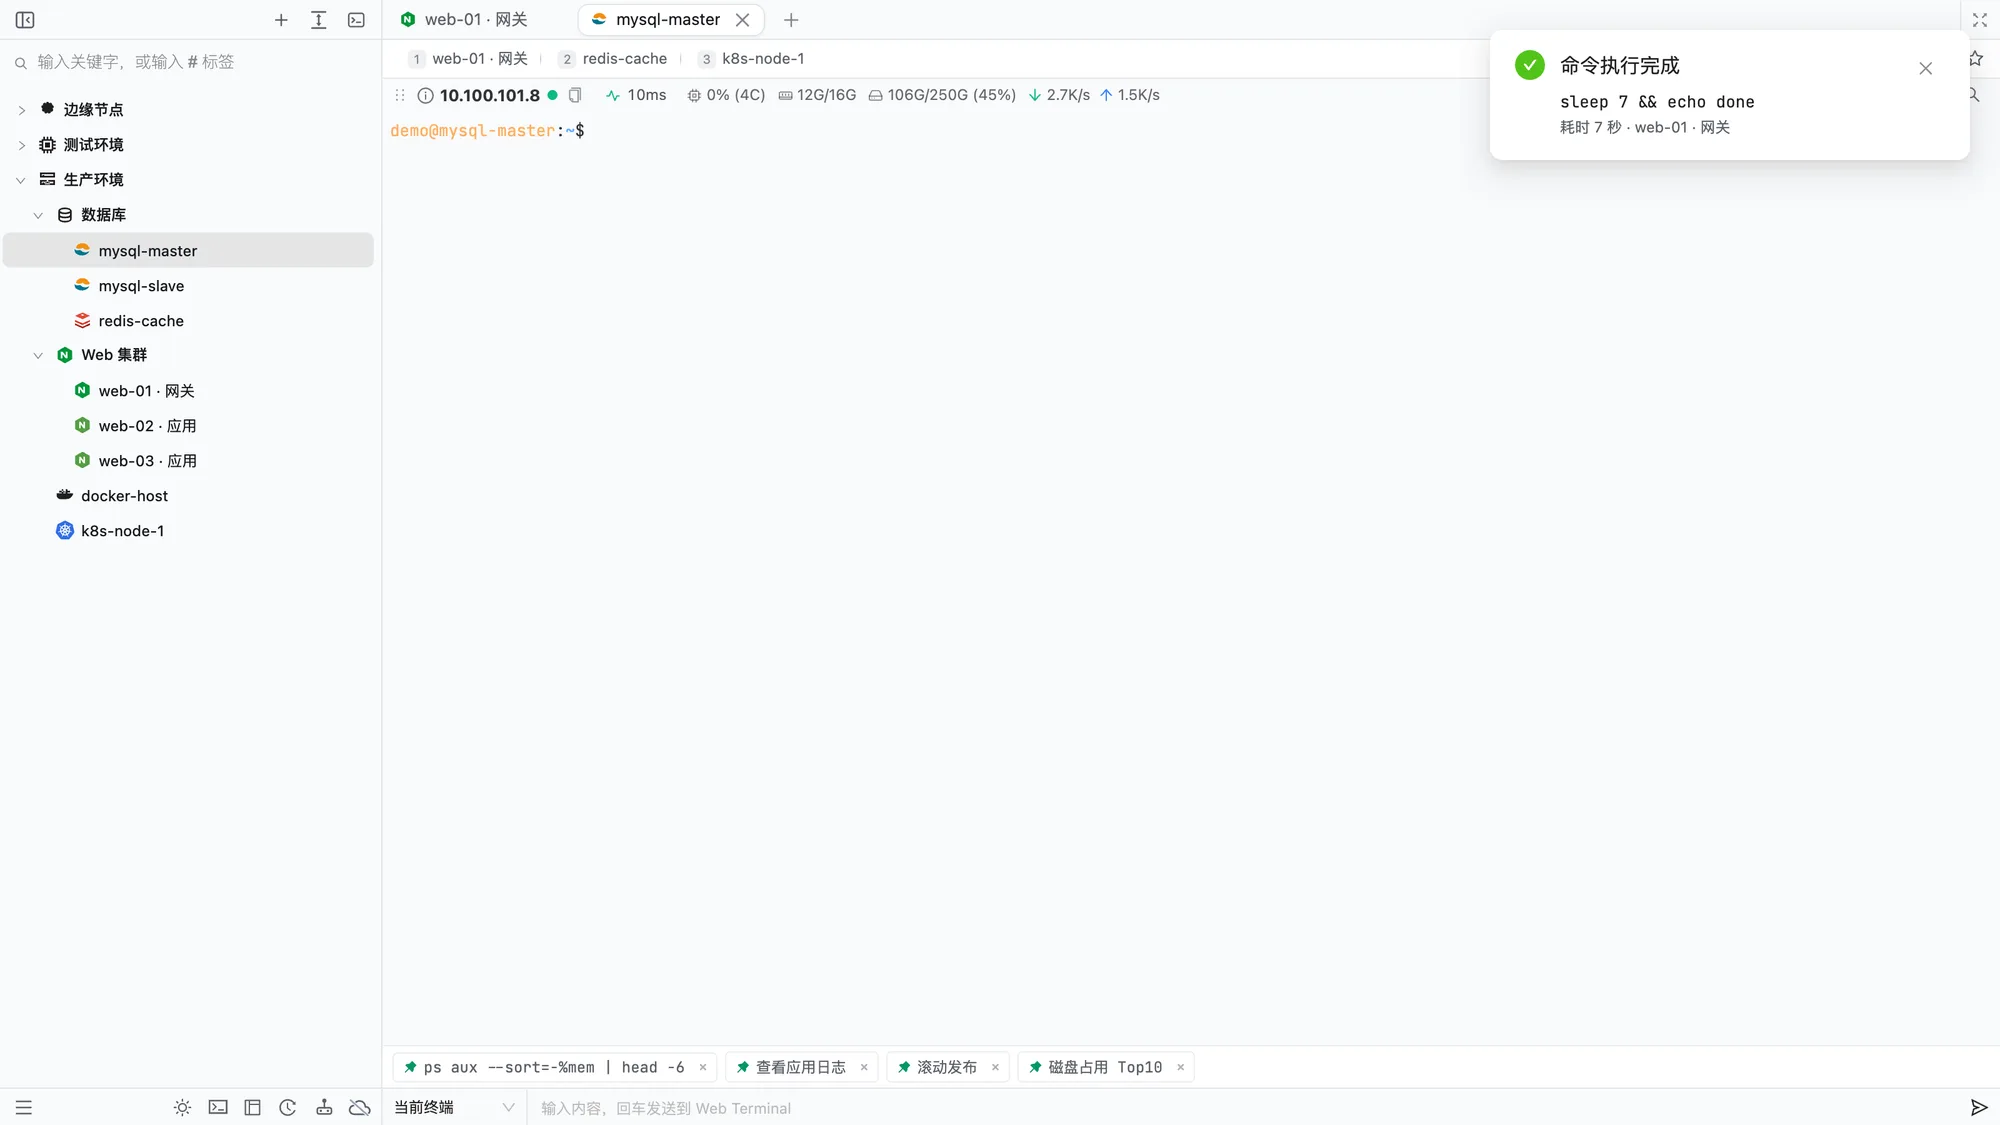
- Delivery: background apps use system notifications. On macOS, clicking can bring the app back across Spaces and select the terminal. If the app is foregrounded but the terminal is unfocused, an in-app notification appears in the upper-right corner. No notification interrupts a terminal you are already watching
- Contents: command, duration, exit code, and connection name. Exit codes require remote shell integration (OSC 133); otherwise completion is detected using prompt heuristics
- Excluded commands: interactive or persistent programs such as vim / less / top / htop / ssh / tmux / mysql / python, and commands sent directly from snippets
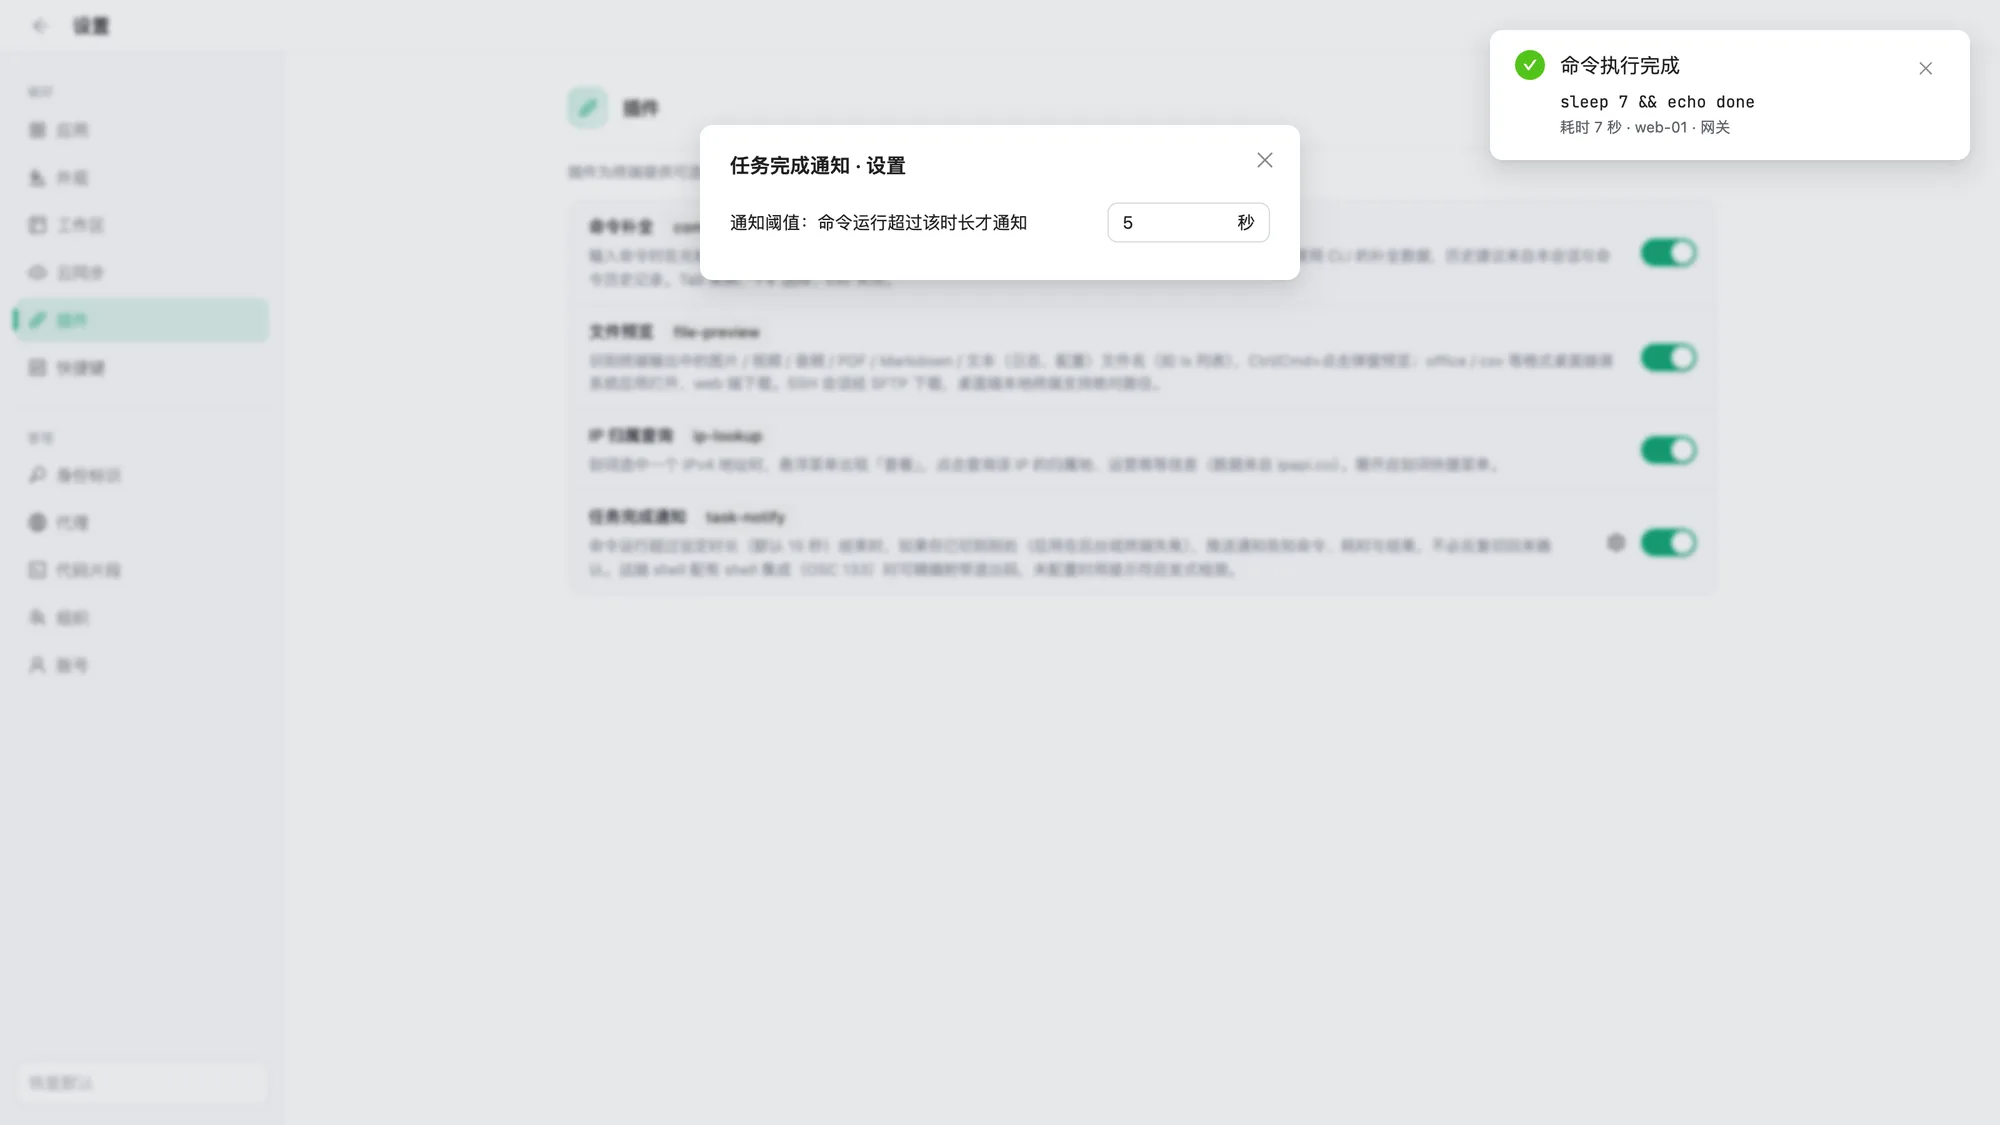
- Adjustable threshold: click the gear on the plugin row and set the notification threshold from 3 to 3600 seconds
| In-app notification | Threshold settings |
|---|---|
 |  |
Workspace settings
The Workspace Settings drawer brings terminal behavior and layout together:
- Terminal appearance: font size and weight, line height, bottom spacing, scrollback (up to 100,000 lines), cursor shape (block / bar / underline), blinking, and rendering (WebGL / DOM)
- Interaction: copy on selection, right-click paste, link recognition, selection menu buttons, multiline paste confirmation, host fingerprint confirmation, tab close confirmation, and automatic English input switching on desktop
- Transfers: enable drag-and-drop uploads, set the per-file limit, and hide echo during uploads; on desktop, set the default
szdownload folder and whether to open it afterward - MCP server (desktop): enable it and set the port and forced-approval threat level. See MCP server
- Layout: show or hide session information, host information, the composer, and favorites; choose normal / compact tabs, the tab style, whether tabs show numbers and icons, and whether clicking a tab locates its connection
- Startup: remember open connections and restore tabs next time
- Connection log: set how many entries to keep, or open the log directly
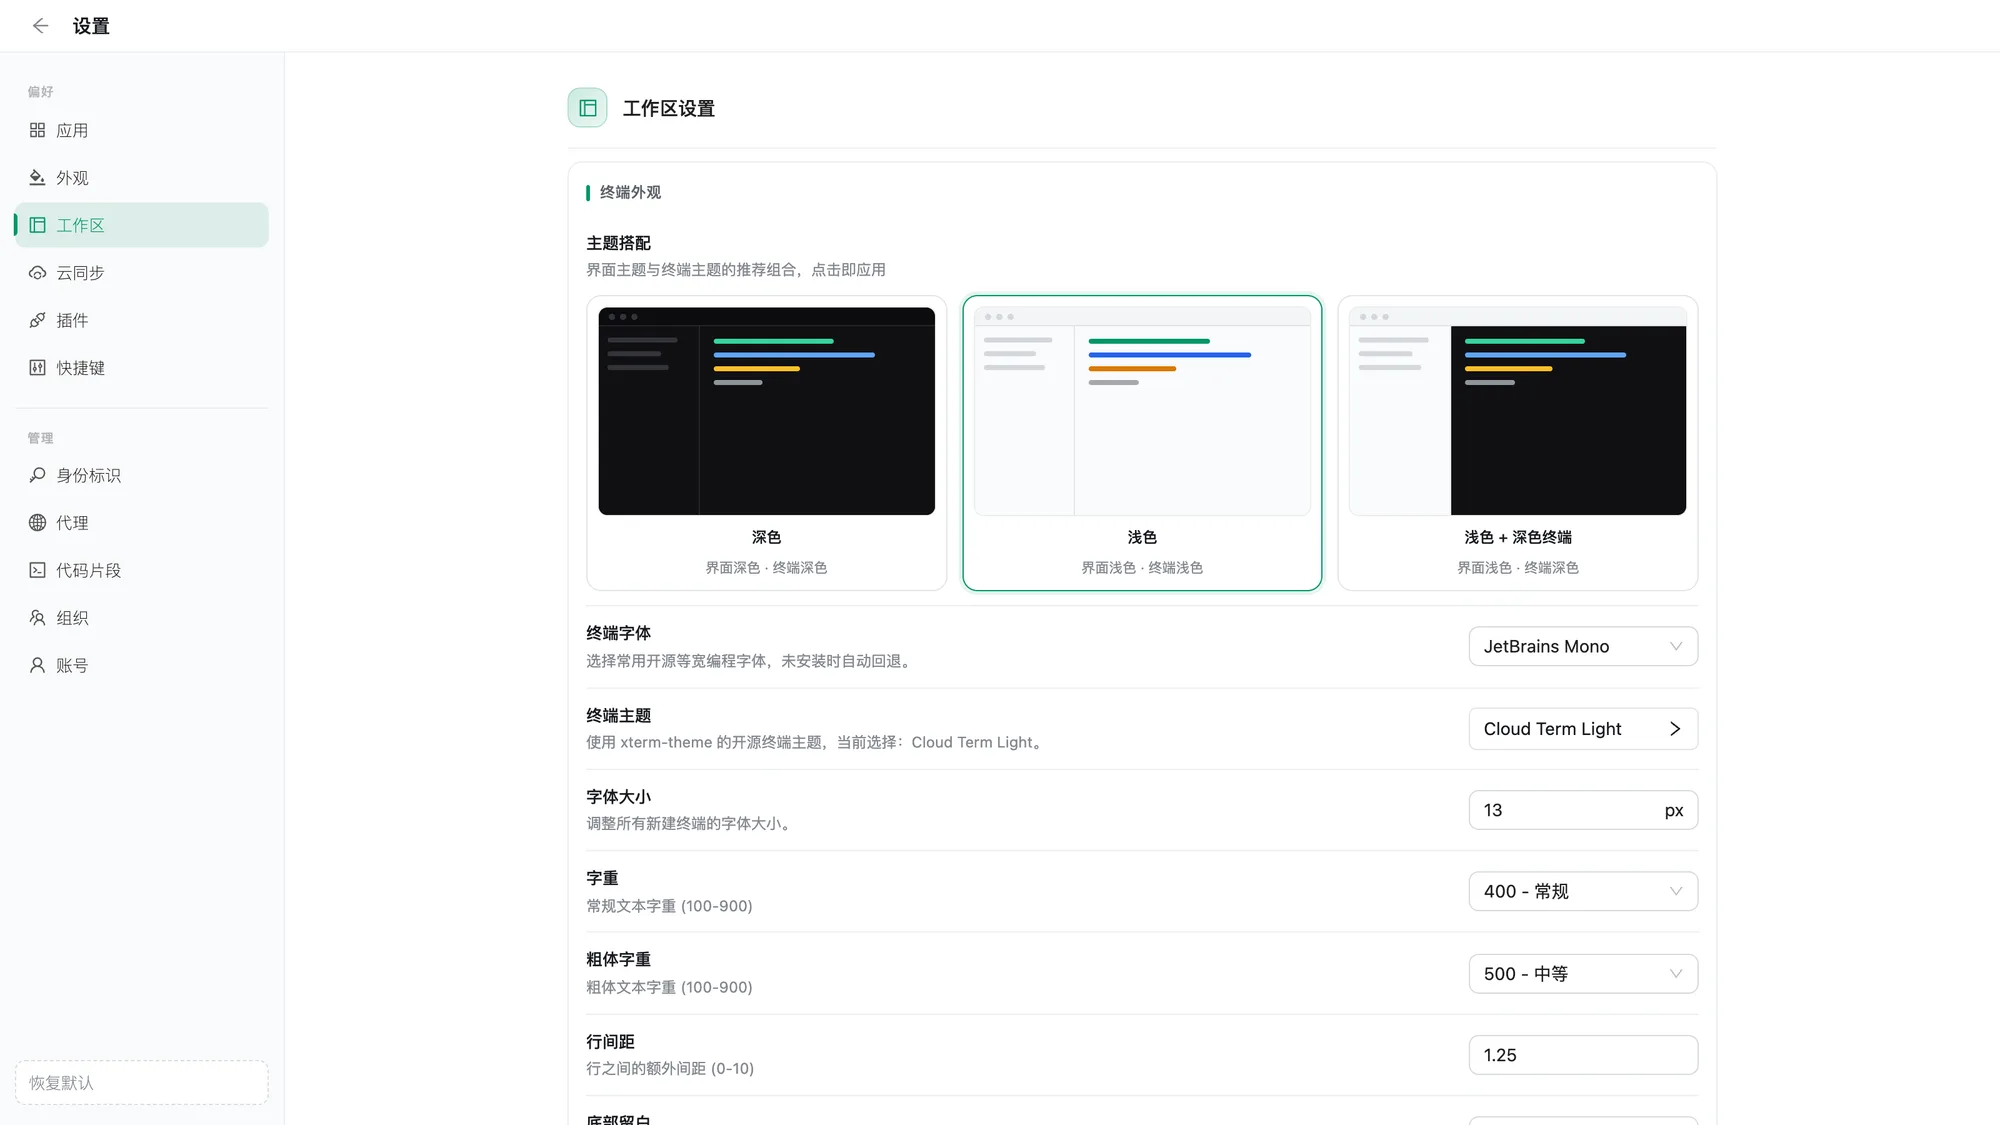
Newer versions disable copy on selection and right-click paste by default; existing saved preferences are unaffected. This makes the context menu available on right-click and reduces accidental pastes. Enable either option here if you prefer the previous behavior.
Search all settings
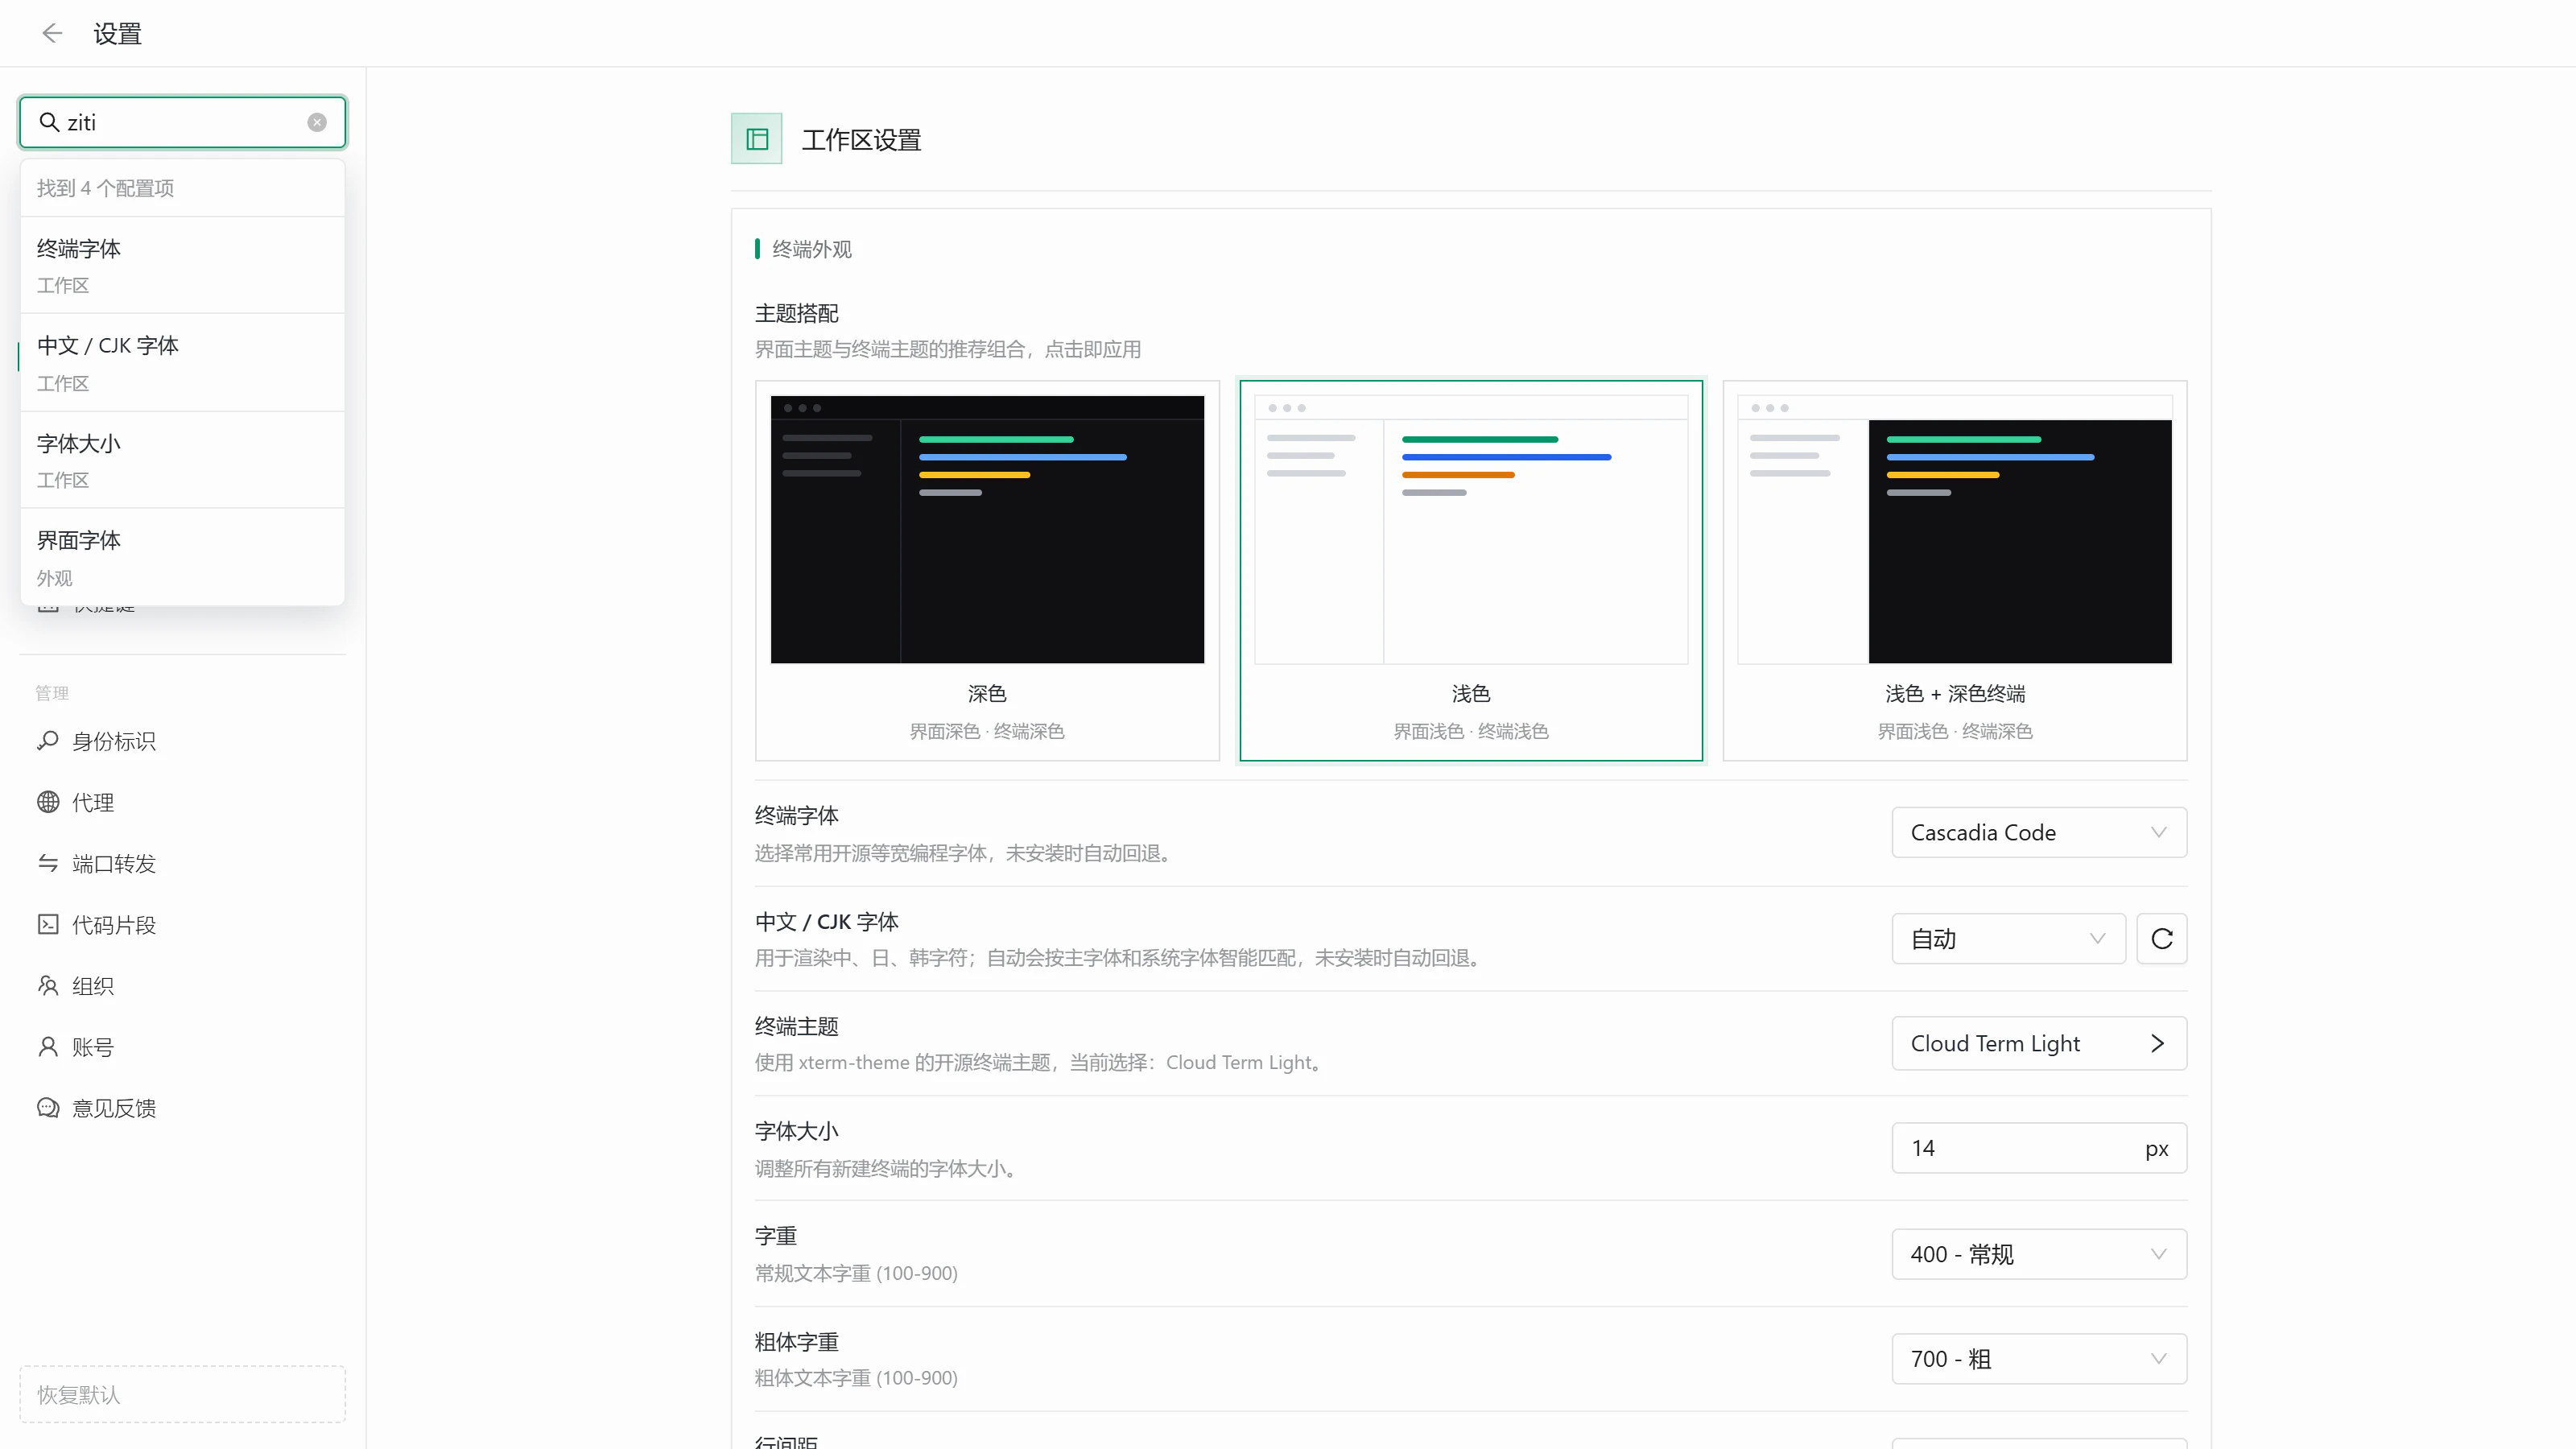
The search box at the top left of Settings finds any option by name, category, or description, with Chinese, full pinyin, pinyin initials, and multiple keywords (for example, ziti finds every font setting). Select a result or press Enter to switch pages, scroll to the option, highlight it, and open its dialog when needed. Drop-downs such as fonts, AI providers, and shortcut presets also support typing to filter.
Keyboard shortcuts
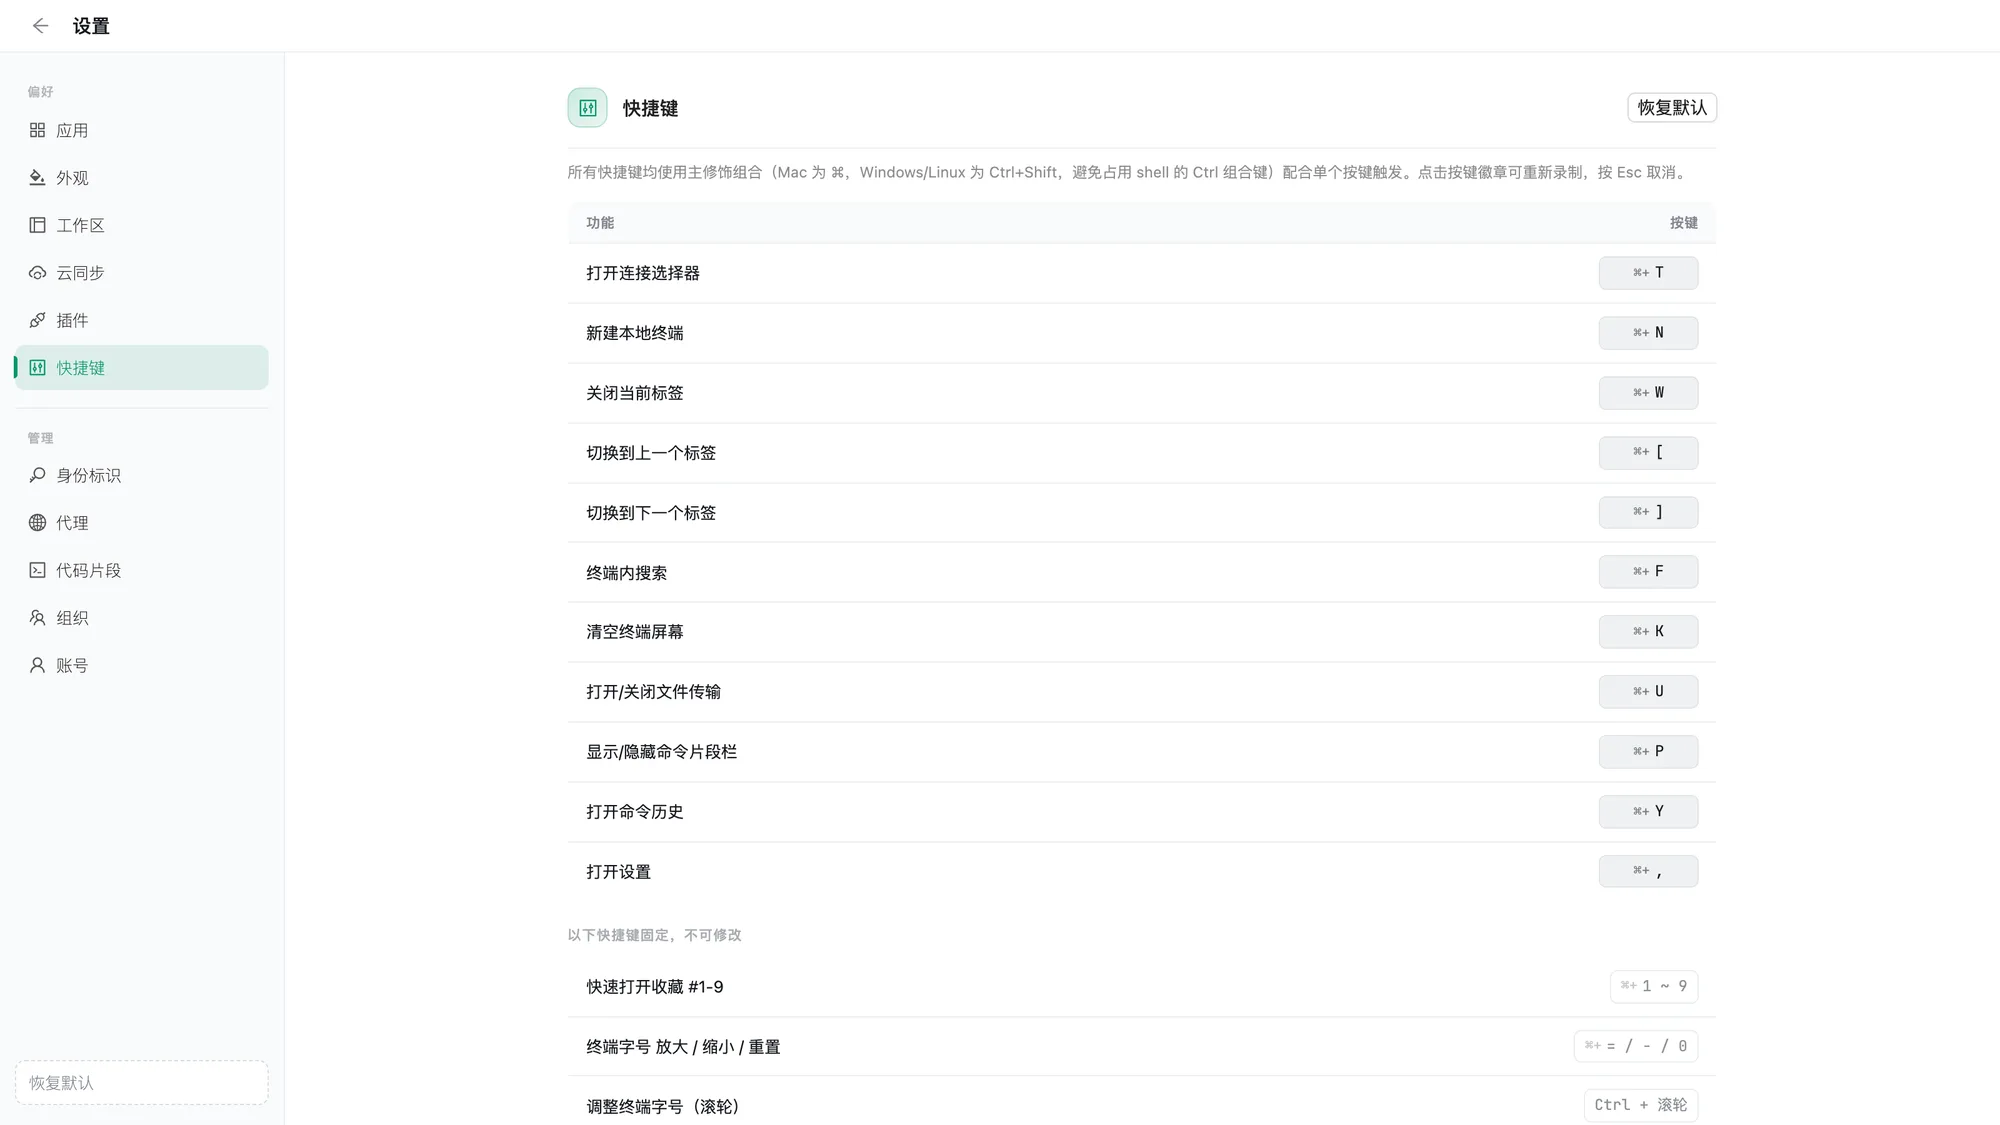
Settings → Shortcuts lets you choose a shortcut preset and customize individual keys. Built-in presets include Cloud Term (default), Xshell, SecureCRT, MobaXterm, FinalShell, WindTerm, PuTTY, KiTTY, and electerm; actions an external preset does not cover use Cloud Term keys. Presets adapt automatically to Windows / Linux or macOS based on the device you are using.
Common Cloud Term defaults (/ separates alternatives; the second macOS combination helps avoid keys browsers reserve):
| Action | Windows / Linux | macOS |
|---|---|---|
| Open connection picker | Alt+O | ⌘O / ⌃⇧O |
| New session (new connection) | Alt+N | ⌘N / ⌃⇧N |
| New local terminal (desktop) | Ctrl+Alt+T | ⌘T / ⌃⇧T |
| Close current tab | Ctrl+Shift+F4 | ⌘W / ⌃⇧W |
| Previous / next tab | Ctrl+Shift+Tab / Ctrl+Tab | ⌃⇧Tab / ⌃Tab |
| Switch to tab 1–9 | Alt+1–9 | ⌘1–9 |
| Open favorite 1–9 | Ctrl+1–9 | ⌃1–9 |
| Fill pinned command 1–9 | Alt+Shift+1–9 | ⌥1–9 |
| Reconnect / disconnect session | Ctrl+Shift+R / Alt+C | ⌘⇧R / ⌘⇧D |
| Duplicate session | Shift+Alt+T | ⌘⇧T / ⌃⌥T |
| Show / hide session sidebar | Alt+J | ⌘⇧J |
| Search terminal | Ctrl+F | ⌘F |
| Clear terminal | Ctrl+L | ⌘K / ⌃⇧K |
| Copy / paste | Ctrl+Shift+C / Ctrl+Shift+V (or Ctrl+Insert / Shift+Insert) | ⌘C / ⌘V |
| Toggle file transfer | Alt+S | ⌘⇧S / ⌃⇧S |
| Toggle snippet panel | Ctrl+Shift+P | ⌘⇧P / ⌃⇧P |
| Open command history | Ctrl+Shift+Y | ⌘⇧Y / ⌃⇧Y |
| Open settings | Ctrl+Shift+, | ⌘, / ⌃⇧, |
| Increase / decrease / reset font size | Ctrl+Shift+Alt+] / [ / Ctrl+Shift+0 | ⌘= / ⌘- / ⌘0 |
| Enter / exit full screen | Alt+Enter | ⌃⌘F |
Additional notes:
- Click a shortcut badge to record a new key;
Esccancels. Conflicts, including favorites and pinned commands, are detected automatically. Disable or reset individual shortcuts. Duplicate any preset into a custom one, and rename, restore, or delete custom presets - Hold a modifier for about 250 ms (for example,
Alton Windows or⌘on macOS) to highlight the number badges on tabs, favorites, and pinned commands - macOS presets leave bare
Ctrl+C/D/Land similar shell combinations alone;Ctrl+mouse wheelchanges the font size on both platforms. Combinations handled first by the browser or OS (such as⌘WorCtrl+Tab) cannot be intercepted by a web page; use the alternative or record a new one - Split panes by dragging a tab to the edge of a terminal panel; there is no keyboard shortcut for this yet
- The bottom of the page includes a GNU Readline shortcut reference for shell cursor movement, editing, history, and terminal control
Cloud sync
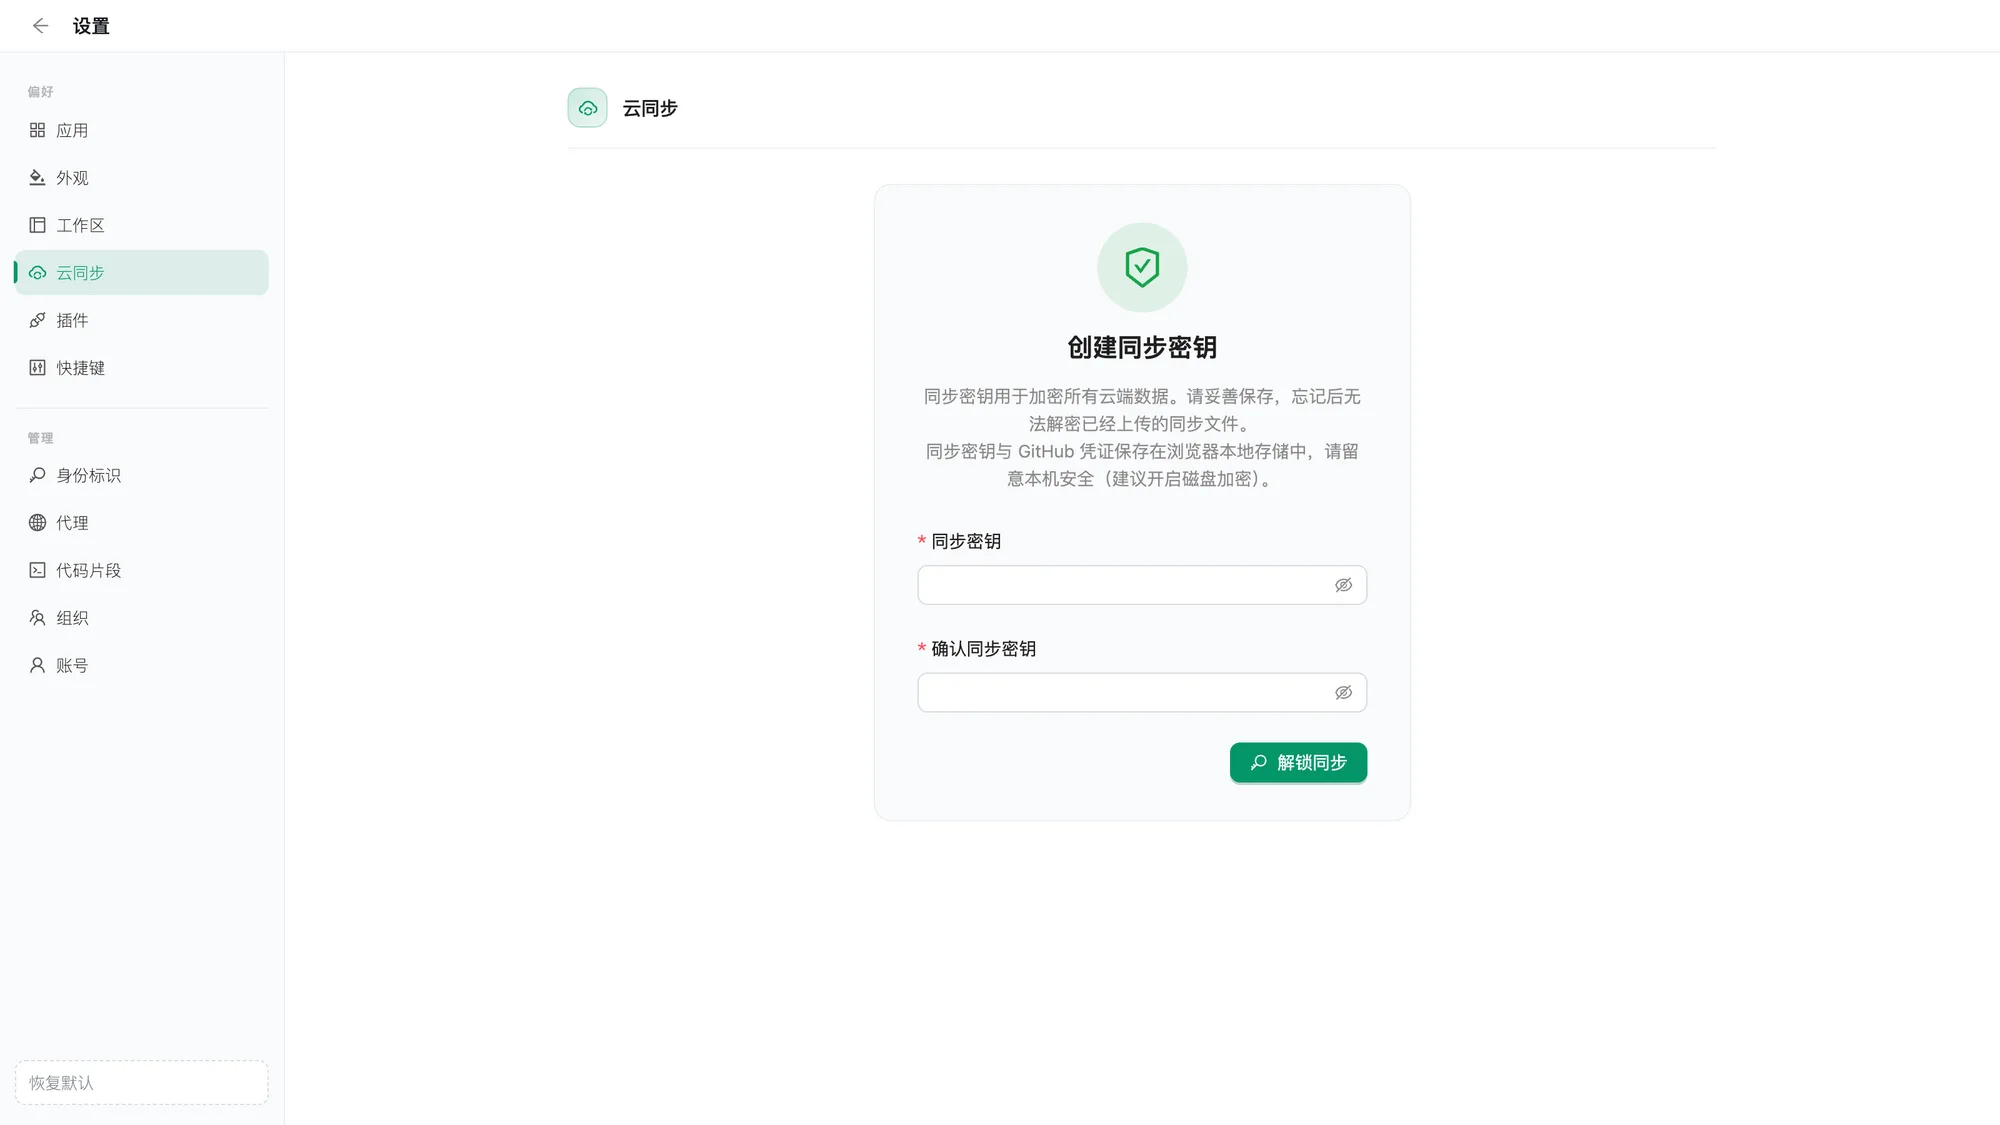
Sync connections, identities, folders, tags, favorites, snippets, and supported settings, including skins and plugin switches, across devices. All data is encrypted locally with your Sync Key before upload, so the server cannot decrypt it. The Sync Key stays on your device; keep it safe, because losing it prevents access to previously uploaded data.
Sync Status lets you control four groups separately: connections, groups, and credentials; favorites; snippets; and app settings. Favorites depend on connections. Snippets sync specific connection bindings only when connections are included. App settings include AI environments and API tokens. Disabling a group does not delete local data.
Supported providers (only one can be active at a time):
| Provider | Description |
|---|---|
| CloudTerm official cloud | Sign in with a cloud account and enable with one click; recommended |
| GitHub Gist | OAuth device sign-in or a fine-grained PAT; the simplest configuration |
| Private GitHub repository | Store data in your own private repository; each sync creates a commit and supports rollback |
| S3-compatible storage | Coming soon |
Key capabilities:
- Automatic sync: upload after changes; conflicts pause automatic sync and prompt for manual handling
- Timely remote checks: the cloud is checked every 15 minutes in the background and again when the window becomes visible, gains focus, or goes back online. A new device restores from the cloud when you first set it up
- Smart merge: field-level three-way merging based on content fingerprints and a sync baseline, including deletion tombstones. Only when the same field changes to different values does the newer edit win
- Status indicators: the top bar shows local changes, remote updates, conflicts, and expired authorization. Active terminal sessions prevent forced refreshes; a manual-sync notice appears instead
- Change review: Sync now and Force upload list the changes first, including before / after values for connection fields, before you confirm
- History: browse remote revisions with the originating device and a change summary. When restoring, choose to restore only this device or both this device and the cloud
- Force upload: replace remote data with local data after confirmation if the remote copy has a problem
- Local backups: back up before every pull or import, keeping up to five backups per user. Restoring also creates a backup first, making it reversible
Set up a private GitHub repository
Step 1: Generate a fine-grained personal access token
- Open github.com/settings/personal-access-tokens/new, also linked from settings.
- Set Resource owner to the user or organization that owns the private repository.
- Under Repository access, choose
Only select repositoriesand select only your sync repository. A dedicated repository is recommended because sync commits remain in its history. - Under Repository permissions, set Contents to
Read and write. - Generate and save the token; it is displayed only once.
Step 2: Set up your Sync Key
For first-time sync, open Settings → Cloud Sync and create a Sync Key to encrypt uploaded data.
⚠️ The Sync Key is stored only locally and is never uploaded. If it is lost, uploaded historical data cannot be decrypted. It is different from the GitHub token created above.
Step 3: Configure “Private GitHub repository”
Choose Private GitHub Repository from the provider list and click Configure.
Complete the form:
Field Description Repository Accepts owner/repoor a GitHub repository URL, including HTTPS and.gitURLs; parsed on saveBranch Target branch; defaults to mainSync file path Defaults to .cloud-term/sync.json; created on the first upload if missingFine-grained Personal Access Token The token from step 1 Save. The app checks that the repository is private, the token is valid, and it has Contents read/write access to the target repository, with specific messages for failed checks.
Step 4: Start syncing
The first sync starts after saving. Then pull remote data, upload local data, or enable automatic sync. Other devices need the same Sync Key and repository configuration, but may use their own tokens.
Notes
- Each sync creates a commit; use a dedicated repository.
- Only one provider can be active. Disconnect the current provider before switching.
- Desktop Sync Keys and GitHub credentials reside in local storage. Protect the local environment; disk encryption is recommended.
Cloud accounts and team collaboration
Cloud accounts
Click the avatar in the lower-left corner to sign in with WeChat QR sign-in (confirm in the mini program after scanning) or GitHub. After signing in, you can:
- Use CloudTerm official cloud sync
- Edit your display name and upload an avatar
- Create or join organizations and submit game scores to the global leaderboard
Email binding is currently available in the WeChat mini program under Account → Edit Profile. Enter an email, request a six-digit code, and confirm. You can later change or remove the binding. This entry point is not yet available in the desktop or web app.
Organizations
Organizations manage shared connections and snippets as team assets:
- Create and join: organization creation is a paid feature, activated with a subscription redemption code defining seat count and duration. Members join through a single-use invitation link (72 hours, one person), a targeted user ID invitation, or an invitation code
- Roles: built-in Owner / Admin / Member roles and custom roles, with granular permissions for members, roles, collections, keys, subscriptions, and more
- Collections: group connections and snippets into collections; grant each role no access, read-only access, or edit access per collection
- Shared connections and personal credentials: maintain connection details centrally while members bind their own credentials locally, without uploading them to the organization. Collection-level shared credentials also allow service accounts to be shared in encrypted form
- Save to personal space: copy a shared connection into your own workspace without organization credentials
- End-to-end encryption: shared data is encrypted too; new members must receive a data key from an administrator before they can decrypt it
- SSH public key directory: members register public keys so administrators can grant server access. Track key × host authorizations and automatically collect the keys to remove when offboarding a member
- Organization sync and rollback: organization data has its own revision history and rollback
- Audit logs: record time, actor, action, and target
MCP server (desktop)
Turn on the MCP server in Workspace settings → MCP server so Claude Code and other MCP-capable AI tools can list and link SSH sessions open in Cloud Term, read their output, and send input:
- The server listens only on
127.0.0.1, on port18766by default (configurable from 1 to 65535). Its settings stay on this device and never sync - Five tools are provided:
cloudterm_ssh_list,cloudterm_ssh_start,cloudterm_ssh_stop,cloudterm_ssh_read, andcloudterm_ssh_write. Unlinking a session through MCP does not close it in Cloud Term - Linking a session and sending input both require approval in the desktop app: allow once, deny, or auto-approve for this MCP session. The AI must rate each input's threat level from 0 to 10; anything above the forced-approval threshold (3 by default) always needs individual approval, even with auto-approval on
- With escapes enabled, the AI can send control keys such as
EscandCtrl+C(for example,\u001b:wqto save and quitvi) - Available only in the desktop app's built-in local backend mode, not with a remote backend or on the web
Desktop-only features
| Feature | Description |
|---|---|
| Local terminal | Open the local shell on macOS or PowerShell on Windows |
| Drag tabs into new windows | Drag a terminal tab outside the window to create a separate workspace window, with a live preview; the session and its output are kept |
| File Explorer menu (Windows) | Right-click a folder, folder background, or drive and choose Open in Cloud Term to open a local terminal there |
| System tray | Closing the main window keeps it in the tray without disconnecting sessions (Windows shows a notification the first time). The tray shows sign-in and sync status and quickly opens a local terminal, a new connection, settings, or Sync now |
| macOS Connections menu | Open saved connections from the system menu bar |
| RDP | Open RDP connections with the system Remote Desktop client |
| MCP server | Let external AI tools work with SSH sessions after approval. See MCP server |
| Automatic updates | Check for updates, download in the background with progress (automatic download can be turned off), then restart to install; update packages have verified signatures |
| Close confirmation | If tabs are open, choose whether to restore them on the next launch |
| Input method switching | Automatically switch to an English input method when focusing the terminal |
| System notifications | Task notifications arrive while the app is in the background; click to return to the relevant terminal |
| Enhanced previews and downloads | Open Office / CSV files with the system's default application; sz downloads stream to disk and can remember their folder |
| Deep links | Open organization invitations and import .ctkey key files |
The web app has no local terminal, system tray, MCP server, or close confirmation because of browser restrictions. If clipboard access is unavailable, a paste dialog appears. Other features are shared with the desktop apps.
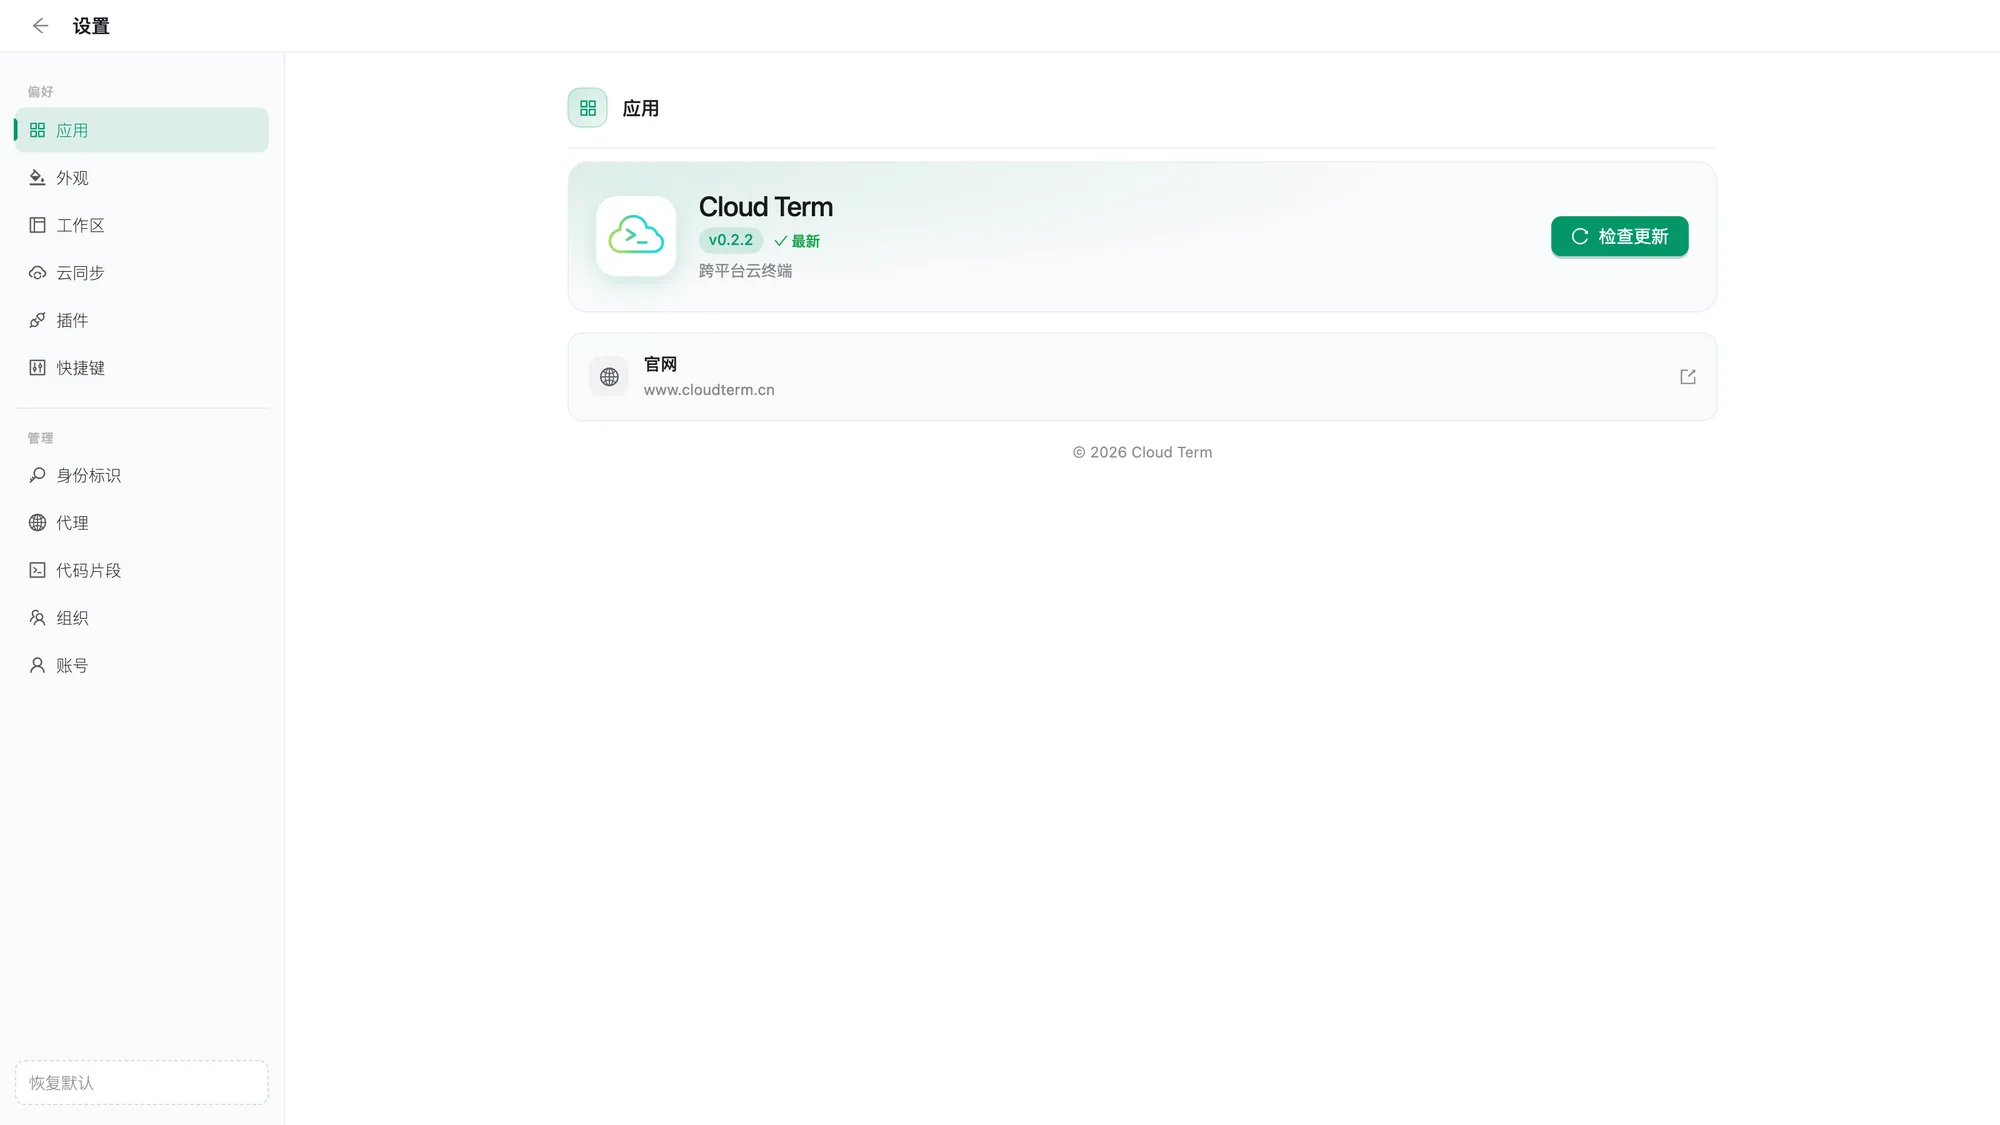
Find the current version and Check for Updates under Settings → App:
Built-in mini games
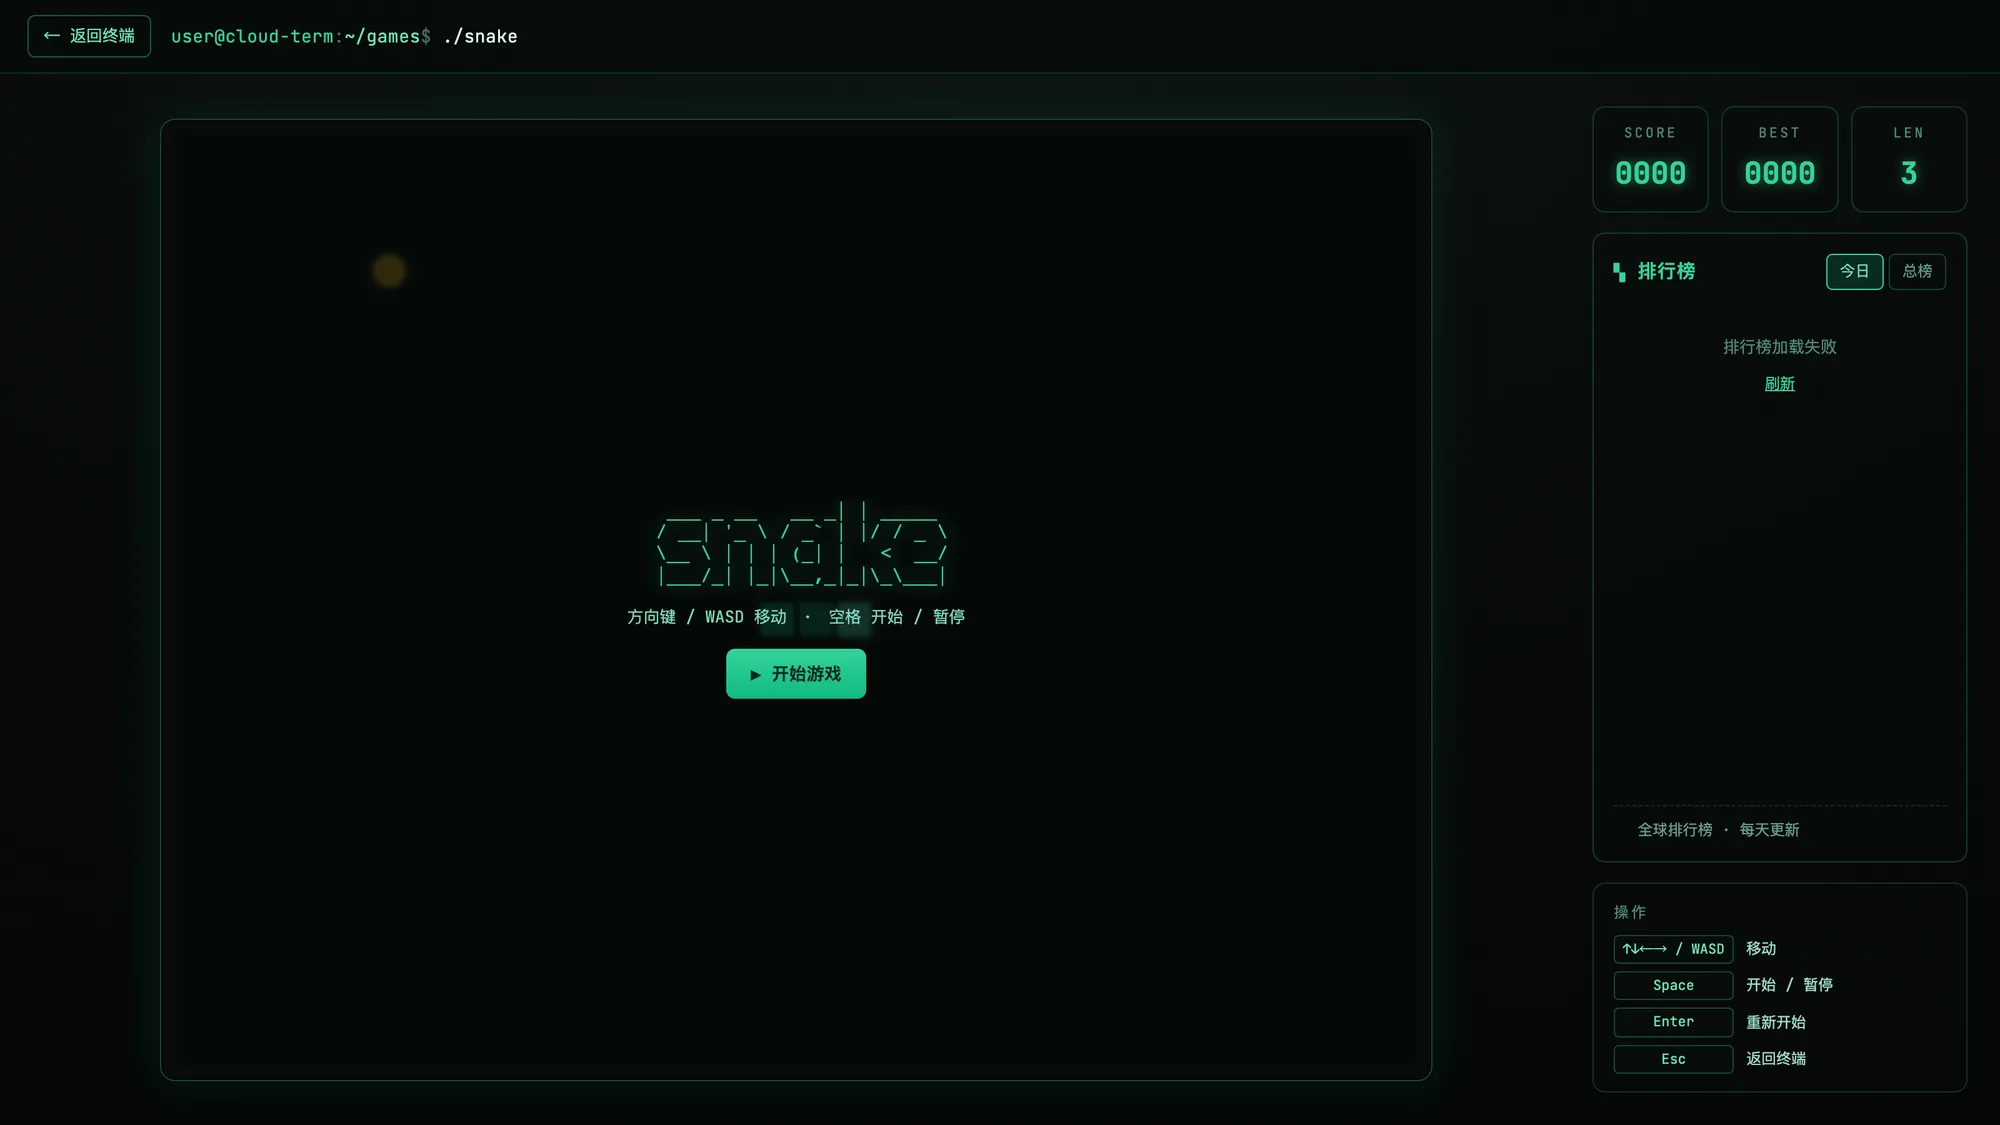
Take a break with two terminal-style games under Games in the menu:
- Snake: use the arrow keys or WASD
- ZType: type the commands on enemy ships to target and shoot them while practicing typing
Sign in with a cloud account to submit scores to the global leaderboard, with daily and all-time rankings updated each day.
Local backup and restore
Before pulling, merging, or restoring historical cloud data, Cloud Term creates a local backup and keeps up to five backups per user. View and restore them in Settings → Cloud Sync → Sync Status. Restoring a backup creates another backup first, so the operation can be reversed.